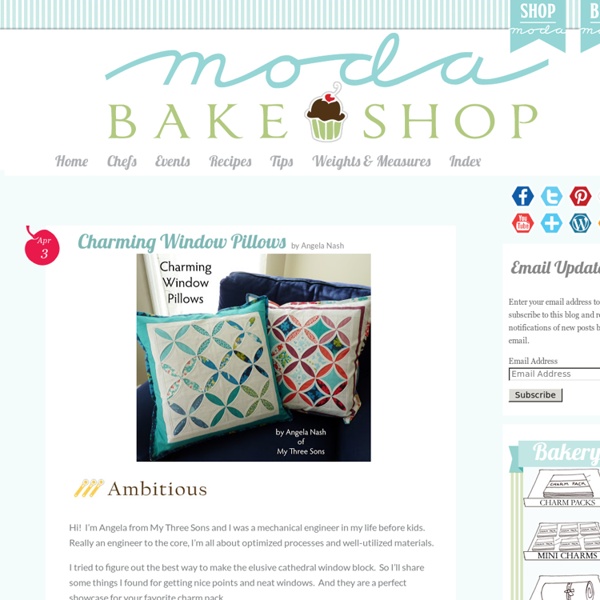
Hip To Piece Squares
Earlier this week I had a request to make one of my patchwork journal covers that I sell in my Etsy shop to fit a standard spiral composition notebook. I was excited to get started on a variation of what I normally make, and thought it would be fun to share how I made it with all of you. It should be noted that this isn't a real step by step pattern, but rather more of a loose idea of what I did to make it. What will you need? *6 strips of pretty quilting cottons, measuring at least 7 1/2" wide x 2 3/4" tall. *1 piece of medium weight linen, measuring at least 13" wide x 12" tall *1 piece of a quilting cotton as the lining, measuring at least 17 3/4" wide x 11 1/2" tall * 2 pieces of matching quilting cottons measuring at least 8" wide x 11 1/2" tall (these are the pockets. 1.) *2, 2 1/4" tall strips *3, 2 1/2" tall strips *1, 2 3/4" tall strips 2.) 3.) 4.) 5.) 6.) 7.) 8.) 9.) 10.) 11.) 12.) 13.) 14.) 15.)
Easy Hooded Bath Towel
I’ve made each of my kids their own bath towel hoodie when they’re born, starting with my son 6 years ago. I make them one with their name on it and one with a fun appliqued shape on the back. These towels are super easy to make, needing only limited sewing know-how. And they make for great birthday or baby shower presents for others. Supplies for Bath Towel Hoodies: one large bath towel – any colorone hand towel – any colorfabric for letters – can be anything. First, cut your hand towel in half horizontally. Updated: You only need one half of the hand towel to make one hooded bath towel. Pin the cut hand towel to the large towel and sew in place. Fold your hood together in half, pairing the cut side together. You could be done here, but I like to add a few extras, a name or a shape to the back that I applique to the towel. I’ve also added some double-bias tape to my newest baby’s towel, down the sides and on the hood. Have fun making your kids some new towels. Written by Marie LeBaron
Southern Fairy Designs
postage stamp coasters
I’m getting ready to go running off to complete the zillion post-holiday errands I have on my plate, but I decided I simply must add the supplies for this project to my shopping list. Jessica is a graphic designer by trade, which is clear to see from her choice of prints for these adorable coasters that she whipped up in no time. Jessica found these images on the flickr site of Karen Horton. This is the perfect project for a laid-back weekend, especially because Jessica and Karen have graciously made the stamp designs available for download. CLICK HERE for the full how-to after the jump! Materials: White feltWhite cotton fabricIron-on transfer paper, available at office supply storesPostage stamp images White threadComputer and printerIronScissorsPinking shearsPinsNeedle or sewing machine Instructions: 1. (note: images in PDF are reversed so they will transfer properly) 2. 3. 4. 5. 6.
New Green Mama: Reversible Messenger Bag Tutorial
Here's what you will need: Main body -2 pieces of home dec weight fabric or corduroy measuring 14" x 12" (Fabric A) Main body-2 pieces of contrasting home dec weight fabric measuring 14" x 12" (Fabric B) Flap- 1 piece of Fabric A- 12" x 11.5" Flap- 1 piece of Fabric B- 12" x 11.5" Back Pocket- 1 piece of Fabric A- 14" x 8" Back pocket- 1 piece of Fabric B- 14" x 8" Small Pocket- 1 piece of Fabric B- 7" x 12" Strap- 1 piece of Fabric A- 6" x 42" Depending on the weight of your fabric, you may want to interface it. I purchased 1 yard of each fabric and had plenty of fabric left over. Let's get started. Cut out all your pieces. Cut a 1 inch square out of the bottom corners of all 4 pieces. Interface pieces. Take your strap piece and iron each side towards the middle. Then fold in half and iron. Round the corners of the flap pieces. With right sides together sew the flap pieces together leaving the top open. Clip the curves. Turn right side out and iron. Stitch across the bottom of the pocket.
The Shirt Skirt | Sew Like My Mom
July 28, 2010 I’m so excited to post about this! When I met Dana, I fell in love with the skirt she was wearing. She made it herself (obviously) and she showed us how simply she’d shirred the waistband. The next day, during the mystery workshop at Whipstitch, we were encouraged to use thrifted tees. I developed an idea in my head I thought just might be crazy enough to work. The Hubs thought I was a little crazy when I explained my idea to him. It’s the easiest thing in the world to do! The shirt skirt perfect for summertime. I wore the green and white one to Sofie’s birthday party. I had 2 women in Walmart stop me to tell me how comfy my skirt looked and when I told them how I made it, they demanded I call Rachael Ray immediately! The process is so easy. I do my shopping at Goodwill for 1 reason. So, get your super cheap thrifted shirt. To determine what shirt size you should get, just make sure it will go around you. I like to use thread the same color as my fabric. And that’s it!
Crafty Creations Challenges
Reusable Produce Bag Tutorial
Paper or Plastic? Neither! We've been shopping with reusable grocery bags for a while now, but I'm still using plastic produce bags when I'm picking up fruit and veggies. I've tried to forgo the bag all together, but the cashiers tend to give me the stink-eye when half a dozen oranges go rolling about freely during check out. What a dilemma. I knew the solution was to make my own, and I had two requirements. Supplies: Nylon netting 34 x 14 inches 2 fabric strips 31/2 x 14 inches narrow ribbon, string or cording optional, cord locks Fold the netting in half, matching short sides. Sew fabric strips WST on short sides forming a band. Leave a small opening on one side, back-stitching where you start and stop. (no precision here, just below the half way point) Press seams open. Edge stitch both sides of seam with the opening. Fold band in half and press Open band up and press 1/4 hem on both raw edges Re-fold band in place Pin all the way around the band. Edge stitch around top of band. Tell us!
How to make fabric storage baskets
Here are 10 terrific ways to make fabric containers, baskets and buckets. These fabric storage basket tutorials will get you organized in style! 1. Fabric Storage Bin Tutorial 2. 3. 4. 5. 6.Fabric Scrap Baskets 7. 8. 9. 10.
Modern Mood Quilt Along
Ever since my fascination with mood rings when I was a kid in the 70′s, I’ve been drawn to the symbolic, cultural, and emotional aspects of color. When I came across this mood-color chart (replicated above in hand-dyed fabrics) a light bulb went off… I don’t know about you but I can be moody. So I decided to document my emotions this summer in a quilt. Once a week when I’m in the studio, I will take the time to check in on how I’m feeling. You are invited to craft-along with me and make your own Modern Mood Quilt. It’s never too late to join the quilt-along.
Crazy Wonderful

Back in the late 60s my Mom wanted to make a coverlet out of these, but chose the really small size - less than 2 inches. She finally ended up with a pillow. Very labor intensive, but beautiful. I saw on once with bright batiks and a black background. Stunning!! by janetdw Jun 3
This is pretty cool! I've been envisioning a similiar project in my mind without a clue how to go about it. I think this will be pretty helpful. (: by vitals Jun 3