
One Max Patch Per Week. Here’s another movement from my composition Vocalise Sintetica that I performed at Echofluxx in Prague and later during Northern Spark 2014.
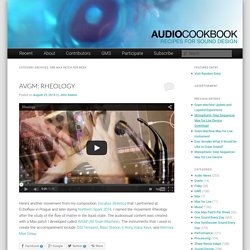
I named the movement Rheology after the study of the flow of matter in the liquid state. The audiovisual content was created with a Max patch I developed called AVGM (AV Grain Machine). The instruments that I used to create the accompaniment include: DSI Tempest, Bass Station II, Korg Volca Keys, and Memory Man Delay. This is a screen capture from a Max project I developed that does interactive, synchronized, granular synthesis of corresponding sound and video that’s tentatively titled AVGM for Audiovisual Grain Machine. I have used the software during aperformance at the Echofluxx festival in Prague and at the Katherine E. On Wednesday, November 16, 2011, Olivia Solon of Wired.co.uk wrote an article describing my piece, Voice Lessons. Free Stuff for Ableton Live: FM Drum Machine in M4L, Minus Artists' Live Sets.
The design of tools incorporates aesthetic ideas and values from the creator.

With freer access to those tools, and easier creation of custom tools, the line between a music release and a tool release blurs. The difference: you can take someone else’s tool, and warp it to your own purposes. And so it is that Ableton is increasingly featuring artists and their Max for Live creations. While Max for Live was introduced last fall, many of its fruits aren’t appearing until now. Magda works with effects and dynamics to polish her included set. Record label Minus, founded by Richie Hawtin, has partnered with Ableton to release a set of free Ableton sets to download. Complete full download: If an instrument is more your style, though, you can turn instead to a new, free FM synthesizing drum machine. How to Synthesize a Glitch Drum Kit with Operator - Tuts+ Music & Audio Tutorial.
This tutorial introduces a simple and quick way of using Ableton Live's Operator synthesizer to produce glitchy and noisy drum samples, the types of which are heavily used in the glitch/idm/experimental electronic music scene by artists such as Alva Noto, Kearley, Aoki Takamasa and Daisuke Tanabe to name just a few.
We'll be covering a basic kit, including "clicks" and "pops", static-like sounds, kick, and snare. The purpose of this tutorial is not to cover every possible type of glitch sample that can be produced with Operator, and does not by all means imply that this is a method used by the above artists. It showcases a basic idea/technique that can be developed further through experimenting and combining other Live devices and effects. This is an example of what we are going for. Open up a Drum Rack. You could also use a "Spectrum" effect instance to have a clear vision of where the frequencies hit the most. The Click sound is the most simple one. The Click sound. Welcome to The Tom Cosm Ableton Community. I think you're the first one to prefer this one !
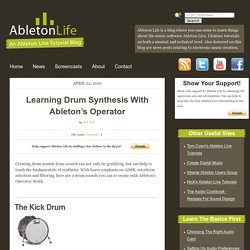
If you have any technical advises I'm all ears, this was my real first mix / pre master experience. And everything is home made so it's not perfect for sure.Read More... Learning Drum Synthesis With Ableton’s Operator. April 22, 2010 by Ryan Creating drum sounds from scratch can not only be gratifying, but can help to teach the fundamentals of synthesis.
With heavy emphasis on ADSR, waveform selection and filtering, here are 3 drum sounds you can re create with Ableton’s Operator Synth. The Kick Drum Programming The Sequence Before we start tweaking knobs on Operator, lets program a simple 1 bar kick pattern. Enter session view and double click the first open clip slot on a MIDI track. Locate the piano roll window that has opened on the bottom section of Ableton Live. Austin Ableton Certified TrainingAustin Ableton Tutor. Basic drum programming with Ableton Live . by Jimmy Allison Austin Ableton Tutoraustinabletontutor.com This tutorial is an introduction to midi drum programming using Ableton Live and Drum Racks.
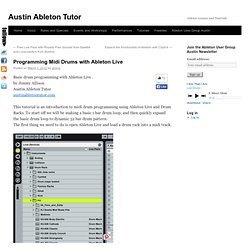
To start off we will be making a basic 1 bar drum loop, and then quickly expand the basic drum loop to dynamic 32 bar drum pattern. The first thing we need to do is open Ableton Live and load a drum rack into a midi track. Pin It To load a drum rack Open the live browser, select the live devices, open the instrument folder, open the drum racks folder, open the kit folder, and select a drum kit. Pick any kit you like, I will be using a kit from Ableton’s Session Drums. Next we need to create a 1 bar midi clip in an empty clip slot on the midi track. When inserting a midi clip, clip view should be automatically selected, you can also switch between clip view and device view by pressing shift+tab or you can select either view on the bottom right of the screen. Drum Beat Programming: Dark Berlin Techno.
The latest of our step by step drum programming tutorials takes inspiration from Berghain, Ostgut Ton and the darker techno sounds of Berlin.
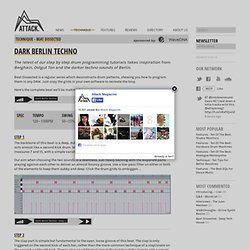
Beat Dissected is a regular series which deconstructs drum patterns, showing you how to program them in any DAW. Just copy the grids in your own software to recreate the loop. Here’s the complete beat we’ll be making this week: Update Required To play the media you will need to either update your browser to a recent version or update your Flash plugin. SPEC tempo 120—130bpm swing 50—55% sounds classic analogue hits & effected noise Step 1 The backbone of this beat is a deep, dubby, organic kick paired with a filtered low tom sample which acts almost like a second kick drum. Our aim when choosing the two sounds is a relentless, sub-heavy backing with the disparate parts playing against each other to deliver an almost bouncy groove. Dark Berlin Techno – Step… Step 2 The clap part is simple but fundamental to the open, loose groove of this beat.
Step 3.