
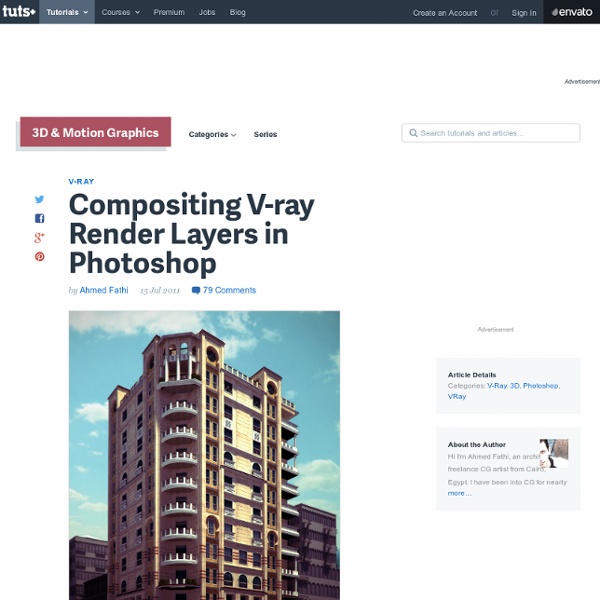
http://cgi.tutsplus.com/articles/compositing-v-ray-render-layers-in-photoshop--cg-4077
Tutorial07: Rendering Architectural Interior in Photoshop In this 1h:18min video tutorial we will be showing you how to render a one-point perspective interior scene entirely in Photoshop, this time completely from scratch, i.e. there will be absolutely no 3D involved. Instead, we will be adding details on the go, using Photoshop brushes and cutting, skewing, masking, stretching, erasing and modifying pieces of photographic materials from of our extensive reference library that we’ve taken ourselves at different locations around the globe. These types of conceptual images, sometimes referred to as “digital painting” or “speed painting” and, which we here at Vyonyx are marketing as “Quicksilver images” is a very flexible and quick way of not just visualising your ideas, but also a very intuitive way of designing things in general and architecture in particular. This way of working allows easy changes – changes are important to your client and to your team.
Quickscape Tutorials Project Overview This tutorial describes the process of creating a 3D infrastructure and landscape scene from an AutoCAD design drawing using MAX/VIZ and Quickscape application software. Popularity: 9.1 visits per day | Last visit: Today | Total visits: 20,052 Vray 2.0 materials guide An in depth look at each setting within a V-Ray material. You can jump to a specific section using the links below. DiffuseReflectionRefractionTranslucencyBRDFOptionsMapsReflect/Refract interpolation Diffuse Diffuse This is the actual colour of the surface, reflection and refraction colours can affect the visual appearance of this colour. Preparing an AutoCAD drawing for 3D by Ian Ibbotson Introduction It is extremely important to prepare an AutoCAD drawing taking into consideration two main issues
Vray Linear WorkFlow Different ways to add Gamma in your renders Share with your friends! Every real device to take pictures adds gamma. We actually are “producers” of images and we need to correctly setup the gamma in 3ds Max, in order to imitate the behavior of real cameras. mental ray & VRay tutorials: Correcting the Viewport colour display of imported AutoCAD drawings, when added into a Layer in 3Ds Max Often, imported AutoCad drawings lose their original colour once added into a new layer (using “Manage Layers” toolbar) in 3Ds Max. This “glitch” usually frustrates numerous users for a number of reasons, as colour coded drawings help to quickly understand the design and to easily “select by colour” any given layer/s of the relevant drawing in the 3Ds Max scene. After countless requests to post an article/tutorial on how to correct this problem, I have finally managed to put something together with help of a prolific script writer/ senior Visualiser/Photographer called David Venables.David created a simple script to override the above mentioned problem! I have had the pleasure to meet and continue to work with David while at AVR London. Without further ado let us start by importing an AutoCAD file format (i.e. DWG) into 3Ds Max.
Hair & Fur in 3D Studio Max Following a great thread in the finished works section of the forums, pixela was very kind to send me a little ‘How-To’ about the the use of 3D Studio Max’s Hair & Fur modifier you can see on the chair in the image above. I hope you’ll enjoy this article, even though it is just a small taste of what could be achieved with this great modifier. In my 3d interior visualization scene ‘Bedroom Concept’ I had one chair with fur which many people asked me to write a small tutorial about. Here I will try to explain the process of making it using 3D Studio Max internal Hair & Fur modifier. I used poly modeling techniques for creating the chair, but I won’t elaborate on that any further since I’m focusing on the use of the Hair & Fur modifier I applied on the chair after I finished it’s modeling.
Making of Maison Hermes 3d render – 3D Architectural Visualization Rendering Blog - Ronen Bekerman Roberto De Rose from State of Art studio posted his great ‘Maison Hermes’ image at the forum not long ago. I was very impressed with that 3d rendering of Renzo Piano’s building and asked him to share with us how he created it. I hope you’ll enjoy this article and learn from it as much as I did! Author: Roberto De Rose (Cepp) Roberto is a Director at State of Art Studio – An architectural visualization studio based in Italy. Visit their website at – www.stateofartstudio.com
My 12 Favorite Tutorials of 2010 15 Flares Facebook 0 Twitter 7 Pin It Share 4 4 Google+ 0 LinkedIn 3 inShare3 StumbleUpon 1 Reddit 0 15 Flares × 2010 is behind us and just before we start with all the 2011 goodness… here are my favorite 12 tutorial articles of 2010 on this blog. I wish you all the best 2011 possible. Enjoy! A quick way of adding fog in post using the ZDepth render pass. Described for VRay, but the method is the same for any render engine that is capable of outputting a depth pass. 3D Underwater Scene 14 May 2010 In this tutorial we’re going to create an underwater scene in 3ds Max. We’re going to create a deep blue sea with light rays and bubbles. Creating convincing underwater scene is a challenging task and I’m not even trying to create a physically accurate simulation. Rather I’m using my artistic freedom to neglect some real world rules to get the look and feel I’m going for.
VRay FREE Stuff For Download Hey! Christmas feeling is in the air and this was a wonderful year of VRay video tutorials, trainings, eBooks and other cool stuff… However I would like to continue the tradition and share some more freebies with you WARNING: Download it only if you are a true VRay user! Oh, and if you liked my stuff don’t forget to SUBSCRIBE Here ————————————————–> This way you’ll be able to follow me on VRay Video Tutorials, News, Reports and Free Downloads… I’ll be sharing Pro 3D tips & tricks only with subscribed users. So now for the juicy stuff: Sea shell model:
Project Manager Author Name: Alexander Kramer Project Manager - Asset Browser for 3ds Max Easy to organize and use 3ds Max models, materials, textures and lights.Interactive rendering previews for materials and IES files.Show native previews for 3ds Max files, HDRI & etc.Search files by tags and file-names.Missing external files management.Support to most used renderers like Vray, Corona, Octane, Mental Ray, Maxwell & etc. Changes for Project Manager v.2.31.12: