Site Officiel – Arduino – EurosmartOutils [color] & Software Educaduino[/color] - Educaduino Site Officiel - Arduino - Eurosmart
Outils & Software Educaduino Arduino & Ardublock (Windows, Mac et Linux) : Télécharger ArduinoTélécharger Ardublock Indispensable, contient aussi les pilotes (texte en anglais). Scratch for Arduino : Télécharger Scratchpour programmation graphique (texte en anglais). Processing : Télécharger ProcessingPour application visuelle sur PC Python : Télécharger Python Accès au didacticiel Python(Texte en anglais) Fritzing Télécharger Fritzing Télécharger Composants FritzingLogiciel en français
ROBOTS (4/5) : Danse avec les robots. Spectacles vivants ?
Quatrième rencontre avec des robots. Aujourd’hui, le robot est sur la scène. Nous sommes avec Aurélien Bory , metteur en scène. Dans son spectacle Sans Objet , il met en scène un robot. En décembre, l’installation du même nom, sera visible au 104 à Paris. Emmanuelle Grangier est à l'origine du projet Link Human/Robot, à la croisée de la recherche artistique et scientifique. En fin d’émission nous demandons à quelqu’un de sonder ses souvenirs à la recherche de moments marqués par des émotions fortes, et qui constituent des ouvertures, des points de départ de nouvelles vagues justement. Programmation musicale : Anonymous Choir Sings Leonard Cohen, The PartisanBartok, Le Château de Barbe-Bleue
Réseau VDI - Pour vous aider à faire votre propre réseau VDI !Réseau VDI | Pour vous aider à faire votre propre réseau VDI !
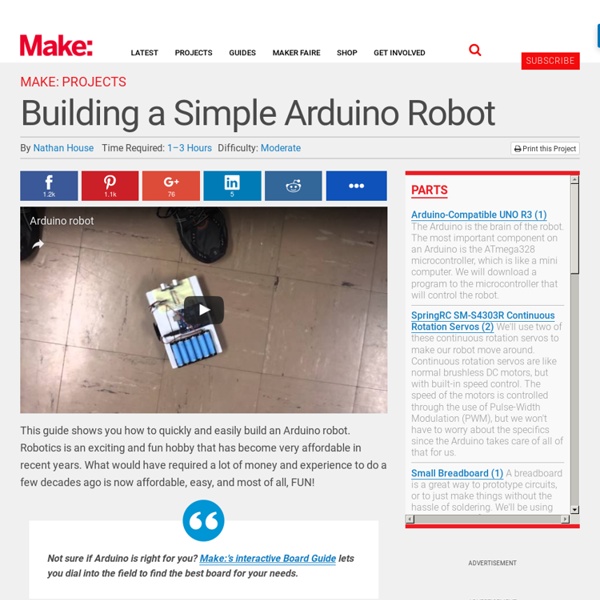
My First Original Arduino Project: What I Learned About Learning
This post is really an op-ed written for those of you who, like myself, are new to making and are just getting into project building with Arduino. You might be a little overwhelmed. You might think you can’t learn this stuff. [Ed. note: As you’ll read below, Gary was inspired by the “Drawdio” Musical Pencil before diving into the world of Arduino. I am a long time computer and technology geek going back to before I was a teenager “programming” BASIC on my new Vic-20. Enter the Arduino… Two years ago I came across an ad in Wired magazine from RadioShack promoting the Arduino Duemilanove and a beginner project complete with parts list, code, and step-by-step instruction. I went online, did my research, and ordered a Duemilanove kit along with tons of random parts from eBay. I spent the next two years reading and learning. The parts sat there. I still loved to learn, and enjoyed the process of exploring new topics, but in the end most concepts remained theoretical. So what did I make?
sans titre
mBot with Me LED Matrix Have you ever imagined how vivid it would be if a dynamic face plate is added on your robot which enables it to have various facial expression like a real man? Or have you tried to program LED walls to display animations or characters? What Me LED Matrix 8×16 can do is to help you achieve these gorgeous display effects. It’s highly welcomed by mBot users. What you will need: Firstly Assemble the led face plate according to below illustrations. Secondly Make sure you have done things below: connect the mBot to your computer via USB cable and upgrade the firmware(mBot) for mBot.Turn on the mBot, choose the correct serial port and board Thirdly Write script below and double click to run. For more documents: User guide download If it doesn’t work, please try steps below: Navigate to “C:\Users\your computer’s user name\Documents”, then delete the folder “mBlock”Reopen the software mBlock with internet connection. mBot Arduino C programming
DIY Power Supply !: 6 Steps
AdWords We use AdWords to deploy digital advertising on sites supported by AdWords. Ads are based on both AdWords data and behavioral data that we collect while you’re on our sites. The data we collect may include pages you’ve visited, trials you’ve initiated, videos you’ve played, purchases you’ve made, and your IP address or device ID. This information may be combined with data that AdWords has collected from you. LiveRamp We use LiveRamp to deploy digital advertising on sites supported by LiveRamp. Doubleclick We use Doubleclick to deploy digital advertising on sites supported by Doubleclick. RocketFuel We use RocketFuel to deploy digital advertising on sites supported by RocketFuel. Twitter We use Twitter to deploy digital advertising on sites supported by Twitter. Facebook We use Facebook to deploy digital advertising on sites supported by Facebook. Sprinklr We use Sprinklr to deploy digital advertising on sites supported by Sprinklr. Dstllery Marin LinkedIn Demandbase Yandex AdForm Baidu Naver
Control RGB LEDs with this Android-Arduino Combo-Circuit
Connect a multicolor LED strip to your smartphone to make a touch-controlled light show! You can attach the color-changing LEDs to the underside of a coffee table, your bike, or anything else you think needs a bit more color. With our latest Weekend Project we’ll show you how to combine an Arduino, a simple solderless breadboard circuit, and your Android device (which must be compatible with USB host mode) to control a strip of full-color RGB LEDs. The flexi-strip of 60 LEDs in our project can draw a maximum 1.2A when the LEDs are at full brightness. According to this Arduino Reference Board, PWM is available on pins 3, 5, 6, 9, 10, and 11 of ATmega328-based Arduinos. Watch the video below to see this project in action.
mBot get started – Open-source Arduino Robot Building Platform|Makeblock Learning Resource
mBot-Blue(2.4G Version) mBot-Blue(Bluetooth Version) Unpack your mBot and assemble Download mBot instruction to put all parts together. Test mBot with remote control Before you start graphical programming, you can play your mBot with three simple modes due to pre-uploaded factory program. Install the graphical programming software mBlock mBlock is a graphical programming environment based on Scratch 2 Open Source Code that makes it easy to program Arduino projects. Windows & Mac support now, download here mBot communication options Option 1: USB cableOption 2: Bluetooth (introduction for connecting Bluetooth)Option 3: 2.4G wireless serial (introduction for connecting 2.4G) Start from some lessons We have created some lessons about graphical programming and robotics to help teachers or kids get started easier. Scratch 2.0 the adventures of Mike has nine chapters with different projects. Kids maker rocks with the robots has twelve chapters with different projects.