
Binder Clips into Office Weapons. Wow, if you thought working at your white-collared job, sitting in your well equipped air-conditioned office, thinking that this is probably one of the safest place to be… you may just want to think twice about that.
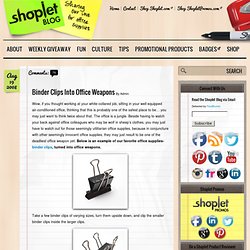
The office is a jungle. Beside having to watch your back against office colleagues who may be wolf in sheep’s clothes, you may just have to watch out for those seemingly utilitarian office supplies, because in conjuncture with other seemingly innocent office supplies, they may just result to be one of the deadliest office weapon yet. Below is an example of our favorite office supplies- binder clips, turned into office weapons. Take a few binder clips of varying sizes, turn them upside down, and clip the smaller binder clips inside the larger clips. It should look like this when the larger binder clips have clipped the smaller ones. Remove all the binder clip handles. Add another 2 larger binder clips on top of the smaller edge with a rubber band in between. stumbleupon.
31 Insanely Easy And Clever DIY Projects. Citra-Solv Photo Transfer Tutorial. Lyric here.

The work I do as a mother involves a lot of delayed gratification. When I escape to the studio and put on my artist's hat it can be nice to see some instant results. Solvent photocopy transfer is one of my favorites. You need only a photocopy, fabric or paper, Citra-Solve®, and a few seconds of elbow grease and viola! The good people who produce this environmentally friendly cleaning product have included an ARTISTS' PAGE on their website. I encourage you to take a peek over there - lots of interesting things being done.
Want to join me in a little playtime? Materials: Citra-Solve® (find where to buy it here)Cotton ballMetal spoonNon-porous smooth surfaceMasking tapeFabric or paper of your choicePhotocopy Directions: DIY Design Community « Keywords: shrinky_dink, how-to, DIY, art. My parents are both science teachers: which means they always ruined the secrets to magic tricks, they forced me to identify every tree by leaf and bark type, and we always created our own versions of ‘science-y’ toys.
We used to cook our Easy-Bake Oven meals with foil and a light bulb, and created our own slime with cornstarch and food coloring. And, when we wanted our own shrinkable art, did we get the sweet pre-printed HeMan or Strawberry Shortcake sheets? Nope. We freehanded it on blank sheets of plastic, and copied the designs from coloring books. (Luckily, neither of my parents could draw, or else we might have had hand drawn versions of those, too.)
The process is simple. Ingredients: - Clean #6 Plastic - Permanent Markers - Scissors - Aluminum Foil - Oven and Tongs or Oven Mitt 1. 2. 3. 4. 5. 6. 7. 8. Please include more application ideas in the comments below. Interested in other creative craft ideas? Or maybe you want to do another science project? How to Skin: A Braintan.com Online Article. How to Skin Deer, Elk, Antelope, Goat, or Sheep IntroSkinning is a straight forward endeavor if you follow the body's built in guidelines.

This is because the skin and muscle tissue are naturally separated from one another by protective membranes. Simply make the initial cuts, and then pull the skin off, as if you are removing the deer's coat. When you peel the skin, it easily separates from the meat along these membranes. After getting a clean start, there is little risk of tearing the skin or the meat. So all you need to do is use your hands and body weight to pull and pry the skin from the deer.
Make the incisions as shown in the illustration. Stuffed animal. This is actually quite a good idea!
