
Ice Candles. Here's a lovely decoration for your next party, indoors or out.

They are super easy to make and will be a great conversation starter. Supplies: balloons water votive candles Instructions: Fill the balloons with water. I found that filling the balloons with the sink sprayer worked best, but you could also use the faucet, a funnel, or even a watering can with a narrow end. Put the balloons in the freezer. When you first put them out they will be frosty on the outside as pictured below.
For an indoor decoration, I used floating votives and placed them in bowls as a centerpiece on the table. By Jess from Hillsboro, OR Recent Feedback Feedback about this article is posted here. By Anonymous [848]04/30/2012 Jess, besides the unique interior crystal designs of each ice holder; I love how they mirror the color of the inside of the bowls! By Frugal Sunnie [11]04/30/2012 These are really beautiful. Post Feedback Add your voice to the conversation. Anthropologie-inspired Ruffled Burlap Lamp! <div class="greet_block wpgb_cornered wpgb_shadowed"><div class="greet_text"><div class="greet_image"><img class="enable-pib-img-under" src=" alt="WP Greet Box icon" data-recalc-dims="1"/></div>Thanks for coming by!

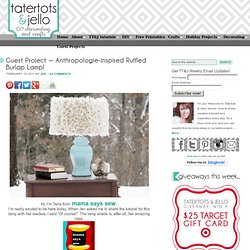
I try to feature a new creative tutorial every day -- and I'd love to have you follow along: <a href=" rel="nofollow"><strong>subscribe to my email updates</strong></a> or <a href=" rel="nofollow">come follow along on Facebook</a>. <div style="clear:both"></div></div></div> I’m really excited to be here today. When Jen asked me to share the tutorial for this lamp with her readers, I said “Of course!”
The lamp shade is, after all, her amazing idea. This is what I’m going to show you how to make today. This was the inspiration: In case you don’t already have a lamp base, head out to the thrift store and grab one. Now on to the lampshade. First, cover the shade in a layer of burlap. Now you need to cut the rest of your burlap in strips. This is the strip I’m gluing right now. Anthropologie Teapot Lamp. Anthropologie Knock Off: Embellished Lamp Shade. I first spotted this gorgeous flowered lamp shade below from Anthropologie a couple of weeks ago on Pinterest.

Priced at $98, I knew I could easily create something similar for MUCH less! And I know just the place… my daughter’s plain jane pink lamp shade. First thing I did was gather my supplies. I purchased some Recollections floral embellishments from Michael’s using my 40% off coupons (one package of pink flower, one package of small white flowers and one package of green leaves).
I decided to split the package of pink flowers into two separate sections for the lamp shade. Next I hot glued some green leaves around the surrounding flowers. Now it’s time to add the second section of flowers. Then it was time to add some little white flowers throughout my design. Wanna see the finished result? Pretty cute, huh? I love how the colors pop against my daughter’s stenciled blue wall (you can see the tutorial for that here). Make a Beaded Chandelier. Welcome to Dollar Store Crafts - the internet's original site for all Dollar Store Crafts!

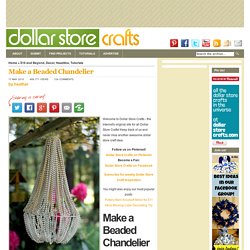
Keep track of us and never miss another awesome dollar store craft idea: Follow us on Pinterest! Dollar Store Crafts on PinterestBecome a Fan:Dollar Store Crafts on Facebook Subscribe for weekly Dollar Store Craft-Inspiration You might also enjoy our most popular posts:Pottery-Barn Knockoff Mirror for $11Mind-Blowing Cake Decorating Tip I made a beaded chandelier from dollar store stuff, and I'm so happy I get to reveal it today. Well, two months later, the beaded chandelier is here. Project Materials: Hanging wire basket, $16 packages of Mardi Gras-style metallic beads (about 48 necklaces), $6Light gauge wire (floral wire will work), $1Spray paint, $1Wire cutters, on hand or $1Hot glue gun & sticks, on handAdditional embellishments, as desired Total: $9 and up To Make:To prepare the beads: paint with white spray paint. Prepare the wire basket: spray paint the wire basket and chains.
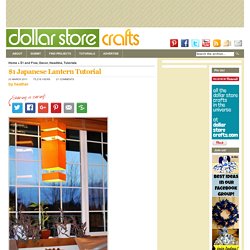
$1 Japanese Lantern Tutorial. Can you guess what this stylish light fixture is made of?

Give up? Manila folders and bamboo skewers! And it's oh-so-cheap to make.