
DIY Decoupage Badges. If you’re a reader of my blog, you probably already know that I’m kind of obsessed with badges (pins, brooches, and the like).
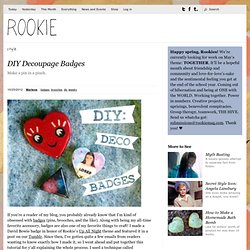
Along with being my all-time favorite accessory, badges are also one of my favorite things to craft! I made a David Bowie badge in honor of Rookie’s Up All Night theme and featured it in a post on our Tumblr. Since then, I’ve gotten quite a few emails from readers wanting to know exactly how I made it, so I went ahead and put together this tutorial for y’all explaining the whole process. I used a technique called decoupage, where you glue paper and/or cloth cutouts onto an object, then cover it all with some kind of lacquer (I use Mod Podge and resin). You can also add paint, glitter, stickers, sequins, tiny baby dolls—whatever you want! You’ll need: Small wooden shapes. Making the base: 1. 2. 3. 4. 5. 6. 7. 8. 9.
EasyCast is a two-part resin that you mix together to make what is basically liquid plastic. 1. 2. 3. 4. How to Make a Tutu. With the amount of tulle that I saw on the moodboard for this month’s issue, I figured it would be not only appropriate but necessary for me to do a tutu DIY!
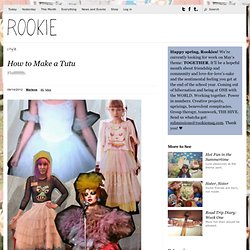
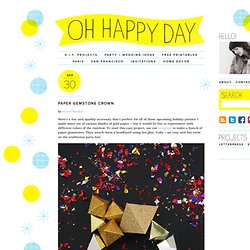
While you might not be the type to wear a tutu every day, I think it’s always a good idea to have one on hand just in case you ever get the urge to frolic around in yards of frilly fabric. Or maybe you just want something to wear with your Halloween costume this year. Paper Gemstone Crown. Sep 30 by Kitiya Palaskas Here’s a fun and sparkly accessory that’s perfect for all of those upcoming holiday parties!
D.I.Y Inspiration from ScrapHacker.com. Broderie. Ces fabuleux artistes du pop-up ! Make a Pop-Up with Popular Kinetics Press. Order Pop-Up How-To book view class offerings For teachers And Parents View Sample Pop-Ups Links to Other Pop-Up Sites Visit Our Bookarts Blog View Press Packet Contact Us.
DIY tassel necklace. INSTRUCTIONS:1. tear 0.5" strips of chiffon, cut strips into ten 5.5" pieces2. fold 9 strips in half3. use the 10th strip to tie the bundle4. add e-6000 inside the bell cap, insert tassel (cut knot smaller if necessary)5. add knots and beads, have fun with colors6. wrap embroidery thread around knot at each end7. to create adjustability, add single knot at ends of rope as shown in photo8. fin!
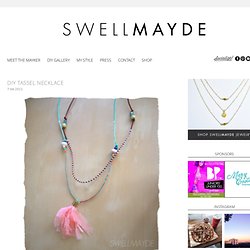
A swellmayde tassel necklace (outfit: uniqlo button up, zara tank, topshop leather shorts) I have noticed tassel necklaces on my favorite blogs/style sites and boutiques for some time now, and I have been waiting for the perfect inspiration to create a SwellMayde version. Un petit bout de chaleur [DIY] Crédits photo: WeHeartIt Quand il a commencé à faire froid et qu’on tentait encore de résister et de survivre sans chauffage, j’ai été prise d’une obsession.
![Un petit bout de chaleur [DIY]](http://cdn.pearltrees.com/s/pic/th/chaleur-everything-lovely-46316801)
Plusieurs soirs de suite, les pieds gelés, j’ai déclaré: « Il nous faut une bouillotte! » Et puis je suis tombée sur un chouette tuto sur Jolie Rue le blog, expliquant comment fabriquer une bouillotte sèche. Intriguée par la chose, et ayant surtout tous les ingrédients pour assouvir mon obsession sur le champ, je me suis donc retrouvée à fabriquer ma bouillotte, à l’arrache, devant la télé. Celle là je ne vous la montrerai pas, elle est moche, faite avec du tissu de récup et cousue tordue à la main. Baume en kit. Photographies Ma Récréation Liberty est sans conteste mon magasin préféré à Londres. Me....in action! DIY : fabriquer une bouillotte sèche Letter light from curbly’s new DIY book. We all know that hardware stores can be a bit overwhelming, especially if you’re an avid DIYer.
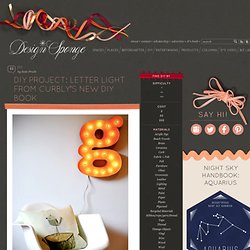
Every time I pass the rows of gleaming copper pipe, I just know there’s an amazing home decor project hiding in there somewhere, but then my eyes scan to the rope section, the molding section, the brackets, and on and on. Too many possibilities! I am so excited to see that the DIY experts at Curbly have tackled the hardware store’s rows upon rows of products in their new book, the aptly named Make It! Hardware Store Decor.
Erik’s recycled wine bottle torch. This clever outdoor diy idea comes from erik anderson of gerardot & co.- a creative branding and design agency in indianapolis. erik was kind enough to share a fantastic project that turns an everyday bottle into a modern backyard tiki torch. i love the way these torches look and am dying to find a backyard to use these in- too bad the closest thing we have is a 2×2 foot fire escape. but for those of you with yards, i hope you’ll enjoy this project from erik. click here for more info on the project and click here to check out erik’s work at gerardot & co. thanks, erik!
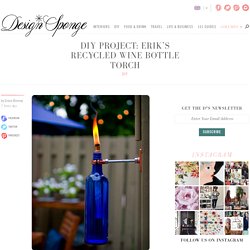
CLICK HERE for the full project instructions after the jump! [****Safety Note: This is for outdoor use only. Mollie’s newspaper taxidermy. Many of you have noticed the amazing paper taxidermy moose that appears on the wall in some of Barb’s Before & After Basics posts, and we’ve received several requests for a tutorial on how to make one.

We asked South Carolina-based artist Mollie Greene — moose creator and woman behind the charming Etsy shop Royal Buffet — to share some of her sculpting secrets with us and she kindly agreed! This is a great project for a rainy day or a lazy weekend. Chris’ budget-friendly mod chandelier. Paper marquee letter lamp. I’ve always had a love of fonts.
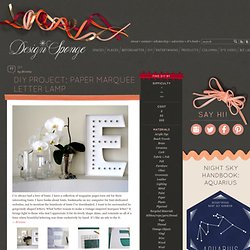
I have a collection of magazine pages torn out for their interesting fonts. I have books about fonts, bookmarks on my computer for font-dedicated websites, not to mention the hundreds of fonts I’ve downloaded. I want to be surrounded by gorgeously shaped letters. What better reason to make a vintage-inspired marquee letter?
It brings light to those who don’t appreciate it for its lovely shape alone, and reminds us all of a time when beautiful lettering was done exclusively by hand. CLICK HERE for the full how-to after the jump! Materials. Mail basket. Spontaneous piles seem to form around my house. Mail is probably the most often piled culprit. Why worry about opening mail and filing it when you can stack it up for a week? If you feel the same but are looking for a way to appease the neat freaks in your life, why not make a cool-looking basket for it? — Matt See the full how-to after the jump!
Jessica’s postage stamp coasters. I’m getting ready to go running off to complete the zillion post-holiday errands I have on my plate, but I decided I simply must add the supplies for this project to my shopping list. Jessica is a graphic designer by trade, which is clear to see from her choice of prints for these adorable coasters that she whipped up in no time. Jessica found these images on the flickr site of Karen Horton. Karen has amassed a treasure trove of amazing images of old postage stamps and labels.
With a few simple materials, Jessica fashioned these “jumbo stamp” fabric coasters, complete with perfectly pinked edges. 25 Gifts You Can Make Today. Wise Bread Picks Homemade gifts are often more meaningful than store-bought gifts, and fortunately they’re usually easy on the wallet too. For those who would like to save a buck or two on the next birthday, anniversary, or shower gift, or just like the idea of making something unique for a friend, here are 25 ideas for gifts that you can make with materials that are easily found at your local craft or hardware store. Many require little to no crafting skills, while others are a little more challenging, but definitely still doable for us amateurs!
(See also: 15 Delicious Gifts You Can Bake) 1. Diy geoball. Un pompon en papier de soie. Le Paper Globe — a DIY paper terrestrial globe. UN OISEAU PUNK SUR UNE TASSE. Depuis que j'ai croisé l'image de cet oiseau à l'étonnante personnalité capillaire, j'ai eu envie de le dessiner quelque part. Et pourquoi pas sur une bête tasse toute blanche ? Pour réaliser cette "création", il vous faudra donc de la vaisselle de votre choix et des feutres pour écrire sur le verre ou la porcelaine. J'ai utilisé le Vitrea 160 de Pébéo. Avec un stylo feutre normal, j'ai dessiné un guide avant de repasser avec le feutre permanent pour porcelaine. Après expérience, mieux vaut utiliser une autre couleur que le noir pour éviter de confondre les traits permanents et les autres.
Pour créer des effets et ne pas avoir une surface noire unie, gratter l'encre avec un coton tige avant qu'elle ne sèche. J'ai suivi mon conseil pour la décoration de la soucoupe et utilisé un feutre rose pour mes guides. Mon petit oiseau sur sa branche en pointillé. Blog de critique: Coup de coeur DIY de la semaine #1.