background preloader

Tutorials

Facebook Twitter

Create a Clean iPad Interface in Photoshop. Create Detailed Vintage Typography. Tablet Tips for Photoshop. Create a Fabric Textured Web Layout Using Photoshop. This tutorial is another collaboration with a very good friend Ciursa Ionut. 
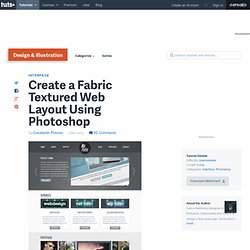
In this web design tutorial we will create a portfolio web layout using fabric textures. You will be taken through the process of designing the logo using Adobe Illustrator, creating spotlights for the "services" area and how to apply textures to the layout in a subtle way that will increase the quality of the final result. Let's get started! Tutorial Assets The following assets were used during the production of this tutorial. Introduction In this tutorial we will use the 960 Grid System. The 12 red columns that you see is the grid that we are going to use. Also, smart guides are very useful when designing web layouts. During this tutorial you will be asked you to create shapes with certain dimensions.

Now that we covered the basics of using the 960 Grid System, we can move on to creating the actual web layout. Step 1: Setting up the document Open the "960_grid_12_col.psd" file in Photoshop. Step 7. Design a Detailed Audio Receiver Icon in Photoshop. New Video Course: Identity Design. Create a Mobile Calendar App in Photoshop. In this tutorial we will show you how to design a Mobile Calendar App in Photoshop. Let's get started! Tutorial Assets Step 1 Create a new file. Step 2 Make a new Group and name it Header. Step 3 Now using Horizontal Type Tool (T) write down "November 2011" and apply the Layer Style. Step 4 Using Rounded Rectangle Tool (U) set the Radius to 3px and make two shapes like the ones in the example.

Step 5 Use Custom Shape Tool (U) and load the custom set called Shapes, from where select the Triangle shape and draw two triangles just like the ones in the example. Step 6 Now using Ellipse Tool (U) make to circles like the ones in the example, set the fill color to #1d1d1d and apply the Layer Styles. Step 7 Draw a shape just like the one in the example using Pen Tool (P), afterwards go to Filter > Blur > Gaussian Blur and set the Radius to 2.5px. Step 8 Using Rounded Rectangle Tool (U) set the Radius to 15px and draw a shape like the one in the example.

Step 9 Step 10 Make a new Group and name it Staples. Create a Festive Cocktail Using Photoshop's 3D Capabilities. For many of our readers, this time of year is filled with family, friends, and celebration. 
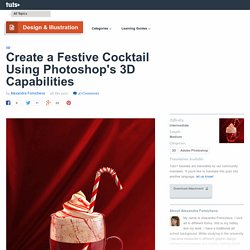
In this tutorial, we will explain how to create a festive cocktail using Photoshop's 3D capabilities just in time for your New Year's celebrations.

Let's get started! The following assets were used during the production of this tutorial. Create a new document, the size is 768x1024px. Insert fabric image, we will use this texture to create background. Select the bottom part of the red fabric just like on the example, use Rectangular Marquee Tool . You will get similar result. Create glass wall silhouette. In the Shape Layer Mode .The size is 145x359px. Open 3D Tools palette. You will see the 3D settings window. Click on right point to choose right spinning axis. Tilt down 3D perspective a bit. And adjust only "X" Orientation setting (-10). In order to set materials for the glass cup, make active "Materials" palette. Apply following settings for the Extrusion Material. And select 3D Axis. . . Create a Futuristic Touch Screen Interface Illustration in Photoshop. Touch screen interfaces are everywhere these days.

You can see them on television, in movies, on the web, and especially on your mobile device. In this tutorial we will explain how to create a touch screen interface for a futuristic spacecraft. In the process we will show the digital illustration process from sketch to vector tracing to Photoshop rendering. Let's get started!

Step 1 First lets start by making a quick concept sketch of our spacecraft. Grab a pen/pencil and paper and roughly sketch out your idea. Step 2 Now we are going to start vectoring your lines. Step 3 With the path selected go to Object > Path > Outline Stroke. Step 4 Continue this process for the rest of the drawing. Step 5 Next we are going to fill our illustration with some shades. Step 6 Paste your selection and you should have a silhouette of your drawing and a few other shapes. Step 7 Place the shading within your lines. Step 8 Now let's move all of our vector elements into Photoshop.

Step 9 Step 10 Step 11 Step 12. Create Elegant Leafy Lettering in Photoshop. Illustrator and Photoshop work extremely well together. In this tutorial we will use both apps to produce elegant leafy lettering that can be used for a variety of projects. Let's get started! Step 1 The first thing we need to do is sketch the layout. When it comes to sketching out my ideas, I used pencil and paper as an extremely basic guide for my layout and composition. Step 2 As soon as I'm done sketching, I drag the sketch into illustrator. Step 3 Copy the path and paste it back into Photoshop. Step 4 Copy a merged version of the canvas in Photoshop (Command/Ctrl + Option + C) and paste it yet again into illustrator. Step 5 Continue this process and create about 3-5 blades of grass per letter.

Step 6 Repeat this process for the remaining letters. Step 7 This is the part where you step out of the original sketch and begin to add other, thinner blades. Step 8 We're now going to transform each thicker blade of grass (portions of the original letters) into a folded blade. Step 9 Step 10 Step 11. Create a Pimped Out Truck Modification in Photoshop. Create a GUI for an iPad Audio-DJ Application Using Photoshop. Slick designs are an important part of a successful iPad interface. In this tutorial we will explain how to create a beautiful GUI for an Audio/DJ iPad application in Photoshop. Let's get started! Tutorial Assets Step 1 Create a new file. Set Width to 768 and Height to 1024 and the resolution to 132 PPI. Step 2 Make a new Group and name it Background. Step 3 Merge all 6 layers that we previously did and apply a Gradient Overlay from the Layer Style panel.

Step 4 Create a ne Group and name it Platter. Step 5 Now we will give the shape a light stroke. Step 6 Using Ellipse Tool (U) make another perfect circle (483x483 px), set the foreground to #111111 and apply an Outer Glow, using the settings from the example. Step 7 Again using Ellipse Tool (U) make another perfect circle (481x481 px) but make this one 2 px smaller than the previous one. Step 8 Step 9 In this step we will create some shapes in order to give more depth to the Platter. Step 10 Step 11 Step 12 Step 13 Step 14 Step 15 Step 16 Step 17 Step 18. Create a Mobile App Icon in Photoshop. This tutorial is part of a three-part series explaining how to design UI elements for mobile applications in Photoshop. 
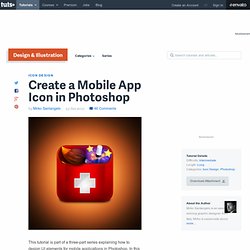
In this part, we will explain how to design an icon for your mobile device's home screen.

Let's get started! Tutorial Assets The following assets were used during the production of this tutorial. Wood Texture Step 1 Create a new document. Step 2 With the Rounded Rectangle Tool (U) draw a shape using a red color. Step 3 With the Brush Tool (B) Paint a vivid light red color to create a light spot on the upper right part of the icon.

Step 4 Add a black shadow with the Brush Tool. Step 5 Add a shape like this on top of the icon with the following Layer Style. Step 6 Duplicate and reduce the last shape with Cmd/Ctrl + T. Step 7 Refine the upper lights using the Brush Tool (B) alternating light and dark red. Step 8 I refined the bottom part using the same way as the previous step. Step 9 Step 10 Make a Rectangular Selection. Step 11 Step 12 Step 13 Add two Highlights stripes. Step 14 Step 15. Create a Medieval Battle Axe in Photoshop. Photoshop is an excellent tool for manipulating photographs but it can also be used as a means to create stunning digital art. This tutorial is part of a 25-part video tutorial series demonstrating everything you will need to know to start producing digital art in Photoshop.

Digital Art for Beginners, by Adobe Certified Expert and Instructor, Martin Perhiniak will begin by teaching you how to draw in Photoshop. At the conclusion of this series you will know all you need to produce your own concept art and matte paintings in Photoshop. Today's tutorial Part 21: Create a Medieval Battle Axe in Photoshop will demonstrate how to construct a medieval battle axe in Photoshop. This tutorial will cover several techniques but don't worry, it won't be too difficult to follow. Let's get started! How to Create High Quality Metal 3D Text in Photoshop. Most of you probably know those awesome letters that were generated with 3D programs. 
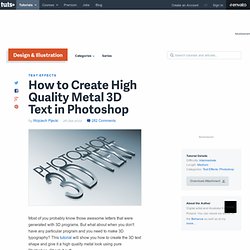
But what about when you don't have any particular program and you need to make 3D typography?

This tutorial will show you how to create the 3D text shape and give it a high quality metal look using pure Photoshop. Check it out! Editor's note: This tutorial was originally published on Psdtuts in December of 2008. Step 1 Let's start with a new document of 1500 pixel by 1500 pixel, and 300px/inch resolution. Step 2 So now, right-click on the "3D TEXT_first" layer and select Rasterize Type. Tip: If you fail by distorting, and some text edges look fuzzy, use Filter > Sharpen > Unsharp Mask, and increase the Amount. Step 3 Now that the text is way smaller and has a nice perspective, create a duplicate (Command + J) of this text layer and name it "3D TEXT_last.

" Step 4 Create duplicates (Command + J) of both text layers and position them as you see in the image below. Step 5 Step 6 Step 7 Step 8 Step 9 Step 10 Step 11. Create a "Transfarmers" Text Effect in Photoshop. In today’s quick tip tutorial we will demonstrate how to create a cinematic "Transfarmers" Text Effect using the layer styles. Let’s get started! Tutorial Assets The following assets were used during the production of this tutorial. Step 1 Make a new .PSD document, 1000 x 500 pixels, RGB color, 100 dpi and grey background (color #33333). Step 2 Now create the text using this font: Transformers Solid.

Step 3 Duplicate the text and rename it "Base". Step 4 Duplicate the text "Base". Step 5 Your text effect is almost completed. Conclusion Now your text effect is completed! Create a Chewing Gum Packaging Design in Photoshop. In this tutorial, we will explain how to create chewing gum packaging in Photoshop and Illustrator.

We will begin by showing you how to create print-ready artwork and then how to render that artwork as a mockup that can be presented to clients. Let's get started! Tutorial Assets The following assets were used during the production of this tutorial. Before We Begin In this tutorial we will explain how to create print-ready artwork as well as a render that can be presented to a client. Step 1 Okay, let's get started. Step 2 Typically, when you are working at an agency, you design on a die, and sent up a file to present to clients that will help them understand what the package will look like. Select the front panel of the package and copy and paste into a new Photoshop document. Step 3 Label that layer Packaging Die.

Step 4 Using the packaging die as a reference, use the pen tool to draw in the shape as seen below. Step 5 Step 6 Here are the settings for the Gradient Overlay. Step 7 Step 8 Step 9. Create a Coffee Cake Photo Manipulation. In this tutorial we will demonstrate how to take pieces from multiple photos and seamlessly blend them into a "coffee cake" photo manipulation.

This tutorial will also explore unique ways to work with paths and smart objects. Let's get started! Tutorial Assets The following assets were used during the production of this tutorial. Step 1 Open the first image of the cup of coffee. Step 2 We are going to extract the cup and saucer as separate elements. Step 3 As long as your Ellipse Tool is still selected, you can right-click the path and select "Make Selection. " Copy (Command/Ctrl + C) and Paste (Command/Ctrl + V) this selection onto a new layer. Step 4 Going back to the original image layer, use the Pen Tool (P) to select just the cup now. Step 5 Right-click the path and select "Make Selection. " Step 6 Next, we are going to remove the background. Clean up the dark edges of the saucer by adding the following Layer Styles to the "Saucer" layer. Step 7 Step 8 Step 9 Next, add a Gaussian Blur set to 67%.

GUI inspiration

Create a Cocktail Blueprint Using Actions in Photoshop. Photoshop actions are excellent tools for speeding up your workflow. In this tutorial we will use Photoshop actions to create a cocktail blueprint from scratch. Let's get started! Tutorial Assets The following assets were used during the production of this tutorial. Before You Begin In order to make this action works in any language, we need to make some steps using the menus (instead shortcuts) so we can fully control the names of every single layer we make. Step 1 - Loading Assets Go to Edit > Preset Manager.

Again, go to Edit > Preset Manager. Step 2 - The Action We do not need to create a canvas here to start the action because we want let the user to set their own canvas size. Step 3 Go to File > New and set any width and height you wish. Step 4 Press "D" to reset the swatches. Step 5 Go to Layer > New > Layer and set the name to "Background", click OK. Step 6 Go to Layer > Smart Objects > Convert to Smart Object (this will rename the layer according to your Photoshop language).

Step 7 Step 8. 30 Days to Learn Photoshop. Create a Mini Planet Using Photoshop's 3D Capabilities. When most people think about Photoshop, they probably don't think about 3D. What most people don't realize, however, is that Photoshop CS5 Extended includes some powerful tools to help you render your artwork in 3D. In this tutorial we will demonstrate how to create a mini planet using Photoshop's 3D capabilities. Let's get started! Tutorial Assets The following assets were used during the production of this tutorial. Step 1 Create a new document, the size is 1400 x 1400px, 96 pixels/inch. Step 2 Insert sky image. Step 3 Add Layer Mask to the sky layer (click Mask icon in the bottom of layers palette).

Icon in the bottom menu of the Layers Palette. Step 4 Group and duplicate sky layers, move them up. Step 5 Insert stars photo. Step 6 Rotate it on 90° and apply Warp Arch transformation just like for the sky layer in previous steps. Step 7 Duplicate stars layer, turn it on 180° and move it left and down. Step 8 Merge stars layers and apply Screen Blending Mode. Step 9 Step 10 Apply following filters. Create an "Action" Text Effect in Photoshop. In this quick tip tutorial we will demonstrate how to create a cinematic "Action" Text Effect in Photoshop using layer styles. Let's get started! Tutorial Assets The following assets were used during the production of this tutorial. Step 1 Make a new .PSD document; size 1000 x 500 pixels, RGB color, 100 dpi and White background. Create a new layer and fill it with a Leather Texture/Pattern and go in the menu Layer > Layer Styles > Blending Options and use these settings: Step 2 Now create the text using this font: SF Fedora.

Step 3 Then go in the menu Layer > Layer Styles > Blending Options and use these settings: Step 4 Duplicate the text and rename it "Base". Conclusion Lastly to make the text effect nicer I added some light around the text with simple brushes and color lights with soft brushes.