
Handy Techniques for Cutting Out Hair in Photoshop. This post was originally published in 2009 The tips and techniques explained may be outdated.

When trimming out images in Photoshop, human hair or animal fur always proves troublesome and can be tricky to achieve a realistic look. Here are two techniques I use on images with both plain backgrounds, and those with a varied background tones, each achieving pretty decent end results. Technique One: Images with Plain Backgrounds The best photos are those professional studio type shots that are taken against a plain white background. These shots make it much easier to find the edges of the subject, but trimming out fine hairs can still be a little tricky. Open up your image in Photoshop. Head over to the Channels palette and review each of the Red, Green and Blue channels. With only the new channel selected, adjust the Levels (CMD+L) to dramatically increase the contrast between light and dark areas. Due to the slight variation in tone of the background, it appears grey in the darker areas.
Flash Animation Tutorials: Step-by-Step Lessons. User interface design?

Interactive animated web pages? E-cards? Funny cartoon shorts? Whatever you want to do in Flash, these tutorials will help you get a foothold on on the basics of developing your animation skills, as well as a few tips and tricks to help beginners get used to the program tools. Flash CS5 Deco Tool: Vine Fill OptionsThe Deco Tool is a Flash feature that lets you auto-create multiple effects and fills without drawing them yourself, including animated and static Vine Fills.
Flash CS5 Deco Tool: Vine Fill OptionsThe Deco Tool is a Flash feature that lets you auto-create multiple effects and fills without drawing them yourself, including animated and static Vine Fills. Introduction to Flash CS5 Workspace ProfilesAdobe Flash CS5 comes with multiple preset workspaces designed to optimize productivity for different types of users.
Flash Tip: Reducing Flash Movie FilesizeFlash movies are improving in quality, but with greater quality comes larger file sizes. How To Apply Textures To Your Photographs. A Post By: James Brandon Let me start off by saying that I don’t use textures all that often, but there are certainly times where I feel that an image could use just a little something extra.
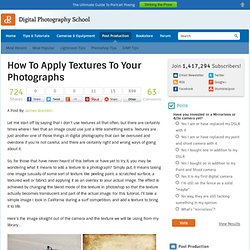
Textures are just another one of those things in digital photography that can be overused and overdone if you’re not careful, and there are certainly right and wrong ways of going about it. So, for those that have never heard of this before or have yet to try it, you may be wondering what it means to add a texture to a photograph? Simply put, it means taking one image (usually of some sort of texture like peeling paint, a scratched surface, a textured wall or fabric) and applying it as an overlay to your actual image. The effect is achieved by changing the blend mode of the texture in photoshop so that the texture actually becomes translucent and part of the actual image. Here’s the image straight out of the camera and the texture we will be using from my library… See how easy that was!?
3D Teaching, Training and Products. Congratulations to Michael Rinnan for winning the Five Second Project for March.

His entry had a great concept and was outfitted with excellent lighting, atmosphere, camera movements and sound design. We wanted to know a little bit more about Michael’s entry, so we asked him a few questions regarding his workflow and the process for creating his winning piece. Where do you work? What is your title? Tell us about what you do at your company. I am a 3D generalist at NFL films in Mt. How did you come up with your concept for the Bright Lights Five Second Project? For my concept, my goal was to come up with a quick story I could tell in 5 seconds. What was the most challenging thing about your project? The most challenging part of this project was honestly the lighting. Tell us a little about how you achieved the zolly (push-pull zoom) effect. To achieve the zolly, I initially mapped out the motion of the motorcycles with a spline and then dropped a camera onto that motion path.
Flawless Flesh Tutorial - Photo editing. Achieving a natural looking smooth flesh tone is one of the many Holy Grail’s of commercial retouchers.
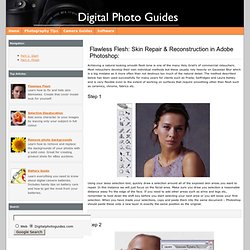
Most retouchers develop their own individual methods but these usually rely heavily on Gaussian Blur which is a big mistake as it more often than not destroys too much of the natural detail. The method described below has been used successfully for many years for clients such as Prada, Selfridges and Laura Ashley and is very flexible even to the extent of working on surfaces that require smoothing other than flesh such as ceramics, chrome, fabrics etc. Step 1 Using your lasso selection tool, quickly draw a selection around all of the exposed skin areas you want to repair. In this instance we will just focus on the facial area. Step 2 Turn off the original background layer by clicking the eye icon next to it just leaving you pasted skin layer exposed with the transparent checkerboard pattern. Step 3 Part 2: The Finishing touches Navigation: Top Articles: Battery Guide.