
Most favorited last 7 days - page 5. Fairy lights, esprit cabane, DIY decorative objects. Fairy lights can be enhanced with feathers, paper, cardboard cones or...egg carton cups!

These recycled cardboard cups offer an unusual texture and soft colors that, with minimal skills, can be turned into a vine of light-emitting morning glory. For this project, use LED lights only. Save different colored egg cartons. With a pair of sturdy scissors, cut away excess cardboard surrounding the cup strips. Then cut out each separate cup. Starting at the cup opening, make a short slit into each side of the cup. Embroidery + Metal? Here's something I've been noodling around with lately - embroidered metal discs!

Wait - what? I bought a bag of these perforated beading discs a while back, intending to make some beaded pieces a la Miriam Haskell. Only I never quite got around to those, and eventually a different light bulb went on over my head. I could use the holes as embroidery guides! The resulting discs are so cute and easy to make, and lend themselves beautifully to lots of crafts. Like this simple cuff bracelet! The stitchery part is dead simple. Just leave a few inches of thread hanging from the back when you start stitching. Then you just follow the holes, making stitches in different colors and patterns. At the end of the strand, tie the ends of the floss into a double knot.
The only thing to watch out for as you stitch is the fact that, for some reason, the outermost row of holes in the disc is not in a symmetrical pattern. Here, I glued a row of them to a paint-chip card. Cute, eh? Most favorited all-time. Knots. The Craft Junkie: Soda Pop Art. The Craft Junkie: Soda Pop Art. Most favorited last 7 days - page 2. How to Make Instructables. Tutorials. Design*Sponge » Blog Archive » diy project: window films.
This month’s material is a simple one…paint!
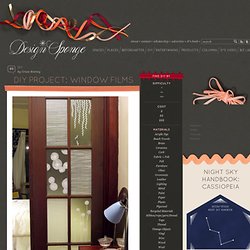
Obviously paint comes in many forms, and one of my favorite craft tools is the paint pen. they have come a long way over the years, and the newest paint pens provide a really clean, fluid line of paint and are great for drawing with. in our home we needed some window films to provide privacy, but we also wanted them to let light through. using contact paper and a white paint pen, i’ve created some decorative window films that are easy to change, replace, move, etc. if you don’t feel super comfortable with your drawing skills, you can easily print out images or text and trace them onto the contact paper. happy crafting! -kate CLICK HERE for the full project after the jump! What You’ll Need: 1. contact paper, clear (this is for lining drawers, you can find it at hardware or drug stores) 2. ruler 3. scissors or exacto 4. paint pen 5. tape Instructions: 1. measure your window panes. 4. using your paint pens, draw out your design on the contact paper.
DIY Doily Lamp. Things to Make and Do. How to: turtleneck sweater turns cardigan in 5 easy steps : julie kundhi. Most favorited all-time. Down and dirty screenprinting for under 10$ For this project, we will need some tools and supplies that are easily available, and a few that might require the tiniest bit of searching....
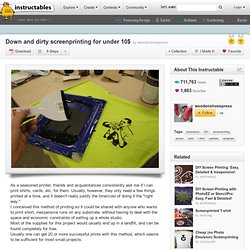
Recycling is key here. Most of the supplies required can be found as trash, including the ink. What isn't direct waste can be recycled from thrift stores or garage sales. Tools:Staple Gun (almost any size will do)X-acto Knife, or Utility knife (you could use a plain razor blade in a pinch)Heat Gun or a Hair DryerScissorsPlastic Putty KnifeSmall Container for mixing Materials:'Spray AdhesiveStaplesAny old picture frame as long as it is bigger than your image. 101 Crafty Gifts. Diy and Crafts. T-Shirt Bracelets. SATURDAY, JUNE 4, 2011 | Comments: 45 Brightly colored t-shirts that are too small for my daughters now, have found new life as bracelets.
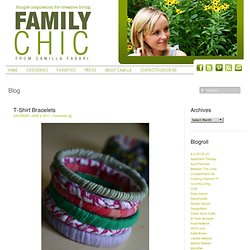
For this project you will need some old t-shirts and a bunch of bangle bracelets. Try using old bangles that you already own, check thrift stores or pick up some up for a few dollars at Target, Walmart – or even the sale bins at Old Navy. Cut t-shirt in 1/2" to 1" wide strips. Depending on the thickness of the bangle – a thick bracelet will need thicker strips. Loosely tie one end of the t-shirt strip to the bangle and start wrapping fabric around bracelet – the tighter the better. Wrap fabric all the way around until you meet the first knot – untie the knot and tie both ends together to close. I found this technique worked well for us – but you could also use a glue gun to secure ends.
Most favorited last 7 days - page 2.