
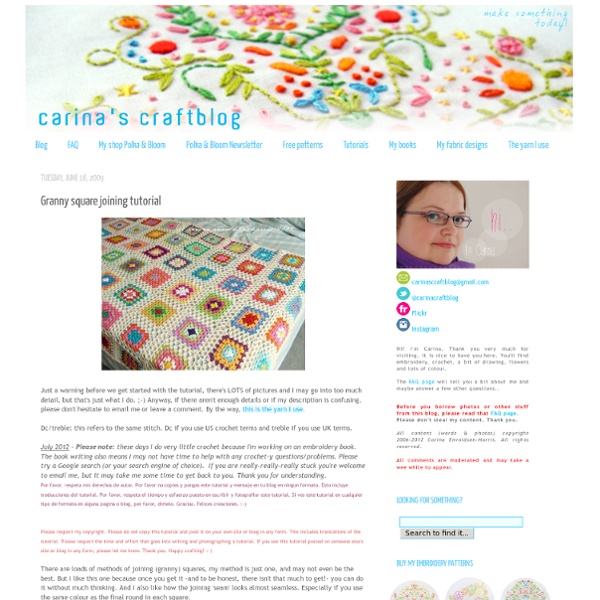
Hipponen Lupasin uutena vuotena opetella jotain uutta ja tässä se nyt on! Melkein kahden viikon hampaiden kiristys ja hermojen menetys! Happypotamus alias virtahepo alias hipponen :) Lanka: Novita 7 veljestä Koukku: 3,5mmHappyhipon ohje löytyy ravelrystä Lankaa kului noin 300g Käytin happypotamukseen pääsääntöisesti vaan jämälankoja. Ja koska hippo on menossa tulevalle kummipojalle ristiäis/kummi/ym. lahjaksi niin personoin sitä töissä sen verran, että "kaulanauhaan" kirjailin koneella nimen :) currentVote noRating noWeight Carina's Craftblog: Crochet magic ring tutorial Mmm... happy colours! Ok, so there's a granny triangle tutorial in the works, but first I'm going to show you how to make a magic ring. This is a very handy thing to know how to make. Not just for granny triangles! Why is it handy? Because it can make centres of your work look a lot better. And despite its name, there is actually no magic involved whatsoever. Please respect my copyright. Por favor, respeta mis derechos de autor. Ok, grab your yarn and we'll do this! 1: wind yarn around your fingers like you are going to make a slip knot. 4: yarn over and pull through 5: with the loop still on the hook, insert the hook in the ring itself, yarn over, then pull through the ring 6: you should now have two loops on your hook 7: pull the latest loop through the other one, so you only have one loop on the hook 8: now chain 3, this will count as the first dc If you are working on a project that has sc or tdc in the first round, adjust the length of your chain accordingly. Thank you!
Näin virkkaat afrikankukan - Neulonta ja virkkaus - Suuri Käsityö Kaipaatko vaihtelua jämälankavirkkauksiin? Afrikankukista syntyy näyttäviä vilttejä pala palalta. Kokeile, kuinka helposti kukkien virkkaaminen onnistuu. Krs=kerrosps=piilosilmukkas=silmukkakjs=ketjusilmukkaks=kiinteä silmukkap=pylväs Virkkausmerkein piirretyn ohjeen kukkaan löydät täältä. Virkkaa 5 kjs ja yhdistä renkaaksi ps:lla. 1.krs: *tee aloitusrenkaaseen 2 p, 1 kjs*, toista *–* vielä 5 kertaa. Korvaa jatkossa aina krs:n 1. p 3 kjs:lla ja sulje krs ps:lla tämän ketjun yläreunaan. Kun vaihdat väriä, tee jo edellisen krs:n ps:n viimeinen langanveto uudella värillä. Vaihda työhön lanka. 2.krs: tee jokaiseen 1 s:n ketjuun 2 p + 1 kjs + 2 p. 3.krs: tee krs:n 1. p siten, että virkkaat 1 s:n ketjuun 1 ps:n ja sitten 3 kjs (= 1. p). Virkkaa langanpäät silmukoiden sisään. 4.krs: virkkaa jokaiseen pylvääseen 1 ks. Tee pylväsryhmien väliin 1 ks niin, että viet koukun 2. krs:n pylväsryhmien välistä. Katkaise ja päätä lanka.
The sloppy slip knot: how to work in the round with no hole | Stacey Trock's Fresh Stitching If you're new here, you may want to subscribe to my RSS feed. Thanks for visiting! The typical way of starting to work in the round is less than ideal for amigurumi. Why isn’t this the best? A number of ways have been devised to solve this problem, one of which is the magic ring. To begin, don’t make a slip knot. Now, continue on as usual. Here’s the magic part. It’s easy! Guess what? Download my free e-book:The Beginner’s Guide to Amigurumi!
Vinkkejä amigurumien tekoon Tarvikkeet Langat Valitse lanka, joka on tiiviisti kierretty, jotta koukku ei mene langan väliin. Itse käytän virkatessa paljon Schachenmayr smc Catania-lankaa (3,5mm koukku). Catania löytyy Helsingistä ainakin FiinaNeuleesta (Annankatu 20), Menitasta (Korkeavuorenkatu 20), Haminasta Käsityöliike Maijukasta (Sibeliuskatu 25) ja ainakin kolmeasta Jyväskylän lankakaupasta. Kun amigurumeihin jää koukkuun, kotiin alkaa kertyä helposti aikamoinen määrä lankoja. Nyt lankoja saa tauon jälkeen taas myös Sokoksesta, Stockmannilta, Anttilasta ja vaikka mistä. Voit virkata myös kotoa löytyvistä langanpätkistä, mutta siisteimmän lopputuloksen saat, kun ostat puuvillalankaa tai ohutta villalankaa. Virkkuukoukku Yhdellä pärjäät, kahdella loistavasti. 3,5mm tai 4mm. Silmät ja kuonot Amigurumeista saa pienillekin lapsille sopivia, kun niille laittaa läpipainosilmät eli turvasilmät. Liimattavia silmiä löytyy monista kaupoista. Jos et halua ostaa silmiä, voit myös käyttää nappeja tai helmiä. Täyte Ohjeet Kirjat
How to Crochet: The Magic Adjustable Ring By Alicia Kachmar – 53 Comments One way of crocheting in the round is to chain 2 and then make a certain number of stitches into the 2nd chain from the hook (you can do so with any kind of crochet stitch–sc, hdc, dc, etc.–but for this tutorial, I’ll be using sc. This tutorial is for both right and left handed people. For left handed pictures, roll your mouse over the image and it will change for you. When you have the desired number of stitches and you join to the first single crochet, you’ll notice a little something–a hole! Making a magic adjustable ring only requires a few extra steps and will give your in-the-round projects a smooth start. With the yarn tail hanging for a few inches along the inside of your left hand, form a ring and rap around your index and middle fingers. Hold where both strands of yarn overlap along the ring, the working yarn behind the ring. Now there are two loops on your crochet hook. Do you have questions about making a magic adjustable ring?
Amineko eli virkattu kissa Japanissa virkattua kissaa kutsutaan Aminekoksi. Amineko sana on puhekielessä lyhenne sanoista "amigurumi neko", joka tarkoittaa ihmisen kaltaista kissanukkea. En löytänyt millään ohjetta suomeksi mutta englanninkieliseen ohjeeseen pääset esimerkiksi tästä. Googletin Aminekoja ja niillä kuuluisi olla kirjaillut uneliaan näköiset silmät. Anleitung: Sunburst Flower Granny Square haekeln ? Kasa Amend Geschafft: Meine Foto-Anleitung zum Häkeln der Sunburst Flower Granny Squares für eine dieser tollen Decken, wie sie viele wahrscheinlich von Sandra Juto oder dieser Flickr Group kennen, ist fertig. Für eine Freundin, die heute Geburtstag hat, wollte ich schon längst mal meine kleine Übersetzung dieser englischen Anleitung von MaryjoO abtippen. Nun hab ich mir etwas mehr Zeit genommen, um die Anleitung noch etwas detaillierter auszuarbeiten. Dank des tollen Fußauslösers, konnte ich die ganzen Häkel-Schritte selbst fotografieren und da die liebe MaryjoO nichts dagegen hatte, stelle ich das Ganze nun auch hier in den Blog und wünsche viel Spaß beim Häkeln. Wolle: Cool Wool 2000/ Merino Superfein von Lana Grossa (Das aber nur als Info, ihr könnt selbstverständlich auch ganz andere Wolle nehmen. Häkelnadel: 4,0 (etwas dicker als zur Wolle empfohlen, dadurch wird die Decke schön locker) Bedarf: Etwa 9 g Wolle habe ich pro Granny Square verhäkelt. ::::: RUNDE 1: Der innere Strahlenkreis :::::
kissa Ensimmäiseen satunnaisia sankareita päivitykseen kokosin kuvia sellaisista amigurumeista, joita olin tehnyt ennen blogin aloittamista. Olin usein kuvannut jostakin amigurumista vain yhden kuvan ja siksi oli luontevaa koota ne kerralla yhdeksi päivitykseksi. Nyt puolestaan amigurumeja ja niiden kuvia on kertynyt niin paljon, että kaikista ei ehdi tehdä omaa päivitystään. Tai sitten olisi päivityksiä valmiina hyvin pitkäksi aikaa. Siispä kokoan tähän muuamia pikkukavereita. Myyrä toimii oppaanamme ja vie tapaamaan satunnaisia amigurumi-sankari kavereitaan. Ensimmäinen kaveri on kissakaksikko. Kissat on tehty Little Mugglesin maksuttomalla ohjeella. Kissoista tuli aika paksuja. Einon tuulenpuuska kaatoi kissat kumolleen. Syystalven päivä on lyhyt. Ja kas, siellähän on possu Veli-Ponteva turkooseissa haalareissaan! Zoomigurumi kirjoista ensimmäisessä on tämän possun ohje ja se löytyy myös Amigurumipatterns.net-sivuilta. Tämä hiiri on satunnainen blogilöytö. Kokeilin avuksi googlen kääntäjää.
Crochet Patterns: Oak, Birch, and Elm Leaves | Mrs. Greene - crafts, food, fashion, life A while back, I designed three different leaf crochet patterns. They are appliques that you can add to any project you want. They remain among my favorite patterns I’ve designed, so I wanted to share them here as well! Oak Leaf Applique Crochet Pattern The examples show were made with worsted weight yarn and measure about 4 inches long. Ch 20; sl st in 3rd ch from hook R1: Sc 17 down chain to end; turn R2: Sl st in next 5 sc; 7 sc; turn R3: Starting in 2nd sc from hook, sc 6; turn R4: Starting in 2nd sc from hook, sc 5; turn R5: Starting in 2nd sc from hook, sc 4; turn R6: Starting in 2nd sc from hook, sc 3; sl st down the side of R2-5 R7: Working into R1, sc 5; turn R8: Starting in 2nd sc from hook, sc 4; turn R9: Starting in 2nd sc from hook, sc 3; sl st down the side of R7-8 R10: Working in the 3 ch space, sc 5 R11: Working down opposite side of starting ch, sc 5; turn R12-13: Repeat R8-9 R14: Working in starting ch, sc 7; turn R15-18 : Repeat R3-6; continue to sl st down the end of the leaf stem.
sääryleet Tiedättehän, että kenkäfriikille talvi on tuskaisaa aikaa. Mitäpä sitä ei tekisi, että saisi pitää korkoja vielä muutaman extraviikon ennenkuin on pakko vaihtaa turkissämpylöihin! malli: omalanka: Novita Nalle, 85 gpuikot: 2,5 mmmuuta: Ravelryssa täällä, kuvissa näkyvä virkattu bolero puolestaan on vanhaa tuotantoa vuodelta 2007 ja löytyy täältä Sain inspiraation alunperin näihin säärystimiin Katyushan samanlaisista. Silloin kun aloittelin neulomaan näitä (kröhöm, kolme vuotta sitten), niin Katyusha ei ollut vielä julkaissut omaa ohjettaan , tällöin tein niistä oman versioni. lanka: Novita Nalle, yhteensä 84 grammaa puikot: 2,5 mm sukkapuikot tai 30 cm minipyöröpuikot tiheys: 22 s / 10 cm sileällä neuleella neulottuna muuta: silmukkamerkki Luo puikoille 76 silmukkaa haluamallasi tavalla. Aloita seuraavaksi mallineuleen neulominen kerroksen alusta. Toista mallineule neljästi (rivit 1-16). Neulo lopuksi vielä tavallista 2 o 2 n- joustinta 3 cm verran. Valmista tuli!
do you mind if i knit: Sewing up knitting or crochet with an invisible stitch. Hello! Would you like to know how I join all the seams of my knitting and crochet? You would?! In these instructions, I'm joining up the squares of my 'Little Squares Scarf'. Right, here goes! Having lined up your middle squares of the first row ready to be sewn up, thread your needle with some yarn. Although I have four squares in each row of my scarf, I am going to start by sewing up the centre of the middle two rows of squares. Make sure your squares are all lying with the right side, (the front), facing up. 1. Above is another photo, to try and make it extra clear. In the photo above, you can see what I've just done. 2. This time, you will be taking your needle up and through the bar, in the chain that is at bottom RIGHT hand side of your square. You can see what I've just done, in the picture above. Now I'd like you to keep your squares flat on your work surface for the rest of your joining up. 3. Above you can see how your stitch is starting to look. 4. 5. Like above! Ta-da! Like above.
Oy - Neulemalli: Katso ohjeessa mainittujen lyhenteiden selitykset. MallineuleetJoustinneule suljettuna neuleena: neulo *2 o, 2 n*, toista *-*. Kohoneule: neulo ruutupiirroksen ja ohjeen mukaan. Luo sukkapuikoille 80 s ja jaa s:t neljälle puikolle, 20 s kullekin puikolle. Virkattu kukkatupsu: kierrä lanka kerran sormesi ympäri ja virkkaa renkaaseen: 1. krs: 10 kiinteää silmukkaa (ks). Lost & Found Lane: Crocodile Stitch The Easy Way I was very frustrated when searching the internet for a free pattern to learn the Crocodile Stitch. All I could find were youtube video's that are very confusing in demonstrating how they crochet this stitch. I had to stop and start the videos over and over again to get the basic idea of the stitch. If you would like a copy of the common crochet abbreviations I have created a "Crochet Abbreviations" reference sheet. Thank you so much for all your support and all your lovely comments. Keep smiling and Keep Crocheting! Love and Hugs to all!