
40 meilleurs tutoriaux Photoshop - Caractéristiques - Arts numériques Learn techniques for Photoshop across art, illustration, graphics and photography in these tutorials from the world's best practitioners. Photoshop is a very versatile software tool, as flexible for seamlessly compositing disparate elements into a beautiful photomotage as it is making your photos look even more stunning. It also provides an effortless platform for creating dynamic graphics for both web and print - and let's not forget its pragmatic usefulness as a day-to-day tool for tranforming graphics and photos into the perfect format for your output requirements. Here we've created a round-up of the best Photoshop tutorials from the past decade of Digital Arts, covering everything from collage and illustration to photography and typography. Some require a recent version of the software, such as Photoshop CC or Photoshop CS6 - but many will work in Photoshop CS, CS2, CS3, CS4 or CS5. Photoshop tutorial types Photo-illustration and collage Advanced compositing techniques
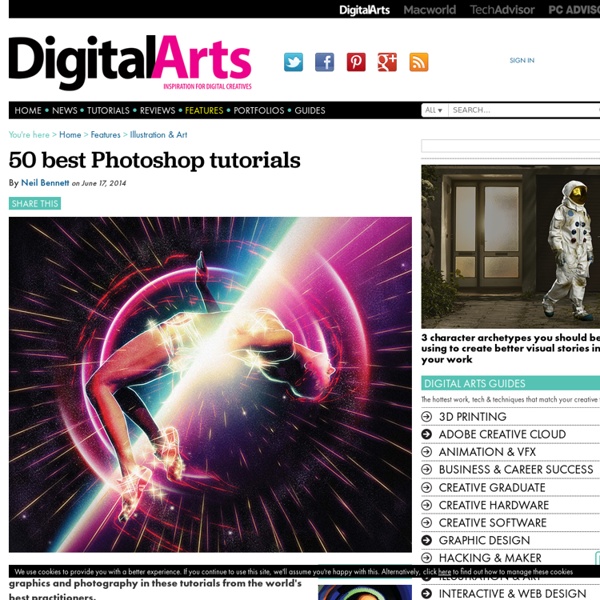
Create an outer world ambiance In this tutorial I am going to show you how to create an 'outer-world' feeling using an experimental Photoshop process. My personal works often deal with the idea of hybrid realities and extra dimensions, so in this project I have created a situation where a person is experiencing an abstract moment that transcends the regular boundaries of nature and reality. To achieve this kind of ambiance, I'll explain how to manipulate the regular laws of light and shadow by partly inverting your images, and merging positive with negative. The female image used here is from a photographer named Katanza-Stock at deviantART, but you can use your own if you wish. 01 Open Photoshop and create a new CMYK document, setting the width to 25cm, height to 35cm and background colour to C:21, M:21, Y:21 and K:0. 02 First of all invert your images (Ctrl/Cmd+I). 04 Experiment with the colours of your inverted image until you're happy with the results. 05 Paste your background image into the document.
Coloriser un dessin fait à la main avec Photoshop Si vous avez d'autres questions, n'hésitez pas à les poser par mail ! Note : ce tutoriel a été réalisé avec la version CS3 de Photoshop sous Windows 7, mais la plupart des fonctionnalités correspondent à ce que l'on peut retrouver dans d'autres versions. L'image tout fraîchement sortie du scan n'est pas franchement extraordinaire : penchée, mal cadrée, pâle... Une méthode "bourrine" pour la mettre en couleurs pourrait constituer en un simple clic avec le pot de peinture, mais il faut l'éviter à tout prix, à cause des fines bordures blanches qui apparaîtraient sur les côtés du dessin. Nous allons procéder à une série de rectifications qui permettront d'avoir un tracé propre, puis nous mettrons la couleur en-dessous. Dernière étape avant la couleur ! Enfin, il reste une manipulation essentielle à faire : le positionnement des calques.Trouvez la boîte de calques sur votre écran (si elle ne s'affiche pas, activez Fenêtre > Calques). Création des calques Mise en couleurs Ajout d'autres couleurs
Give your photos a pattern kick In this tutorial I'll show you how to add a bright, graphic edge to your photographic pieces by working in your own colourful pattern designs. First we'll be creating patterns in Illustrator (alternatively, you can find some I've made earlier on the disc) then blending them into photographic compositions in Photoshop. We'll then look at the best methods of colouring and blending. In the end, it's all about having fun and experimenting with your new patterns. Click here to download the support files (1MB) 01 I always start by browsing for photography stock images. 02 Once you've made up your mind about the right stock picture, the fun starts. 03 Once I've cut my model out properly, I create my grungy background. 04 Now that I have the model and background ready to work with, I adjust the Contrast and Brightness accordingly, desaturate her and used the Burn tool to make the edges of her clothing blend into the background. 06 We'll use our Brush tool to make some painterly brush strokes.
500+ Free Download High Quality Photoshop PSD Files For Designers Why redo what is from the web “free download” ? Plenty of web designers create and share with the community, plenty graphic files. Most often, they are free download and can mostly be used in business projects. But the plenty ways used for the distribution of these files is problematic (from own blogs, social networks, sharing networks)…Lot of you have interest for these files, and regarding this point, 2experts decided to create selection lists of these files. These lists give to the web designers, the possibility to get a quick overview of some of the best free download files, grouped on an unique page. Today is an exceptional day because you are not restricted to one list but you can browse a selection of the best lists from all of them, and this final selection cumulate all together, around 500 Photoshop files, files you can download. If you like this selection, you will certainly appreciate the posts below too: You can’t hardly wait ? 26 Polariod and Paper Clips ( by atilazz )
Create a rapport with your illustrations Patterns nowadays can consist of much more than simple repetitions. With the growth of digital textile printers, Illustrator and Photoshop have become some of the most powerful tools available for developing complex and colourful designs. They also give creatives the ability to experiment and achieve a large range of results in a very short time. In this tutorial, I will present the process from scratch, selecting a theme, illustrating the elements that will be on the canvas, then building the repetition pattern (called 'rapport' in the fashion industry). As well as on fabrics, your pattern can be used in many other ways; such as within web designs and interfaces and as wrapping paper or posters. 01 Before you do anything, first look for a theme for your pattern and find some reference images. 02 After selecting your reference images, choose the elements that you want to use in your pattern and start to sketch them, either on paper or in Illustrator.
Photoshop backgrounds, textures and icons Plot your pictures It's easy to add a variety of elements to a movie poster through portraiture, colour schemes and composition. This could go some way to explaining why greater numbers of movie posters and DVD covers are being illustrated. Graphic illustration is a great way to inject a different look into a movie poster while still having a strong sense of realism. The main aim of this project is to use illustration to create a movie poster that's different. Take this opportunity to create an image that has your personal stamp all over it and ticks all the boxes in regards to having elements of realism as well as strong evidence of the movie's plot. Illustrator and Photoshop enable us to swiftly compose and create illustrations in somewhat unusual colour schemes, and ones that are also full of energy. 01 Once you've sourced your images it's time to put together a composition in Photoshop. 03 Set the Color palette to CMYK by clicking the icon at the top right corner and selecting CMYK.
Agrandir une photo sans perte de qualité avec Photoshop - Dans ce tutoriel Photoshop vous verrez plusieurs techniques pour augmenter la résolution d’une photo sans détériorer la qualité de celle-ci. De base il faut savoir qu’il est impossible d’augmenter la taille d’une photo sans perdre la qualité de celle-ci. Cela est vrai avec Photoshop mais aussi avec n’importe quelle logicielle de retouche d’images. Cela proviens du fait qu’une image est constitué de pixel, cela veux dire que vous image est crée à partir d’une grille sur laquelle est positionné une suite de pixel de différentes couleurs. Imaginons votre image est composé d’une grille de trois pixels de coté et que vous souhaitez doubler sa taille à 6 pixels de coté … cela est impossible car ces pixels n’existent simplement pas. En fait la solution pour agrandir une photo sans perte de qualité c’est d’accepter cette perte mais de tout faire pour la limité. ETAPE 1 Ouvrir le fichier et vérifiez les informations de votre image ETAPE 2 Augmenter la taille de 5% Partager cet article avec vos amis
Prepare RAW images for print One mistake that a lot of designers regularly make is to use images straight off the camera. No matter how good your photographer is, I would always strongly suggest doing your own pre-press work before sending your images to print. Photographers often do their own colour-correction so that it looks amazing on screen, but they don't necessarily think about what happens after us designers get our hands on it. After all, there's a massive difference between seeing an image on a shiny backlit LED MacBook Pro screen and seeing it printed on the cheap, porous paper that your client is prepared to pay for. Over the next four pages I'll walk you through how I've worked on one particular photo from a shoot for my streetwear brand AnyForty, enhancing the key details and adding some extra punch before sending the final files to print. Click here to download the support files (17.8MB) 01 The first thing to do is open the file: you'll find mine to work with in the support files.