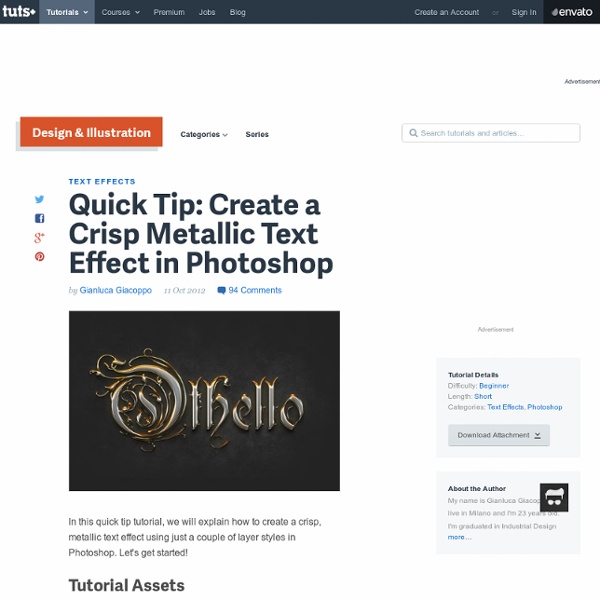
Create a Crisp Metallic Text Effect in Photoshop
aaron blaise
960 × 797 - creatureartteacher.com
Create a "Two-Faced" Digital Painting in Photoshop
Creating a nice character painting in Photoshop can be a difficult but rewarding task. In this tutorial, we will explain how to create a classic Batman villain in Photoshop. Let's get started! Tutorial Assets The following assets were used during the production of this tutorial. Brush File Step 1 Go to 'File' > New. Step 2 The next step is to decide on the dimensions of the canvas you'd like to work with. Step 3 We now have our canvas! Step 4 This is where we handle the line work. To draw in the sketch, I used a fairly small brush (around 8 pixels) with an opacity of 25%. Step 5 With our sketch completed, we can now begin painting! I use the Gradient tool (G) to quickly fill in the background color. Step 6 Now that I have the main color theme decided, I decide to quickly paint in the general lighting theme of the image. I paint in lighter tones as well, this time coming from the bottom of the image to represent the light source. Step 7 Step 8 Here is where we establish values. Step 9 Step 10 Step 11
How to Create Suspended Text Effect
This tutorial explains how to create a nice colorfull suspended text effect. Final Image Preview Step 1 First create a new document, 1000×500 pixels, with a black background. Step 2 Create a new layer on top of the Background layer and call it “Gradient”. Press the Ctrl key, and click on the text layer thumbnail (icon) to create a selection. Select the “Gradient” layer so that it is the active layer, and press Ctrl + J to copy the selection and paste it in a new layer, call the new layer “Gradient Letters”. Step 3 Pick the Rectangular Marquee Tool, and click the Intersect with Selection icon in the Options bar. This will make the letter S the only selected letter. Create a new layer on top of the “Gradient Letters” layer and call it “Colored Letters”, then change its Blend Mode to Screen. Repeat the same process to each letter. S – #ff0000 U – #ff7e00 S – #fffc00 P – #a2ff00 E – #06ec00 N – #00d8ff D – #004eff E – #7200ff D – #f000ff This is what you should get: Step 4 Step 5 Step 6 Step 7 Step 8
Art of Aaron Blaise - Animation Lessons, Tutorials & Digital Painting Courses
How to Create an Awesome Splashing Sneaker in Photoshop
Preview of Final Results Download the PSD Splashing Sneakers.zip | 8.72 MB Download from Website Splashing Sneaker Photoshop Tutorial Tutorial Resources Step 1 Create a new document 1289×1000 px and fill the background with #adadad color. Step 2 Duplicate the texture layer and change it’s blend mode to normal. Step 3 Make a new layer (Ctrl + Alt + Shift + N) and lower the opacity to 11%. Step 4 Open file “Shoe” and using your favorite selection tool copy and paste the shoe into our document. Step 5 Unzip the “Paint Tossing Pack” and open file 15. Step 6 Add a clipped Gradient Map adjustment layer and Curves adjustment layer to darken the splash. I sampled colors from the place the splash is supposed to be coming and used them as dark and white colors in the Gradient Map adjustment layer. Step 7 Repeat the instructions from step 5 but this time use file “9″. Step 8 Add a clipped Gradient Map adjustment layer and use the settings shown below. Step 9 Repeat the instructions from step 5 with file “14″.
there's a stone for the things forgotten
CHECK OUT SOME NEW CHARACTER IMAGES AND DESCRIPTION FROM DISNEYS UPCOMING ZOOTOPIA - Comicpanel.org
Disney has definitely got a star studded cast for their upcoming zootopia story. Idris Elba, Octavia Spencer and many others are in it. But who is playing who? Checkthe cast list with faces to go. The modern mammal metropolis of Zootopia is a city like no other. Idris Elba provides the voice of Chief Bogo, head of the Zootopia Police Department. Oscar winner Octavia Spencer voices Mrs. Oscar winner J.K. Tommy Chong voices Yax the Yak, the most enlightened, laid-back bovine in Zootopia. Nate Torrence lends his voice to the Zootopia Police Department’s most charming cheetah, Benjamin Clawhauser. Jenny Slate voices Assistant Mayor Bellwether, a sweet sheep with a little voice and a lot of wool. Alan Tudyk returns to Disney’s recording studio as the voice of Duke Weaselton, a small-time weasel crook with a big-time mouth. Directed by Byron Howard, Rich Moore, Jared Bush (Co-Director).
25 Excellent Photoshop Web Design Layout Tutorials
By Marcell Purham Photoshop is a popular web design tool. With it, you can create web design mock-ups that can later on be converted to a functional HTML/CSS template. This collection of tutorials features top-notch techniques on how to create web design layouts using Photoshop. 1. A step-by-step Photoshop web design layout tutorial using basic techniques. 2. Learn how to make a dark-themed blog design layout in this Photoshop tutorial. 3. Discover how to use patterns in website layouts through this Photoshop tutorial. 4. This Photoshop tutorial uses 960 Grid System for laying out the web page. 5. This simple tutorial shows you how to apply background textures in your web designs. 6. Learn to make a dark-themed photo gallery via this excellent Photoshop tutorial. 7. In this Photoshop tutorial, you’ll use layer styles to create great web design elements. 8. Learn techniques for creating elegant web designs in Photoshop through this tutorial. 9. 10. 11. 12. 13. 15. 16. 17. 18. 19. 20. 21. 22. 23.
Related:
