Exempel på texter, provuppgifter och bedömning - Uppsala universitet
Det nationella provet i svenska och svenska som andraspråk består av olika delprov som prövar förmågorna att tala/samtala, läsa och skriva. Vissa delprov prövar fler än en färdighet i ett och samma delprov. På denna sida finns exempel på textunderlag för läsförståelseprov, provuppgifter samt bedömningsunderlag av olika slag. Samtliga exempel är hämtade från 2009 års prov. Av upphovsrättsliga skäl kan vi inte visa hela prov. Tal och samtal Exempel på instruktion till muntlig uppgift inklusive de mål som prövas. Läsning Exempel på skönlitterär text från ett av läsförståelseproven. Skrivning Exempel på mål och kravnivåer för skriftlig uppgift, berättande text.Exempel på instruktion till skriftlig uppgift, berättande text.Exempel på autentiska elevtexter, berättande text.
30 Days of Creativity Exercises & Design Inspiration
The book "Unstuck" features 52 exercises, divided by time commitment, to help you beat creative block. Here we sample 5 for a work-week's worth of inspiration. Creative Bliss is a web series that pools together 30 creativity exercises. No. 30 challenges you to shift your perspective to that of a beginner. Creative Bliss pools together 30 creativity exercises. Creative Bliss pools together 30 creativity exercises. Creative Bliss pools together 30 creativity exercises. Creative Bliss is a web series that pools together 30 creativity exercises. Creative Bliss is a web series that pools together 30 creativity exercises. Creative Bliss is a web series that pools together 30 creativity exercises. Creative Bliss is a web series that pools together 30 creativity exercises. Creative Bliss is a web series that pools together 30 creativity exercises.
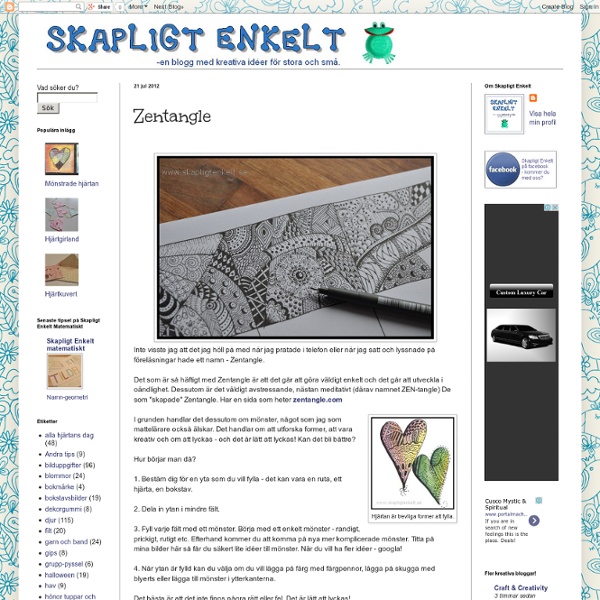
Prima julkalender
Mysteriet med lussekatterna Klockan var bara 5 på morgonen men på Bageriet Bullen var bagarna i full gång med att baka. De hade redan 8 färdiga plåtar med lussekatter som senare skulle skickas till Mys och Jons skola. Klockan 7.30 kom lastbilen till bageriet och 160 lussekatter packades in.
Art Classes Online, Mixed Media Workshops
Online Art Classes with Jane Davenport My wish for you, is your creativity to be roaring with confidence. My e-courses are so popular because I really can help make that happen for you. “If I only had time for that part of yourself”, you think. Time to doodle, draw, paint or journal. Creativity isn’t far away, or outside of you, or laying somewhere forgotten. As a creativity expert who has guided thousands of women back to their art, It’s one of our first childhood joys. Each video Lesson in my classes features a new skill that is designed to build your creative confidence.As you move through the course from beginning to end, your skills and confidence will growand you will feel comfortable with the progression.My tutorials are created with high quality video and step by step instructions. Choose the Starting Point that suits You: Draw Happy is a mini Workshop specially created for people who say “I can’t draw”. If you already enjoy drawing, this class isn’t for you – but Supplies me is!
Arbetsscheman | Min undervisning
Jag använder ofta arbetsscheman och fick en ide om att göra några i Canva. Så här blev de och här finns arbetsscheman som pdf för utskrift om så önskas. Varför arbetsscheman? För att det blir tydligare för elever och särskilt om de har diagnos inom NPF. Det är ett sätt att skapa struktur och lugn i klassrummet. Här finns några enklare arbetsscheman en i punktform och ett per lektion. Spana in min pärla om stödinsatser för mer konkreta metoder för att arbeta med extra anpassningar, särskilt stöd och åp.
Quickposes: pose generator for figure & gesture drawing practice
Adventskalenderlänkar
art journaling as a creative process
Fantasibild - blandade tekniker
En sak, som jag tycker är roligt, är att få eleverna att använda sig av nya tekniker och nya material. Det är så lätt att de annars fastnar i blyertsteckningar. Den här bilduppgiften görs i flera moment och kan med fördel göras lärarledd, dvs man gör det steg för steg tillsammans. Läraren gör sin bild och eleverna gör sina. Jag valde att använda sk "julgransljus" som är lite mindre och lättare att hålla i för eleverna. Uppgiften är att rita figurer med ljuset på pappret. Moment 2 - vattenfärger Andra momentet innebär att man målar över allt med vattenfärger så att figurerna, som man gjorde med ljuset framträder. (Medan den första bilden torkar kan man låta eleverna göra flera bilder enligt moment 1 och 2 utan lärarstöd.)Moment 3 - hitta kanterna Nu är det dags att ta fram färgpennorna. Uppgiften är nu att hitta kanterna på figurerna och fylla i dem med pennan. Nu är det dags att ta fram en lite mindre pensel och nytt vatten. Moment 5 - mer detaljer! Gör sedan fler detaljer med färgpennor.
Art Journal Every Day
Q: How can I find all the previous Art Journal Every Day posts? A: Find them all listed by category and linked here. Q: What is Art Journal Every Day? A: Art Journal Every Day is weekly feature on this blog. Q: What does the title "Art Journal Every Day" mean? A: I do my best to art journal every day. Q: How can I participate? A: Lots of different ways! There is a free flickr group here for sharing photos of your pages. Also, you can grab this button... ...for your blog by copying the text in the box and pasting it into your sidebar. Q: What if I've never art journaled before? A: Jump right in! Q: What supplies do I need to get started? A: You don't "need" anything.