
UO Wire Heart Necklace/Bracelet Tutorial This is yet another super easy, super quick tutorial. This dainty wire heart bracelet from Urban Outfitters is great for summer; the gold and silver tones look great against tans! Plus, it's lightweight and you can layer them with other necklaces. The original is a bracelet, but in the tutorial I make both a bracelet and necklace. You can make whatever you want, just cut the chain accordingly. The copper heart is my bracelet, while the silver heart is the necklace. You can also vary the shape of the heart by using different forms to bend the wire around. I am not a "heart" person; I was thinking of making these to wear myself in lightning bolts, diamonds, half moons or any other cool symbol! Let's get started! Step 1: Gather materials. Step 2: Cut a length of wire, 1 foot is plenty. Step 3: Right next to the point in the "V", on the outside of the "V", place your pen/pencil. Step 5: Find the center of your bracelet/necklace chain, and split it into two equal lengths. Finished!
How To: Make Origami Stars Origami stars look tricky to make. There are several steps to follow in order to make a cute mini origami star. Maybe in the first attempt you will fail, but you will get better on the second. They can be made from every kind of paper. You can make them from magazines, book paper, music sheet etc. Step 1: Cut 1 cm strip off a A4 sheet of paper. Step 2: Tighten knot and press flat. Step 3: Fold short - end of paper down towards center of the star. Step 4: Fold long - end of paper up. Step 5: Flip paper around so long - end of paper is pointing down again. Step 6: Fold long - end of paper up and to the left. Step 7: Flip paper around again so long - end of paper is pointing down. Step 8: Repeat: fold the paper up keeping it aligned with the edge below. Step 9: Keep folding the long - end of the paper until it is too short to continue. Step 10: Hold the pentagon along the edges as if you were holding a coin. Once you've made the wishing star, you can make more.
Ear Cuff Tutorial: The Double-Loop Technique It's been a bit since I've done a proper tutorial, hasn't it? Don't worry, I'll be doing some craftsy ones soon-- but fellow jewelers are in luck today! I've photographed the making of another kind of ear cuff (which I'm calling the "Double-Loop" because you kind of loop it twice... For those unfamiliar with ear cuffs, they are awesome and comfortable pieces of jewelry that simply wrap around the cartilage of the ear-- no piercings required! Before you begin, I recommend that you check out my tutorials on the basic ear cuff and the swirly ear cuff. Now then. We are creating a left ear cuff. This particular design is a bit more understated than the other ear cuffs because the decorative swirls are limited to the bottom of the cuff! You will need: - 8 inches of 18 ga wire - needle-nose pliers - (optional) beads, other wire for decorative wrapping, headpins to add dangles, etc. Cut a length of wire at least 8 inches long. Bend it at the three inch mark. Did that make sense?
Tassel Earring DIY I have a lot of earrings, but always seem to forget to wear them. But lately I have been in the 'earring wearing mood', and that called for a new crafty tutorial featuring earrings! I found these tassels on sale in a store that sells about anything (xenos for the Dutch people among us). And I am sure that they are not supposed to be worn in someones ear, but I just saw so much earring potential in them that I decided to buy them :) Here's how I made the tassel earrings: Easy right?!
Flapping Paper Butterfly I had a baby so I’ve invited some fave guests to take over for me while I spend time with the little guy. Today’s post is from super crafter and cute mom, Amelia of The Homebook. Growing up, I had an aunt who lived in Canada. I made my butterflies into Monarchs, but you could use different materials to create any sort of colorful butterfly. Materials: You’ll need heavy cardstock, 24 gauge wire, silicone rubber bands (I found mine in the hair aisle at Walgreens) needle-nose pliers, scissors, tape, a paintbrush, a black marker, and a white ink pen. Step 1: Measure and cut your wire. Step 2: Find the center of the longer wire. Step 5: Find the center of the shorter wire, and wrap it around the base of the paintbrush. Step 8: Draw the shape of your wings and cut them out. Step 11: Tape each wing to the body of the butterfly. Thanks for the chance to finally figure out how these darned things are made, Melanie! See more awesome from Amelia on The Homebook
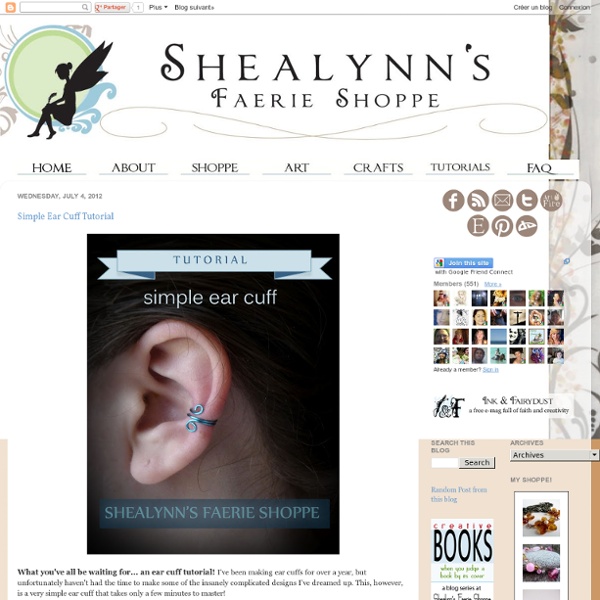
Earcuff TUTORIAL!!! (on BIG demand) - JEWELRY AND TRINKETS I started making ear cuffs half a week ago, and already LOTS of people were asking me to make a tutorial.I made two.One on the basic cuff, just to get the hang of it, and one more expanded, where you can use your own imagination. What you need: The 18g wire can also be 20g 1. Cut from the 18g wire a piece of 2,5" Bend the right end 3/4" 180° upwards. Do the same with the left end, downwards. Make a loop to the right with the round nose pliers out of the upper end. Do the same with the lower end, to the left, in opposite direction. Bend the side parts backwards around round nose pliers or a pencil. Ready! 2. Cut from the 18g wire a longer piece f.e. 5" Bend the right end 180° upwards. Bend the left part 180° downwards, but see that the middle part is app. 1" Finish the upper end by making curls and loops with the round nose pliers. Bend the lower part 90° downwards in the middle. From this point I turned the piece around. Bend the wire further to hold the bead in it's place. Done!
Tangerine Chandelier Earrings It hardly seems fair to call this one a “tutorial”, because it’s SO easy, and fairly self-explanatory. But now that spring is (nearly) here, I have been itching to add some color to my wardrobe. And because shopping isn’t easy when you feel gigantic, I settle for adding some color to my accessories instead. And speaking of feeling gigantic – this is what I’m talking about. Okay, back to jewelry, though. You only need a few things to make up chandelier earrings: Beads you love – and disc beads like these work beautifully. Your chandelier bases will dictate how many beads you need – I only used 16 (leaving me a lovely stash for future projects). All you have to do is open your jump rings, add a bead, and attach them to the loops on your bases. When you’re done, just attach an earring wire to each base. It was more difficult trying to get a proper photo while is was raining buckets outside than actually making these beauties. (You’re looking for the raindrops, aren’t you?
How to Make 3D Paper Diamonds Well, this is really something that all crafty hands would like to do! 3D Paper Diamonds we have discovered on this creative, British website called “minieco.co.uk”. Kate, the designer of all those cool, paper stuff, provides a printable template for this geometric jewel shape. It can be used either as a garland, toy, or as a wonderful gift box for jewellery. Since I have got Minecraft fans at home, I am pretty sure, Simon and Dorian will take up this project soon. They say blue diamonds are the most precious to dig out while playing. I assume, this particular paper craft will suit your taste, and you would want to start as soon as possible. For the full tutorial and template of 3D Paper Diamonds, click the link. Tools: ScissorsNeedleRuler Supplies / ingredients: A4 sheet of paperGlue-stickPrintable template
Make Your Own Ear Cuffs | Savvy Practicality Lately, we’ve been making ear wraps or earring cuffs here at SavvyPracticality. You can easily make your own earrings that wrap around your ear using beading wire and chain nose pliers. Watch the video below to see how we transform a length of wire into a fun and flirty fashion accessory. [suffusion-widgets id='3'] To make your own DIY ear cuff you will need 20 or 24 gauge jewelry or beading wire, seed beads and a jewelry pliers kit which includes chain nose, round nose and side cutting pliers. These products can be purchased in the jewelry craft section of any store. Hogwarts Double-Knitted Bookscarves © Ann Kingstone SuppliesSmall amount of 4ply/sock yarn in the two colours of the relevant house as follows:• Gryffindor - Red and Gold• Hufflepuff - Yellow and Black• Ravenclaw – Blue and Bronze• Slytherin – Green and SilverUS/0 (2.00 mm) needlesYarn needle ChartsClick on the thumbnail for a full-sized picture. InstructionsCast onMake 18 sts in each of the two colours for the bookscarf (36 sts total), alternating the colours with every stitch. Any two-colour cast-on will do. First rowSlip the first stitch knit-wise, then alternate knit then purl stitches as when working a (k1,p1) rib, but work all the knit stitches with one colour and all the purl stitches with the other until the last stitch. Always take both yarns back before working a knit stitch, and bring both yarns forward before working a purl stitch. Purl the last stitch with both colours held together. Second and subsequent rowsSlip the first, double-stranded, stitch knit-wise. Purl the last stitch with both strands held together.
96 Great Homemade Gift in a Jar Recipes How to make homemade gift in a jar recipes which are easy and cheap gifts to make! These gifts in a jar include pictured tutorials on how to make pies, cookies, and cakes in a jar recipe as well as homemade mixes in a jar like soup, sugar scrubs and other mason jar gifts. To make these homemade gifts in a jar simply layer the ingredients per the recipe, add a ribbon and cute tag for a practical and stylish gift. These jar gifts are also perfect gift-giving ideas for any occasion throughout the year. Here are amazing homemade gifts in a jar complete with recipes and lots of pictures so you can make them at home for your friends and family. Gift in a Jar 1. 2. 4. 5. 6. 7. 8. 9. 10. 11. 12. Spa In A Jar 13. 14. 17. 19. 20. 22. 26. 29. Pies In A Jar 30. 31. 32. 33. 35. 37. 38. Cakes In A Jar Recipe 39. 40. 41. 42. 43. 44. 45. 46. Cookie Mix in a Jar 48. 49. 50. 52. 54. Jar Soup Recipes 57. 59. Homemade Mixes In A Jar 61. 63.
DIY | DIY Steel & Ombre Ring Hey everyone! I have a quick tutorial up over at For the Makers today on how to make a ring from dark annealed steel wire from the hardware store (3!) DIY Wood Jewelry Holder I love junk wood. Months ago when I was having some fun with dimensional paint for the Martha Stewart craft article, I experimented with a dot stippling method that could make some interesting designs. So all you need for this project is a an old piece of wood, 3-dimensional paint, and some hooks to screw into your wood, and a little elbow grease to screw them in. It’s a Great Day For… It’s a cool rainy day here, one that calls for some indoor cozy activities – like embroidery. (Pattern from the September For the Makers box. Also, with the weather change, it seems to have brought out some big spiders around our house. Is the weather changing where you are? Consider the Birds I picked up this Blue Jay feather the other day. Guest Post: DIY Earrings from Paint For the Makers April Box For the Makers
Origami Butterfly by Akira Yoshizawa - tutorial Today is the 101st birthday of Akira Yoshizawa, the great origami master and the father of the modern origami. You have probably noticed that Google marked the occasion with a special origami doodle created by Robert Lang! Why not celebrate the event by making your own origami butterfly?! Here is a step-by-step tutorial for a 3-d variation of a classic butterfly by Akira Yoshizawa (first spotted on Nick Robinson’s blog), enjoy! UPD. Tags: Akira Yoshizawa, Animals {Tutoriel} Fabriquer ses Bracelets Shamballa Exprimez votre personnalité en fabriquant l’accessoire incontournable du moment: Les Bracelets Shamballa Les Fournitures qu’il vous faut: - 30 cm de fil de nylon noir - 150 cm de fil de nylon rose - 1 Perle à strass Fuchsia 12 mm - 2 Perles nacrées Gris Anthracite 12 mm - 2 Perles en verre Noires 8 mm - 2 Perles en verres à Facettes Noires 8 mm - 2 Perles en verre Givrées Roses 6 mm Première étape: Préparer le fil du milieu - Enfiler toutes les perles sur le fil de 30 cm (noir) dans l’ordre final souhaité. Deuxième étape: Apprendre à faire les nœuds Astuce: Vous ne savez plus si vous venez de commencer par le fil de gauche ou de droite ? Variante: Vous pouvez faire un bracelet torsadé en commençant toujours par le même fil pour le tressage. Troisième étape: Tresser le bracelet - Pour insérer une perle dans les nœuds, on remonte la perle jusqu’au dernier nœud et on refait un nœud juste en dessous Tous le matériel est disponible sur La Mercerie de Moumy: