
Layer Masks GIMP Tutorial - Layer Masks (text & images) by Pat David is licensed under a Creative Commons Attribution-ShareAlike 3.0 Unported License. Intention Layer masks are a fundamental tool in image manipulations. They allow you to selectively modify the opacity (transparency) of the layer they belong to. This modification of a layer’s transparency through a mask is non-destructive to the layer itself. This flexibility to define the opacity of different areas of a layer is the basis for more interesting image manipulation techniques such as selective coloring and luminosity masking. Adding a Mask to a Layer Layer masks need to be added to a layer before they can be used. For this example I will use a simple image with only two layers, as shown above. Right-Click on the layer you want to add a mask to (the “Teal” layer in my example), and the Context menu will show an option to Add Layer Mask…: You can also add a layer mask through the menus: There are many options for initializing the Layer Mask.
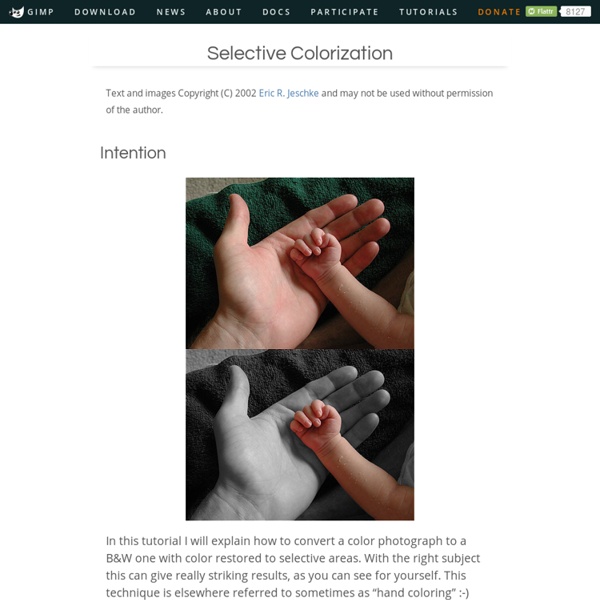
Converting Color Images to B&W Text and images Copyright (C) 2002 Eric R. Jeschke and may not be used without permission of the author. Intention In this tutorial I'll show you some different ways to convert color RGB images to B&W: We'll examine each of these in turn. The Procedure Here is an example image, loaded into GIMP. Via Grayscale Here is what I get if I use the standard mode change to grayscale from RGB. Duplicate the original image (Ctrl+D) and right-click on the copy. I suspect GIMP uses a similar formula. Via Desaturate Here is what I get if I use desaturate instead. The result is visually different; note the increased contrast in the scales. Via Decompose RGB A third method is to consider the red/green/blue channels of the image. Here you can see the three channels: red (top), green (middle) and blue (bottom). Very often the green channel contains an excellent B&W version of the image. Via Decompose HSV Via Decompose LAB Yet another decompose option: LAB mode. Via Decompose CMYK Via Channel Mixer Tips Other Examples
Angelina Jolie As A Na'vi From Avatar So by now you have seen a ton of people spit out photomanipulations of themselves as a Na'vi character. Some have been very well done... while others... could use a little guidance. Well it has been requested that I provide a thorough tutorial on how to turn someone into a more realistic looking Na'vi. Hopefully the information I provide will encourage some to go back and re-work their Na'vi'ed selves, or maybe inspire those of you who haven't made one yet... to hop on the bandwagon! I must warn you: this is a VERY advanced tutorial. I do go through every stepâ? First make sure you have the tools you need! A GOOD picture! Index Prep Eyes Eye Brows Skin Color Nose Shape Pupil Size Pupils Color Lips Nose Tip Face Eye Brows (Na'vi Style) Face Stripes Glow Dots Body Neck Background Ears Hair Prep Install the brush. Open Photoshop. Go to File>Open and locate your file. If you are experienced with Photoshop, I recommend a very large image with a resolution of 300 pixels per inch.
Picasa » GeeksOnTour.TV | GeeksOnTour.TV Free Videos: The 5 tutorial videos listed below are free for anyone to watch. To view the rest, we have 96 total, you need to be a member. You can join here. Beginner’s Guide to Picasa, eBook or Print with 27 Videos We’ve divided the Picasa Videos into five categories. From the Camera, to your computer, to the Web – Picasa handles it all. Then, below, are a list of *all* our Picasa Lessons. Picasa Reducing CCD Noise Text and images Copyright (C) 2002 Eric R. Jeschke and may not be used without permission of the author. Intention Images captured by a CCD or CMOS imaging chip will often have some noise present. If you find it necessary to shoot with a higher ISO and you find that you have an unpleasant amount of noise in your image, this tutorial will help you improve the image. The Procedure One procedure that works reasonably well is to apply the Despeckle filter. Step 1 Here is the original image. Step 2 Right-click in the image and select <Image> Filters -> Enhance -> Despeckle. Examine the resulting image, zooming in to examine shadow areas. Unfortunately, you may also notice that the image is softer; the despeckle filter actually blurs the image. Step 3 For best results, especially with a noisy image, you'll want to use smart sharpening, explained elsewhere on this site. Step 4 Zoomed out (upper left). Tips and Suggestions Other Examples Further Reading on Reducing CCD Noise
Severed Arm in Photoshop Bummer! Picasa’s Creative Kit is Gone If you click on the button in Picasa to ‘Edit in Creative Kit’, today this is what you’ll see: What was Creative Kit? If you don’t know what Creative Kit was, here are some articles I wrote about the useful tools in Creative Kit that do not exist in Picasa3 proper. Picasa Tip: Speech Bubble on Your Pictures (put text into a speech bubble right on your picture – using Creative Kit)Picasa Tip: Merry Christmas Photo! What is the Replacement? If you have joined Google+, there is a new Edit button when you’re looking at a single photo. Are there other Options? The Creative Kit button began as a plugin to the Picnik photo editing website that Google bought a few years ago. Picmonkey.com has it’s own look and feel, but seems to include all the features you could possibly want for editing, enhancing, and embellishing your pictures. Why did Google Make this Change? We REALLY don’t know! All comments are welcome! p.s.
CCD Noise removal - Noise removal with selective Gaussian blur Text and images Copyright (C) 2002 Atte André Jensen and may not be used without permission of the author. Intention Digital cameras often have quite some noise in their pictures. Some are worse than others, but it's there. Here I'll show you a way to get rid of that noise using the selective Gaussian blur filter. The basic idea behind selective Gaussian blur is that areas in the photo with contrast below a certain threshold gets blurred. Step 1 Since the selective Gaussian blur filter doesn't have a preview and is quite heavy to compute (proportional with blur radius), it's easier to only work on a cropped version of you picture. For best results, this should a part where there's some noise you want to remove and some detail you want to preserve. Step 2 The next thing is to experiment with different combinations of the settings ("blur radius" and "maximum delta") in the selective Gaussian blur filter. The result First image: Before. Files
Avatar Photoshop Tutorial Author: Sanja Soltic Freelance web designer and web programmer (PHP). Avatar's main character Jake Sully, paraplegic war veteran, is brought to another planet called Pandora. Pandora is inhabited by a primitive race called the Na'vi, and Jake is sent in to learn their ways so that he can help relocate them in order for humans to take over their resources. 3D computer graphic adventure Avatar is the most expensive film in history, it took $500 million and 10 years to make. With this tutorial you can easily transform yourself into a Na'vi. Step 1 - Creating Na'vi's nose Import a photograph of your choice, just make sure that size is relatively large. First you need to duplicate background layer. This is one of the most important steps. After you fix the nose you have to raise the eyebrows. Step 2 After first step, duplicate layer. Step 3 – Cleaning eyebrows and enlarging eyes Use Clone Stamp Tool to remove the excess of the eyebrows. Step 4 – Na'vi's Skin color Step 6 – Levels Step 8 Step 9 – Ears