
Launcher - Document Download – TeacherGeek Make It Your Own: The documents for this activity are available in PDF and Microsoft Word format. If you wish to edit a document, simply download the Microsoft Word format. Download the Out of the Classroom Version This document has everything you need to do the Ping-Pong Ball Launcher Activity "Just for Fun". Start by building the example Launcher, then go straight into the Design & Engineering Challenges to make it your own unique design. Looking for something with a little more classroom clout? All-in-One - PDFAll-in-One - Editable Word Document Download the Build Guide This brief Build Guide will help you get started designing and engineering your own unique launcher. Build Guide - PDFBuild Guide - Editable Word Document Download the TeacherGeek Engineering Notebook Available at two different learning levels, the TeacherGeek Engineering Notebook is designed to help students cycle thru the Design & Engineering Process and help them innovate and invent new designs. Other useful resources:
geda:gsch2pcb_tutorial [gEDA Project Wiki] Translations of this page are also available in the following languages: Русский. This is a tutorial on the process of using gsch2pcb as an interface between gschem and PCB. It assumes the gEDA, PCB and gsch2pcb packages are already installed and ready to use. Starting with gEDA 20030901, gsch2pcb is packaged with gEDA and doesn't need to be separately installed. This tutorial is functional and intended to generate results as quickly as possible. The goal is to use gsch2pcb as the bridge between gschem and PCB so that the schematics can always be in sync with the PCB layout because all element additions or deletions in the layout will automatically be driven by changes in the schematics. See the release notes for the history of this tutorial. Terminology With gschem, you add symbols representing electronic components to a schematic. The schematic footprint attribute value of a symbol is the name of the PCB element to be placed on the layout for that instance of the symbol. Setup to:
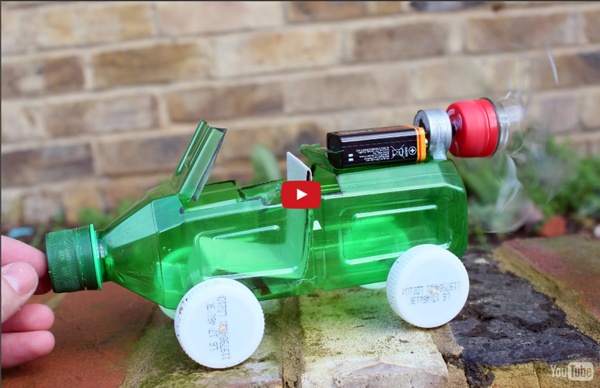
Student Media Examples » showcasing student digital work! Wiggle-Bots - Doodling, Scribbling, Drawing, Racing Bots – TeacherGeek Wiggle-Bots are motorized contraptions that are designed and built by kids. Wiggle-Bots are much more than "a lot of fun". They inspire. Watch eyes widen as wires are connected and Wiggle-Bots start to move. See how understanding and design evolves through experimentation and tinkering. Appreciate the challenge of going beyond step by step instructions and creating something completely new and innovative. Make it Scribble: Create a marker-holding Wiggle-Bot that draws crazy and fun patterns on a sheet of paper. Race it: Create a Wiggle-Bot that can get somewhere in a hurry. Hack It: You can use Wiggle-Bot components to make your own inventions. Print It: Wiggle-Bots play well with 3-D printers. Everyone loves to wiggle! This is a real engineering project (not a toy). If you would like to do this activity "Just for Fun", download the "Out of the Classroom Version" to get building quick (an all-in-one document, without the labs). Download the Fun Build Guide Download the Overview
Getting Started With PCB Table of Contents This document is a manual for PCB, the interactive printed circuit board layout system. 1 Introduction PCB includes a stand-alone program (called pcb) which allows users to create, edit, and process layouts for printed circuit boards, as well as a library of footprint definitions for commonly needed elements. While originally written for the Atari, and later rewritten for Unix-like environments, it has been ported to other operating systems, such as Linux, MacOS/X, and Windows. While PCB can be used on its own, by adding elements and traces manually, it works best in conjunction with a schematic editor such as gschem from the gEDA project, as gschem will create a netlist, make sure all the elements are correct, etc. The file in which pcb stores its data ends in .pcb such as myboard.pcb. There are a couple of different outputs from pcb. 2 Terminology There is some variation in terminology used by EDA packages. action annulusannular ring aperture arc attribute Varied meanings. mil
Digital Storytelling Project Examples - iPad Multimedia Tools App Smashing! Using multiple apps to create stories! Book Trailers by using middle schoolers using Puppet Pals, Toontastic, iMovie, and more! Talking Book Characters by middle schoolers using FaceJack, Tellagami, PhotoSpeak and more! ChatterPix Kids: The Angels Speak! Talking Snowmen - combination of snowmen created in the Drawing Pad app with animation added with ChatterPix, by 2nd graders Write About This: 30 Hands: Explain Everything: All about Bats - kindergarten drawings using the Hello Crayon app, narration added with Explain Everything. At the Pumpkin Patch - kindergarten drawings using the Hello Crayon app, narration added with Explain Everything. Adobe Voice: Public Service Announcements on Technology and Self Control - by 6th graders
Sensational Straws - 10 Sensory Ideas - Special-ism Random national observances can provide great inspiration for sensory diet fun. Take National Drinking Straw Day, for instance. This little-known observance was celebrated on January 3 in honor of the invention and patenting of the paper drinking straw by Marvin C. Stone in 1888. However, fabulous sensory fun can be had with drinking straws all year round. Today’s Challenge: Drinking Straws Original Purpose: Sucking up liquids With Sensory Savvy Lenses: Inexpensive for auditory, fine motor, oral motor, proprioceptive and visual input. What can YOU and your child with sensory challenges do with straws? Build a Straw Structure Cut straws into 24 inch pieces. Make Some Blow Art Drop several different colored drops of food coloring or paint onto a sheet of paper. Meet the Mini Marshmallow Challenge Solo, as a team, or in competition with others, try to transfer a bag of mini marshmallows from a tabletop to a cup by touching them only with a single drinking straw.
Arduino UNO Tutorial 6 - Rotary Encoder Arduino UNO Tutorial 6 - Rotary Encoder We have written a tutorial for Rotary Encoders using a Microchip microcontroller but now would be a good time to make an Arduino UNO version. With a rotary encoder we have two square wave outputs (A and B) which are 90 degrees out of phase with each other. The number of pulses or steps generated per complete turn varies. The Sparkfun Rotary Encoder has 12 steps but others may have more or less. The diagram below shows how the phases A and B relate to each other when the encoder is turned clockwise or counter clockwise. Every time the A signal pulse goes from positive to zero, we read the value of the B pulse. We will now use the rotary encoder in the simplest of applications, we will use it to control the brightness of an led by altering a pwm signal. We will use the sparkfun encoder as discussed above. Each time our timer code triggers, we compare the value of our A pulse with its previous value. The schematic is shown below
6 Best Education Videos to Make for Your Classroom Videos are a great way to bring vibrancy into the classroom! For teachers, a video shares content in a powerful and engaging way. For students, a video encourages interaction with academic material by hand-picking images, video, music and text. Here are 6 videos you can quickly and easily integrate into your curriculum: Video Technology for Teachers Introduce yourself — You’ll look more approachable when you use video instead of the standard introduction speech. Video Technology for Students Book trailer — If you’re an English teacher, this is definitely one of the coolest projects out there. Learn more about how to create a fun and engaging education video with just a few photos and a few minutes. DIY Google Cardboard with Homemade Lens in 30 Minutes! From our STAR Maker: Rodolfo S, Jr The Google Cardboard is one of the most easiest ways to experience Virtual Reality at home. Using this tutorial, you will be able to make one for yourself at ZERO cost if you have some: cardboard, clear plastic and magnets in your home. What are the stuff required to do this project? Google Cardboard templatesScissorsExacto knife (stencil cutter)GlueQuick dry EpoxyClear plastic bottle made of PET (Polyethylene Terephthalate), an example.Syringe with needleVelcro or rubber bandGlue stick and glue gunNeodymium magnet (optional for older iPhones)Smartphone (iOS / Android) How does it work? In this tutorial, we will be first making the homemade lens for the DIY Google Cardboard or VR Headset. Here, we will be making a Biconvex lens using clear plastic bottles and some water. STEP 1: Making our Biconvex Lens for our DIY Google Cardboard So lets start first with the lens, then followed by the cardboard VR enclosure. 2. 4. 5. 6. 8. 1. 3. 4.