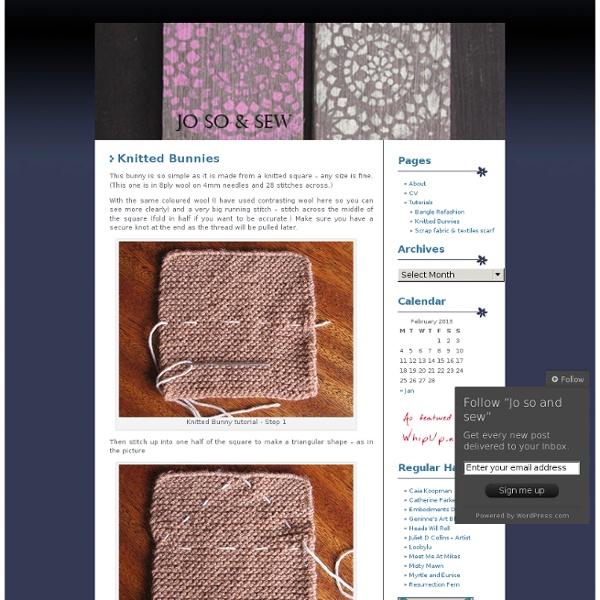
Virka en enkel sjal | Malin Bohm
Jag har länge lovat er det här mönstret och nu har jag fått tummen ur och fotat processen. Jag är väldigt dålig på att läsa virk-/stickbeskrivningar, det är något i min hjärna som inte kan koppla texten till handen. Så det är därför lite svårt att skriva en virkbeskrivning, men, jag har gjort mitt bästa för att skriva en, på mitt eget vis. Om ni inte förstår så hojta till, så ska jag försöka beskriva bättre… Du behöver: Garn av trevlig kvalitet, förslagsvis ullgarn. Förkortningar: lm = luftmaskor st= stolpar 1. 2. (Arbetet ligger här åt fel håll, egentligen så virkar jag från höger till vänster) 3. 4. 5. Efter ett tag kommer ni börja se ett mönster. Detta mönster kan varieras. VARNING! Sorry, this description is only in Swedish.
Double Knitting - Knitting Community
Double knitting is the exception to many knitting rules. You can double knit a stockinette scarf, and it will lay flat instead of curling. Color knitting will be reversible, showing a negative of the image on the back of the work instead of floats. How is this possible? Cast on Cast on with double the number of stitches The cabled cast on is great for double knitting because it creates a flexible edge. Cast on with yarn held double You could also use the cast on of your choice, but with the yarn held double. How to Double Knit Single color double knitting instructions This is the easiest way to do double knitting Cast on an even number of stitches *Knit 1, slip 1 purlwise with yarn in front, repeat from * across the row Repeat stitch pattern on each row Bind off (using any method) Double knitting with one color in the front and one color in the back Bring both yarns to the front and purl the next stitch with only the contrast color Repeat these two stitches across the row
Pipe Fox Tutorial by ~rallamajoop on deviantART
Vintage Fan Ripple Stitch Pattern pattern by Janis Cortese
This pattern came about as a result of this thread, which I figured out from the photo linked in the first post. It would make a great afghan in DK-or-heavier yarn, and this sample that I’m working up in fingering is going to be a nice scarf. Done widthways, it’d be a nice stole. The sample piece in the photos is 10.5” (eight fans) wide. Six fans would be ideal for a scarf. It was done with a size E hook and KP Stroll Tonal in Foliage. UPDATE: I’m defining a trtr as a 4-tuple stitch here. BTW, if you’d like to sell items made from this pattern, that’s fine by me, but I’d rather you didn’t sell the pattern. Commenter superlucypop linked to the following video in the comments for this pattern as well, which people may find useful.
Clothesline Knitting or Filled I-cord - KNITTING
Recently I thought about how to make low-priced purse handles. I wanted to make them from the same yarn that I will use for my purse but I didn’t want to have a simple I-cord because I’m always knitting very loose and the cord gets much to flexible for a purse handle. Then I thought about 'Clothesline Crochet' (see my blog entry) and thought that this must be possible with knitting, too.It is ;-)) That’s what you do:I choose a thick ready-made cord to cover with knitting.The number of stitches to cast-on depends on the size of the cord, the yarn and the needles (try it!) So, cast-on the stitches, lay the inner cord in (see photo) and knit the first stitch over the inner cord.The inner cord will be trapped in the stitch. Then knit simply the rest of the stitches, lay the inner cord a little beside (see photo). This is a copy of my blog entry 'Clothesline Knitting or Filled I-cord'
Recycled Glove How-to: Make a Chipmunk Softie
Gloves (like socks), while born to be part of a pair, often end their days in lonely solitude, separated from their mates by the forces of the universe that conspire at every turn to pull them apart. Alone, they sadly serve little purpose (aside from the occasional show biz appearance for only the most sparkling among them), and are left to languish in the backs of a drawers and bottoms of closets — that is, if they’re not disposed of all together. Ah… but it’s a new day. Thanks to the Penguin Group for sharing this project from Happy Gloves. Author Miyako Kanamori is a crafter who lives in Tokyo. For more cute critters made from recycled materials, search “Recycled Softie“.
the heartfelt company: Bubbly crochet edging
Today as promised the edging of the lappity lap blanket. I have given it the name bubbly edging. I bought it at an Etsy shop; Be warned, I`ve spend many hours there looking at al the lovely craft books before I decided which books I would order. and there is a sale until the 5th of july. So hoppity hop to both shops for the book and the yarn. 1. 8 ch (chain) 1. 8 Losse 2. Don`t finish the tr/dc leave one loop on the hook, ( there are 2 loops on your hook). 2. Maak het stokje niet af maar laat 1 lus op de haak (je hebt nu 2 lussen op je haak). 3. (3 tr/dc total). 3. (3 stokjes in totaal). Pull the yarn through the 4 loops. Haal het garen door de 4 lussen. 4. 4 ch, repeat from 2 but go back 4 stiches. 4. 4 losse, herhaal vanaf 2 maar ga nu 4 steken terug. 5. 5. 6. 5 ch, close with a slip stitch. 6. 5 Losse, sluit met een halve vaste. Good luck and have fun.
Knot Just Knitting - freeform knitting & crochet by Prudence Mapstone
2010 guest blogger series: make a bale of turtles with Jodie
September/October brings change of season, and fresh starts and frivolity and seriousness too. So for a break from whipup realtime I am introducing a few weeks of guest bloggers to liven up your crafty experience. To bring you something fresh, and hopefully invigorate you to make and do and be and think! Its going to be a fun few weeks so come along for the ride. Today I want to introduce you to Jodie from vintage ricrac . My name is Jodie and I blog at www.vintagericrac.blogspot.com where I make toys and not-toys. Hi, I’m Jodie. Apart from the crazy need to dream up little back-stories to all sorts of inanimate objects, especially toys, I also love the crazy terms given to a group of things. These teeny turtles have been haunting my blog for a very long time. Pattern Pieces For Party Turtles Tagged as: softies , toys , tutorials
290 Basket Weave Crochet Dishcloth
MONDAY OCTOBER 17, 2011 Follow me onto #291 & the rest of the story… Basket Weave Dishcloth Original Design By: Maggie Weldon Copyright 2011 Maggie Weldon Skill: Easy Size: About 7” wide and 9” long. Special Stitches Front Post Raised Double Crochet: (FPdc): YO, insert hook in front of work from right to left around next dc of previous row, YO, pull up a lp, (YO, pull through 2 lps) twice. DISHCLOTH Row 1: (Right Side) Starting at bottom, with A, ch 26, dc in 4th ch from hook (skipped ch count as first dc), [dc in next ch) across. (24 dc) Rows 2-3: Ch 3 (counts as first dc now and throughout), turn, FPdc in next 3 dc, BPdc in next 4 dc, [FPdc in next 4 dc, BPdc in next 4 dc] across. (24 dc) Rows 4-5: Ch 3, turn, BPdc in next 3 dc, FPdc in next 4 dc, [BPdc in next 4 dc, FPdc in next 4 dc] across. (24 dc) Rows 6-17: Rep Rows 2-5. All Rights Reserved ©2011 Maggie Weldon Enjoy, Maggie