
DIY Leather Friendship Bracelets. I was so excited to share these DIY Leather Friendship Bracelets with you.

They are so quick to make and look amazing stacked with other friendship bracelets, chain bracelets, you name it! You can never have enough friends, or friendship bracelets for that matter. Make This - Beaded Rings - Luxe DIY - How Did You Make This? These rings are pretty, surprisingly quick to make, and a great way to learn peyote beadwork stitch if you’ve never tried it before.
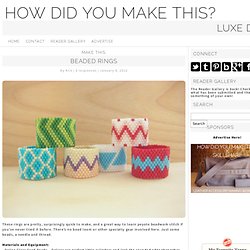
There’s no bead loom or other specialty gear involved here. Just some beads, a needle and thread. Materials and Equipment: - Delica Glass Seed Beads – Delicas are perfect little cylinders and lack the rounded edge that other kinds of seed beads have. You can use any size 11 or smaller seed bead for this, but I like the Delicas for the crisp finish they give. - Beading Needles – My all time favorites are John James size 12 needles. If you’re working at a table you’re good to just pour out beads like this, but if you’re working on a lap tray it’s wise to keep your beads in some small, shallow bowls or a similar container. I use my thread doubled, so I cut a moderately long strand, thread the needle, then even up the ends. Temporarily use one of your beads as a “knot.”
String the first row of beads by color. Now you need to turn for the next row. DIY Micro Macrame Rhinestone Bracelet. I’m loving working with micro macrame so much that I’ve been coming up with some new designs.
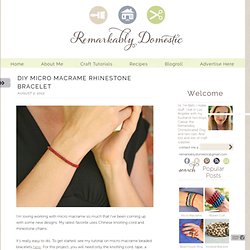
My latest favorite uses Chinese knotting cord and rhinestone chains. It’s really easy to do. To get started, see my tutorial on micro macrame beaded bracelets here. For this project, you will need only the knotting cord, tape, a button, and a length of rhinestone chain (I used a very small stone and cut 3″ of it).
Depending on how big you want your bracelet, you can get larger cord and larger rhinestone chain. Begin the bracelet as you do in my other tutorial, making knots until you’ve reached about 1 1/2″. Once you’ve got a length of knotting, you will start adding your chain. Here’s what your beginning knotting should look like: To add the chain, begin the first part of the square knot, but don’t tighten it. Now, place your chain on top of the bracelet. The trickiest part is tightening this knot.
It’s really not all that hard. Tighten up this completion of the knot. The DIY: FASTEST FRIENDSHIP BRACELET EVER. We were super excited to share the Fishtail Friendship bracelet tutorial with you and we are even more excited to share that we've found an easier way to do it.

Don't get me wrong, I will still use the original technique to create more intricate designs but, this new tutorial is so quick you will end up wanting to make one in every color combination possible (like we did!) This tutorial is very similar to the other one so I will just share with you the differences. 1. DIY Friendship Bracelet. For several months now, we’ve been receiving emails requesting a friendship bracelet DIY.
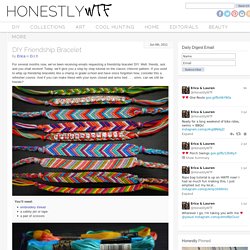
Well, friends, ask and you shall receive! Today, we’ll give you a step by step tutorial on the classic chevron pattern. If you used to whip up friendship bracelets like a champ in grade school and have since forgotten how, consider this a refresher course. And if you can make these with your eyes closed and arms tied . . . umm, can we still be friends? You’ll need:embroidery threada safety pin or tapea pair of scissors Start by cutting several strands of embroidery thread at about 24 inches each. Start on the left side with the outermost color (shown here in red) and make a forward knot by creating a 4-shape over the 2nd color, loop it under and back through the opening. Pull up and to the right to tighten.
Now pick up the outermost color on the right side (show here in red) and make a backward knot, creating a reverse 4-shape over the 2nd color, loop it under and back through the opening. Cross Stitch Bracelet by Wrapped Up In Rainbows. Hi guys!

You are in for a treat today! Since I'm away from the blog for a bit, I've got Laura from Wrapped Up In Rainbows here to share this fun DIY with you today. Hi, I’m Laura and I blog over at Wrapped Up In Rainbows. I am very excited to be guest posting on Erica’s blog today. I know that you are a crafty bunch so I thought I would take you through a little DIY for a unique cross stitch bracelet. DIY Heart Friendship Bracelet. As the month of love approaches, we thought we’d combine friendship and hearts into one Valentine’s Day themed tutorial: a heart patterned friendship bracelet!

Using some candy-colored embroidery floss and your familiarity with the chevron friendship bracelet, you’ll be able to whip up one of these tokens of love in a heartbeat. You’ll need:2 colors of embroidery flossscissorstape or clipboard Creating a heart pattern involves just a simple modification to the chevron patterned friendship bracelet. Start by cutting 4 strands of each color, at about 24 inches each, for a total of 8 strands. Alternate the thread colors before tying them together in a knot. Separate the threads into 2 sets, 2 of each color on each side. Start on the left side with the outermost strand (shown here in red) and make a forward knot by creating a 4-shape over the 2nd strand (shown here in blue), loop it under and back through the opening.
Pull up and to the right to tighten. Mirror the step on the other side. Fun for Kids / heart pattern friendship bracelets.