
My 2AA battery sensor. Don't know if it's too obviuos but I haven't seen many basic designs so I thought I'd share mine.
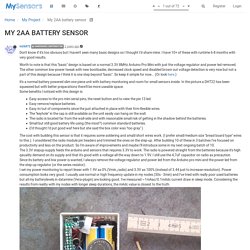
I have 10+ of these with runtime 6-8 months with very good results. Worth to note is that this "basic" design is based on a normal 3.3V 8MHz Arduino Pro Mini with just the voltage regulator and power led removed. The other common low-power tweak with new bootloader, decreased clock speed and disabled brown out voltage detection is very nice but not a part of this design because I think it is one step beyond "basic". So keep it simple for now... (Or look here.) It's a normal battery powered slim one piece unit with battery monitoring and room for small sensors inside. The cost with building this sensor is that it requires some soldering and small/short wires work. More photos of a complete node to be found here below. Main material (note that some links are for >1pcs). Glue the battery holder to the case "bottom".a. Building an Arduino based temperature, humidity and light sensors (Update)
Recently I came across the MySensors project.
This open source project for the Arduino aims to make building sensors and actuators for the internet-of-things easier. It integrates with a variety of home automation systems of which Domoticz is one of them. This project caught my interest as with this I could add sensors and actuators to my domotica system at a fraction of the cost of commercially available sensors. The sensors communicate wirelessly to a gateway and form a mesh network much like z-wave operates. This saves me from having to put wires everywhere and the mesh network will increase range and reliability. 20140613_192959. La domotique [Topic unique] - Page : 41 - Vie pratique. Bon, le matériel arrive au compte-goutte, mais je peux commencer ce week-end mes essais avec mysensors.
![La domotique [Topic unique] - Page : 41 - Vie pratique](http://cdn.pearltrees.com/s/pic/th/domotique-unique-pratique-120271743)
Je vous fais le topo en quelques mots, car tout est largement documenté sur c'est un protocole domotique open-source et open-hardware basé sur Arduino et les chip radio nrf24 qui fonctionnent en 2,4GHz. Le réseau est basé sur une passerelle connectée au serveur domotique. (en ethernet, en port série ou en usb). Les capteurs et actionneurs (les noeuds) peuvent aussi faire office de répéteurs pour mailler le réseau. (Il est alors recommandé d'avoir un nœud alimenté sur secteur). Pour ma part dans un premier temps je mettrai en place des capteurs uniquement. Il faut ensuite programmer l'arduino. Il faut aussi modifier libraries/MySensors/utility/RF24_config.h: Et un peu plus bas dans le meme fichier: Une fois les modifs faites, on enregistre, on compile, et on charge tout çà dans l'arduino.
On peut désormais rajouter des nœuds pour les afficher / les contrôler dans Jeedom. Mysensors - wetware labs. My first contact with home automation came via MySensors, an project that combines Arduino with various sensors and NRF24L01+ wireless 2.4Ghz module.
Lots of example code for both sensors and transmitter relays can be found on their site and thus deploying working prototype was quite straightforward. In just few hours of work I was able to construct simple wireless temperature sensor and it’s counterpart, a relay hub that receives temperature information wirelessly. I first used Dallas DS18B20 temperature sensor, but then decided to swap it to DHT22 that also gathers humidity values. MySensors architecture supports plethora of home automation hubs where you can program the actual rules and behaviour of the system. Hub gathers data from sensors, can react to certain values and conditions and then manipulate lights, switches and other devices in the network. After some research I decided to pursue the first prototype: MySensors - Welcome. Simple Mysensors clock.
It was an idea a year ago to test an idea of simple and smart clock this clock will need no attention because it will be set and synchronized by MySensors support.
The previous version a year ago was running my port to Plain C MySensors 1.3 and able to fit into atmega8 Now it is upgraded to arduino + Mysensors 1.4.1 but for this I had to also upgrade to atmega328p (same as in arduino UNO) (google translated article is here. MySensors Step by step. #include <DigitalIO.h> // This include can be removed when using UIPEthernet module #include <SPI.h> #include <MySensor.h> #include <MyGateway.h> #include <stdarg.h> #include <Ethernet.h> #include <EthernetUdp.h> #define INCLUSION_MODE_TIME 1 // Number of minutes inclusion mode is enabled #define INCLUSION_MODE_PIN 3 // Digital pin used for inclusion mode button #define RADIO_CE_PIN 5 // radio chip enable #define RADIO_SPI_SS_PIN 6 // radio SPI serial select.
Open Emitter: MySensors - Internet of Things Project. We've all heard that the Internet of Things is The Next Big Thing.
I'm not so convinced, particularly when the "standards" are already fractured by big business groups with their own agenda. In any case, I've always been fascinated with the idea of wireless sensors and automating my home. I made an attempt about 20 years ago but the technology wasn't readily available. I've become fond of Arduino for doing microcontroller projects because of the huge base of libraries and code available. Its also incredibly cheap - I recently bought Pro Mini clones for about $2.50 and 2.4 Ghz radios for about $1 each on Ebay. I've used the 433 MHz TI CC1101 radios before using the Panstamps library .
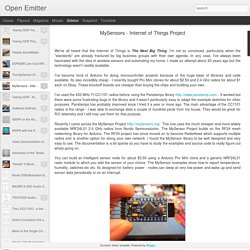
Recently I came across the MySensor Project This one uses the much cheaper and more widely available NRF24L01 2.4 GHz radios from Nordic Semiconductor. Arduino Pro Mini Sensor Node with NRF24L01 radio hand wired to bottom side The controller code currently does the following: