
Pixlrworkshop. An Online Community for Digital Photographers. D-Town TV. Digital Post-Processing. A Photo.net guideJune 2008 Digital photography requires a solid workflow, allowing for professional preparing of digital photo files for the web and print.

For the Digital Photography Workflow series, we consulted with a number of experienced professional photographers who are also stellar photo.net members and frequent contributors to the Photo.net Digital Darkroom forum. Also listed here are a few articles on topics ranging from Advanced Photoshop Tutorials to Digital Technology to Image Retouching to Printing Labs to Digital Photo Projects. Whether you are just entering the world of digital photography and need some tips and advice on how best to post-process your images, or are a seasoned pro, the insights shared here should be helpful with your own digital photography workflow.
Articles Printing Labs Labs: Painless Printing from RAWs Digital Technology RAW, JPEG, and TIFF: what's the difference? Digital Photo Projects Collage: creating digital collages of images in Photoshop Gallery Forums. Expert Photography. Tutorials. 27 Excellent Digital Photography Tutorials. To improve and modify digital photographs is very interesting and a fun part.

Lots of digital photography techniques and tutorials are available on internet, you can create same digital effect in different ways. The best technique to create effect is which take less steps. In this post i have listed 27 excellent digital photography tutorials to help you create different effects and manipulate your digital photographs. I hope you will enjoy these tutorials and don’t forget to mention the tutorial which was an add on in your experience. 1. In this tutorial designer will show you how to create a post apocalyptic manipulation using adjustment layers, vector masks, and some special effects. 2. This tutorial uses a different method than either of CMYK curves adjustment layers. 3.
In this tutorial designer will show you how to spice up a fairly dull and flat photograph. 4. In this tutorial, you will learn how to create a fantasy landscape using some simple and easy techniques. 5. 6. IMO. FREE Resume Creator Online Write and Print Your Resume Instantly. Emurse.com: Resume Builder. Letterpop. Knowledge is Power – Here’s 200 sites that give you power. IBM is offering wide range of certifications for their professionls in which 000-025 exam is helpful for storage manager and implementation while 000-076 is for system sales and 000-081 is for system technical principles professionals.

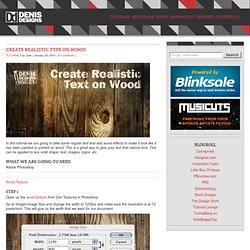
Social Media brings us within arms reach of everything. The most valuable thing out there is simple… Knowledge. Get your learn on… 1: Stack Overflow Collaboratively edited question & answer site knowledge,social,web20,stack+overflow 2: ErrorKey Search engine for Error codes & messages search,knowledge,web20,errorkey 3: internshipIN Brigde two hungry group of people knowledge,social,web20,internshipin 4: Kreeo The World of Knowledge Networking knowledge,networking,web20,kreeo 5: Mahshelf Ready to Read knowledge,share,web20,mahshelf Photoshop Tutorials and Links design,knowledge,web20,psdtuts 7: My Happy Planet Learn a Language. Knowledge,social,web20,my+happy+planet 8: TeachMate Whoever teaches — learns knowledge,social,web20,teachmate 9: Dynamic Periodic Table 10: Defuddle. Create realistic type on wood. In this tutorial we are going to take some regular text and add some effects to make it look like it has been painted or printed on wood.

This is a great way to give your text that natural look. This can be applied to any solid shape, text, images, logos, etc. What we are going to need Adobe Photoshop Wood Texture Step 1 Open up the wood texture from Zen Textures in Photoshop. Go to Image>Image Size and change the width to 1200px and make sure the resolution is at 72 pixels/inch. Step 2 Using the Type Tool (T), create some white text that will roughly fit the width of the document (leaving some space on the edges). Using the Crop Tool (C) crop the top and bottom edges so they have a small margin around the text, about the same amount as the sides or a little more. Step 3. Create realistic type on wood.