
Duct Tape Double: DIY Dressmaker's Form. Rustybobn Makes a DTD (Duct Tape Double) I read about it, and wanted one for a long time.
The whole process just seemed *icky* and I didn't think I'd be able to breath with all that tape on me. In fact, just thinking about it would almost bring on a panic attack. It ain't that bad... Mandatory reading: In fact, it was Neefer's web page that finally gave me the courage to try this thing. My supply list--most of this you will already have or can get cheap/free: A couple of rolls of duct tape (I only needed one, but YMMV). Procedure: Tear many, many strips of duct tape and stick them around the room so that you can grab them as needed.
Don your disposable t-shirt or shopping bags Define the bust by wrapping a strip underneath and then crisscross. Wrap shoulders, then remaining areas horizontally Wrap a second layer vertically Mark your body landmarks--waist, hip, bust points with the Sharpie pen Use the scissors to cut the form at the center back. DIY Sewing Mannequin Tutorial. Draft A Fast & Easy Flounce. I made this velour tunic for my niece this morning.
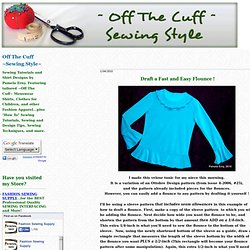
It is a variation of an Ottobre Design pattern (from issue 4-2006, #25), and the pattern already included pieces for the flounces. However, you can easily add a flounce to any pattern by drafting it yourself ! I'll be using a sleeve pattern that includes seam allowances in this example of how to draft a flounce. First, make a copy of the sleeve pattern to which you will be adding the flounce. Next decide how wide you want the flounce to be, and shorten the pattern from the bottom by that amount then ADD on a 1/4-inch. Now take your rectangular piece, and draw lines on it that are about an inch apart, as shown below-- Next, cut along these lines, leaving a "hinge" of uncut paper along the top edge like this-- Place this slashed piece on top of another larger piece of blank paper. Now trace over your newly formed flounce pattern, truing the curves as you go.
Labels: Children's Designs, More Sewing Tutorials. How To Make A Pattern From A Favorite Garment. Resizing A Pattern. Just when I thought I was too busy for anything except complaining about being so busy…I came up with a little tutorial sort of thing!
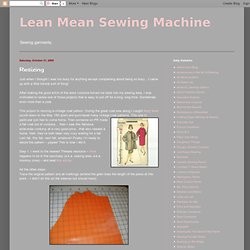
After making the good witch of the west costume forced me back into my sewing area, I was motivated to tackle one of those projects that is easy to put off for a long, long time. Sometimes, even more than a year. This project is resizing a vintage coat pattern. During the great coat sew along I caught Marji fever (scroll down to the May 15th post) and purchased many vintage coat patterns. Tapering Or Widening Pants Pattern. Taper your pants for a custon fit. by Karen Howlandfrom Threads #67, pgs. 24, 26 I need to taper the leg width of a pants pattern that fits well otherwise.
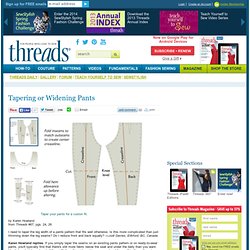
Is this more complicated than just trimming down the leg seams? Do I reduce front and back equally? —Judi Davies, Ellkford, BC, CanadaKaren Howland replies: If you simply taper the seams on an existing pants pattern or on ready-to-wear pants, you'll typically find that there's still more fabric below the seat and under the belly than you want. Start by noting the widths you want at hem and knee levels, then measure the distance from hem to knee line. Unfold and cut both pieces horizontally at the knee. Now, repeat the entire process for the lower-back pattern piece, this time adding 1 in. to the knee and hem widths before dividing by 4. My Pattern Fitting Secrets. I have picked up a handful of fitting hints I should not keep secret!
Sewing should be FUN. That is why we buy and use Lutterloh. Why not master some great ways to fit your patterns? When you think about fitting a garment the first thing to consider is:"what does everything hang off of? " Free Pattern Fitting Series. Leena's.com: PatternMaker Tutorial Web Site. Copyright ©1998-2000 Leena Lähteenmäki, Järvenpää Use PatternMaker ladies' coat/robe macro to draft patterns to this coat.
To download and buy macros, please go to the PatternMaker Website. In the macro there are options for two kinds of hoods, normal and integrated. See picture. Iron interfacing to coat's front and back facings, under collar and pocket flaps. Only vertical coat seams need to be overlocked. Cut a seam at the linings CB and add extra width to the seam, to form a pleat. Sew pocket flaps together along the outer edge right side to right side. Sew pockets to the front pieces.
Sew a rectangle around the pocket mouth line, sewing through all thicknesses. If you need more instructions of how to sew pockets, refer to the. Pattern-making. Everything Fitting. Make An Easy Patttern For Gathered Fabric Items. Alright, as promised here is a "making a gathered pattern tutorial.

" I hope at least someone finds it useful! For the tutorial, the pictures come first, and then the explanation. 1. Draw out what you'd like your bag to look like. I always just use whatever scraps I find on the floor, but you can use a fancy notebook if you'd like! 2. 3. 4.