
Www.sparkfun.com/datasheets/IC/FT232R_v104.pdf. Www.stancor.com/pdfs/Catalog_2006/Pg_025_26.pdf. Linear Regulator (LDO) - Single Channel LDO - UA7805. Www.ti.com/lit/ds/slvs056o/slvs056o.pdf. 00097.jpg (452×247) Atmega168PinMap2.png (600×388) Setting up an Arduino on a breadboard. Overview This tutorial shows you how to build an Arduino compatible breadboard with an Atmel Atmega8/168/328 AVR microcontroller and FTDI FT232 breakout board from SparkFun.
You could also use the Arduino USB Mini. Originally created David A. MellisUpdated from the ITP version by Carlyn MawUpdated October 23, 2008 by Rory Nugent Parts To do this, you'll need: The Supplies Basic Parts for wiring up Arduino A breadboard 22 AWG wire 7805 Voltage regulator 2 LEDs2 220 Ohm resistors 1 10k Ohm resistor 2 10 uF capacitors 16 MHz clock crystal 2 22 pF capacitors small momentary normally open ("off") button, i.e. USB to Serial Communication Board You will need a FT232 USB Breakout board from SparkFun. FT232RL USB to Serial Breakout Board, SKU BOB-0071Arduino Serial USB Board, SKU DEV-08165 If you plan to use the top option and have not yet soldered headers to the breakout board, now would be a good time. Bootloading your Atmega Chips Adding circuitry for a power supply Top Power lines Bottom Power lines.
Eagle Tutorial - Custom Part. Beginning Embedded Electronics - 10. You can dig around the Eagle libraries all you want.

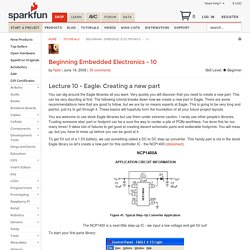
Very quickly you will discover that you need to create a new part. This can be very daunting at first. The following tutorial breaks down how we create a new part in Eagle. There are some recommendations here that are good to follow, but we are by no means experts at Eagle. This is going to be very long and painful, just try to get through it. You are welcome to use stock Eagle libraries but use them under extreme caution. To get 5V out of a 1.5V battery, we use something called a DC to DC step-up converter. The NCP1400 is a neat little step-up IC - we input a low voltage and get 5V out! To start your first parts library: Once the Library Editor is open, hit the Save icon and save your library with your name on it: Click on create a new symbol. Create a red box by clicking on the 'Wire' button: Don't worry about centering the box at this time. Key commands to try out: Add 5 pins to the box: Press F4 and click on a pin.
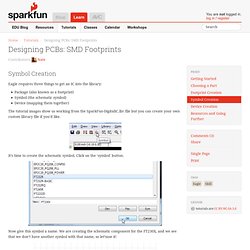
Lucky us! Nifty Whoa! Naming Pins. Designing PCBs: SMD Footprints. Eagle requires three things to get an IC into the library: Package (also known as a footprint)Symbol (the schematic symbol)Device (mapping them together) The tutorial images show us working from the SparkFun-DigitalIC.lbr file but you can create your own custom library file if you’d like.

It’s time to create the schematic symbol. Click on the ‘symbol’ button. Now give this symbol a name. Start by clicking on ‘Wire’ and drawing a square box. Now how many functional pins does the FT230X have? You’ll find the ‘pin’ button on the left menu. Once you’ve are in ‘pin’ mode you’ll get a different menu at the top of the screen. Time to save your work! That is one ugly schematic symbol. I am going to start at the top of the list with VCC and work my way down the datasheet list so that I don’t miss any.
Oh no! The reset pin is named RESET# which is short hand for ‘active low’. A trick in Eagle: if we put a ‘!’ We’ve now got our pins labeled. BoardUno. OSH: Schematics, Reference Design, Board size Arduino / Genuino Uno is open-source hardware!

You can build your own board using the follwing files: Programming The Arduino/Genuino Uno can be programmed with the (Arduino Software (IDE)). Select "Arduino/Genuino Uno from the Tools > Board menu (according to the microcontroller on your board). The ATmega328 on the Arduino/Genuino Uno comes preprogrammed with a bootloader that allows you to upload new code to it without the use of an external hardware programmer.
You can also bypass the bootloader and program the microcontroller through the ICSP (In-Circuit Serial Programming) header using Arduino ISP or similar; see these instructions for details. The ATmega16U2 (or 8U2 in the rev1 and rev2 boards) firmware source code is available in the Arduino repository. Warnings The Arduino/Genuino Uno has a resettable polyfuse that protects your computer's USB ports from shorts and overcurrent. Differences with other boards Power.