
Create This Incredible Surreal Photo Manipulation of a Dancer in Photoshop - Photoshop Tutorials. Learn how to use Photoshop to create this amazing photo manipulation using several clever techniques such as using the Liquify tool to bend twigs and branches.
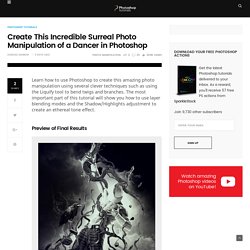
The most important part of this tutorial will show you how to use layer blending modes and the Shadow/Highlights adjustment to create an ethereal tone effect. Preview of Final Results Tutorial Resources Step 1 Create new document (File > New or Ctrl/Cmd+N) Use the Paint Bucket tool (G) and fill with the color #A1A1A1. Step 2 – Add Ground Layers Add the ground layer (GROUND\IMG_6231). Note: Every layer name will have the same number as the ones in the tutorial resources. As you can see, the details of the rock has increased with the Shadow/Highlights adjustment.. Now I will add a layer mask and erase parts of the image that I don’t want. Info: Cienie / Podświetlenie mean Shadow/Highlights (Sorry about that, I use the Polish version of Photoshop) Select the Brush tool (B) then paint with black on your layer mask.
Creating “Surreal Head Stack” Photo Manipulation - Photoshop Tutorials. Photoshop is a great tool to create many forms of art.
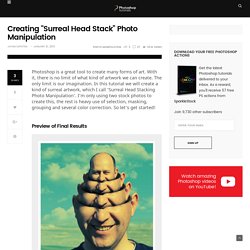
With it, there is no limit of what kind of artwork we can create. The only limit is our imagination. In this tutorial we will create a kind of surreal artwork, which I call ‘Surreal Head Stacking Photo Manipulation’. I’m only using two stock photos to create this, the rest is heavy use of selection, masking, grouping and several color correction. So let’s get started! Giraffe Neck Knot Photoshop Tutorial. How to apply skin texture to the knot shape. Learn how to create realistic giraffe neck knot effect and how to apply spotted skin pattern to the knot shape..

You may get .psd* file of Photoshop tutorial by making a payment . Put the tutorial title in "Add special instructions to seller" line of PayPal and it will be sent to you shortly. Help files: Create a new Photoshop document 550px X 800px, 72pixels/inch resolution. Insert background desert image. I flipped desert image horizontally and cropped the part below. Create a Surreal "Parting of the Sea" Photo Manipulation. Water, by its very nature is difficult to convincingly incorporate into a composition.
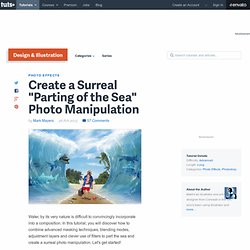
In this tutorial, you will discover how to combine advanced masking techniques, blending modes, adjustment layers and clever use of filters to part the sea and create a surreal photo manipulation. Let's get started! Tutorial Assets You will need the following stock images and brushes to complete this tutorial. Step 1 Set your Background color to # e7f3fe. Step 2 Open the first landscape image and choose Image > Image Rotation > Flip Horizontal.
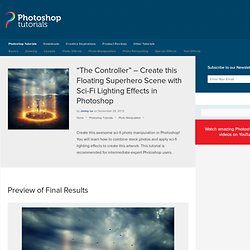
“The Controller” – Create this Floating Superhero Scene with Sci-Fi Lighting Effects in Photoshop. Preview of Final Results Tutorial Resources Man – sunshine114Sky – PhotoxpressBackground – sxc.huExplosion – sxc.huFireball – sxc.huCrack – sxc.huRocks – Creativetuts Step 1 Create a new document and fill it with white.
You can choose the size you want but in this tutorial I choose the width larger than the height. Create an Underwater Scene of a Giant Goldfish in Photoshop. In this tutorial we will create a cool underwater scene with a big fish.
We will use some basic selection tools and adjustments to achieve a great result. Preview of Final Results Download the PSD Big Fish.zip | 99.21 MB Download from Website. Undress a Giraffe in Photoshop. Have you ever wanted to know what a Giraffe looks like without its spots?
If so, this tutorial is for you, you pervert! Today, we will demonstrate how to undress a giraffe by removing its spots. We will then show how to turn its spots into an outfit that will be draped over an ironing board. Pretty cool! Let’s get started! Create a Dark Fantasy Manipulation of a Broken Girl - Photoshop Tutorial. Step 1 Start by creating a new document (Ctrl+N) of 1024 pixels wide and 768 pixels high.
I gave this document's name: broken Step 2 Set the color of the foreground to #365a53 and the background to #7fb4af. Now activate the Gradient Tool on the tool panel. Step 3 Now open the stock picture on the document from which we are going to get the grass texture used to create the field for the image. Step 4 We will scale and place the size of the grass to fit the one as needed. Step 5 Now mask the top part of the grass and then set it to normal blending at 36% opacity. A Photo Manipulator's Guide to Blending. A Photo Manipulator's Guide to BlendingReviewed by Jarka Hrnčárková on Dec 23Rating: Preview of Final Results A Photo Manipulator’s Guide to Blending Blending is the essential skill for every photo manipulator and it’s one of the first things to learn.
Without proper blending your images won´t look believable. Create a living museum in photoshop cs4. Create a living museum in Photoshop CS4 Step 1 Assemble your stock images and brushes.
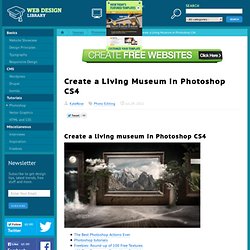
All resources used in this image are from deviantart. Some are available exclusively to deviantart members. Always make sure you have license to use your chosen stock and be sure to give proper credit to the provider. You don't have to use the exact textures and images I used. How to Create an Imaginative, Magical Painted Scene. In this tutorial, we will be using several basic tools and stock images to create a fantasy artwork where everything seems to come alive from what is being painted on an old piece of paper.
Let's get working! Editorial Note: this tutorial is influenced by the work Afterlife by Maciej Mizer. Final Image Preview Take a look at the image we'll be creating. Want access to the full PSD files and downloadable copies of every tutorial, including this one? Preparation Before you start take a look at the images we'll be using: Paper Texture from Bashcorpo, Sky from Neoikeia, Paint Brushes from Nyssi, Tree from WolfC Stock, Stroke Brush Set from FlightOfGrey, Toucan from sxc, Airplane from sxc, and Hand holding brush from sxc. Step 1.