
D.I.Y. Ghee. I love ghee, and am ecstatic that it’s Whole9-approved for the latest version of the Whole30.

Ghee — a traditional Indian preparation of clarified butter — has been one of my go-to fats for high-heat cooking ever since I went Paleo, and I use it to prepare everything from vegetable stir-frys to meaty stews. Yes, it’s cheaper and easier to get your hands on butter, and normally, if you’re okay with small amounts of full-fat dairy from grass-fed cows, more power to you. But if you’re on a Whole30, butter’s out. The solution? The Art Of Cooking Steak. The art of cooking the perfect steak can be intimidating for many, but it doesn’t have to be, because with only a few basic techniques you’re guaranteed to experience great success every time.
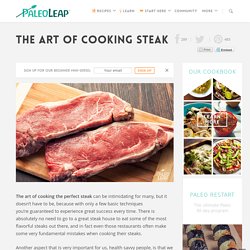
There is absolutely no need to go to a great steak house to eat some of the most flavorful steaks out there, and in fact even those restaurants often make some very fundamental mistakes when cooking their steaks. Another aspect that is very important for us, health savvy people, is that we obtain an end product that is not only tasty, but also health promoting. Tips for Using Julienne Peelers. Look: Zoodles ‘n Meatballs!

This is all thanks to my julienne peeler. It makes me want to make noodles out of every vegetable in my crisper! Yes, I have a mandolin and a food processor but this tool is efficient, compact, inexpensive, and quick to clean. You can have “noodles” on the table in no time flat! Here’s what I gathered to make zucchini noodles for 4 people: 6 zucchiniKosher saltFreshly ground pepper Here’s how I made it: I washed the zucchini… …and cut a thin slice off the bottom of each one so they wouldn’t roll around on the cutting board.
Then, I placed the zucchini flat-side down on the cutting board and went to town with the julienne peeler. UPDATE: A julienne peeler ain’t the only game in town anymore, folks. This thing is pretty darn efficient at cranking out a ton of zoodles in no time flat—and the kids love taking turns with it, too. The Joy of Home Cheesemaking. Perfect Hard Boiled Eggs. Now that we’ve mastered Ghee and Paleo Mayonnaise, let’s move onto another fundamental building block: Hard boiled eggs.

Looks like a simple thing to master, right? But looks can be deceiving. Homemade Coconut Milk Yogurt. 5008StumbleUpon Like many people these days, Babyzilla and I are allergic to dairy, soy and most nuts—each one of the most allergenic foods in the world.

(We are even allergic to goat milk, too!) So, we’ve been looking for a suitable alternative for one of our favorite probiotic-rich foods: Yogurt. Yogurt is a very healthy, mildly fermented food which contains one or more strains of friendly gut bacteria. This fermentation process also improves the nutritional quality of any milk you use (coconut, rice, almond, cow, etc.), resulting in about 20% more protein, and lots of enzymes that can help your digestion. Making your own yogurt is easy, fun, delicious, and cheap—often costing less than 30 cents a cup!
Most people use high-fat, organic coconut milk for this recipe, either in cans or in tetra-paks. Another option is to get coconut milk in Tetra paks or cartons. Be sure NOT to use the coconut milk “beverages” in Tetra paks. Tools Ingredients Directions. Making Coconut Butter. Servings: 1 to 2 cups Time in the Kitchen: 10 to 20 minutes You don’t need a recipe for coconut butter.

After all, coconut butter only contains one ingredient: coconut. And to make coconut butter, you only do one thing: blend. What you do need, are these 10 no-fail tips for making the best coconut butter ever. Tip #1: Buy unsweetened, dried coconut, either shredded or flakes. Tip #2: Both a food processor and a high-powdered blender (like a Vitamix) can make coconut butter.
Pros of using a food processor: It’s easier to make smaller batches in a food processor and you don’t have to scrape the sides down much. Cons of using a food processor: Takes longer and sometimes the butter isn’t quite as smooth. Pros of using a high-powered blender: Takes a shorter amount of time and can result in a smoother butter. Cons of using a high-powered blender: You have to scrape down the sides/push the flakes down more often. Tip #4: Be patient. Tip #8: Cover the jar with a lid and store at room temperature. How To Cook Steaks On Your Stovetop That Taste Better Than in a Fancy Restaurant. Is there anything more satisfying than a perfectly seasoned steak cooked to your exact liking?

For a meat-lover like me, there is not. Unfortunately it can be hard to get that steakhouse taste at home, unless you know a couple of culinary secrets. Here is my tried and true method for cooking steaks.