
Creating Easy Time-Lapse Movies In Lightroom 3.0. Are you looking for a quick and easy way to create time-lapse videos and already own Lightroom 3.0?
Thanks to the hard work of Sean McCormack, your search is over. Being budget minded and already owning Lightroom, I came across Sean’s plugin and was pleasantly surprised at the price tag (free). While the plugin currently does not export to 1080p, only 720p, it makes creating these fun, and often stunning, videos a lot easier than previous methods. What is the genius of this technique? No resizing or need to export RAW files.
What is the downside of this technique? First, for those not acquainted with the technique for shooting time-lapse, let me point you to two posts already covering the subject on DPS. Hautretusche in Lightroom. Exposure vs. Fill Light Sliders. Everything I Know About the Adjustment Brush. FleetingGlimpseImage's Channel Datacolor SpyderCube review. We've been having a look at the new SpyderCube, recently announced at the PMA show.
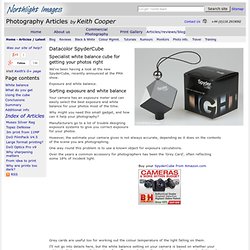
Exposure and white balance. Sorting exposure and white balance Your camera has an exposure meter and can easily select the best exposure and white balance for your photos most of the time. Why might you need this small gadget, and how can it help your photography? Manufacturers go to a lot of trouble designing exposure systems to give you correct exposure for your photos. However, the estimate your camera gives is not always accurate, depending as it does on the contents of the scene you are photographing.
One way round this problem is to use a known object for exposure calculations. Over the years a common accessory for photographers has been the 'Grey Card', often reflecting some 18% of incident light. Grey cards are useful too for working out the colour temperature of the light falling on them. At about 40mm (1.5 inch) per side, the cube is smaller than most cards, and somewhat more rugged. FleetingGlimpseImage's Channel Cropping and Rotating Images in Adobe Lightroom. Cropping and Rotating Images in Adobe Lightroom Even though everything in Lightroom is nondestructive, you aren't limited to just basic tonal corrections and contrast.
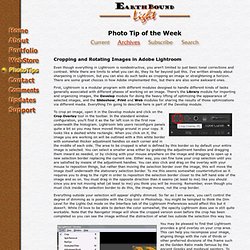
While there are limits to what you can do, they lie far beyond just this. I've written already about sharpening in Lightroom, but you can also do such tasks as cropping an image or straightening a horizon. There are some great choices in how Adobe implemented this, but there are also some awkward ones. First, Lightroom is a modular program with different modules designed to handle different kinds of tasks generally associated with different phases of working on an image. To crop an image, open it in the Develop module and click on the Crop Overlay tool in the toolbar. Everything outside your selection will appear slightly dimmed. Lightroom 3 Noise Reduction. Lightroom 3 Noise Reduction Modern digital cameras have much less of a problem with noise than models sold even a few years ago.
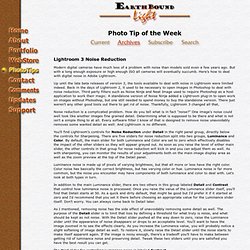
But with a long enough exposure or high enough ISO all cameras will eventually succumb. Here's how to deal with digital noise in Adobe Lightroom. Up until the late beta releases of version 3, the tools available to deal with noise in Lightroom were limited indeed. Video: Using the Adjustment Brush « Digital Daily Dose. I am working on a Lightroom 3 training DVD, which I will be offering for sale, hopefully soon.
The concept is a “Lightroom Workshop on DVD”. It is a series of many videos, several hours long in total, designed for beginning and intermediate Lightroom users. I cover just about everything I teach in my two-day Lightroom Fundamentals workshop. Since it has been a while since I have posted to this blog, I thought I would share with you one video from this series, on how to use Lightroom’s adjustment brush to make local changes to your images. Using the HSL Panel to Work On Individual Colors « Digital Daily Dose. The HSL panel allows you to affect individual colors in your image.
HSL stands for Hue, Saturation, and Luminance. You can use Hue to shift a color towards another color, for example, blue to purple or green. (Yes, you too can have purple skies!) Saturation is the intensity of color, so you can make your blues, for example, more rich or more faded out. Finally, Luminance is brightness. Lens Profile Creator. Digital Negative (DNG) Specification Patent License Adobe is the publisher of the Digital Negative (DNG) Specification describing an image file format for storing camera raw information used in a wide range of hardware and software.
Adobe provides the DNG Specification to the public for the purpose of encouraging implementation of this file format in a compliant manner. This document is a patent license granted by Adobe to individuals and organizations that desire to develop, market, and/or distribute hardware and software that reads and/or writes image files compliant with the DNG Specification. Selective coloring techniques. Share this Episode Please select a language: Autoplay End of Video Show End Screen Default Quality Adjust your embed size below, then copy and paste the embed code above.
Community Translation. Lightroom Presets » Lightroom Presets. Black and white in Lightroom. Learn Lightroom 3 - LR - Converting Images to Black and White. Share this Episode Autoplay End of Video Show End Screen Default Quality Adjust your embed size below, then copy and paste the embed code above.
Sharpening Workflow. Matt Kloskowksi travels the world teaching people how to integrate their photography and Lightroom.
He writes a blog at LightroomKillerTips.com which features tips, tutorials, and weekly content about how to improve your Lightroom workflow. Sharpening is always a hot topic when it comes to working with Lightroom and Photoshop. We have sharpening sliders in the Detail panel in Lightroom and we also have sharpening controls when it comes to printing and even more sharpening in Photoshop. Which ones are you supposed to use and in what order?
Making the Split – Split Toning for the rest of us. Split Toning in Lightroom is quite simply a real-life lesson in simple complexity. The tools is five, simple sliders that together create an effect over an entire image. Split Toning is amazingly simple to use, but using the Split Toning tools effectively can be surprisingly complex. Split Toning can be easily used to quickly and dramatically enhance an image. But care must be taken not to overdo it. At first, Split Toning may seem to be a rather limited tool. Bestest of Friends – Histogram and Tone Curve. It sits in the upper right hand corner of the Library and Develop Modules of Lightroom. Quickie Fix – Exposure. Everyone has encountered shots that have been over or under exposed before. Be it accidental or the result of bracketing, there are always a few less than ideal exposures in any project.
Fixing each of the images can be time consuming, but if you leverage some tricks in Lightroom, you can speed up your workflow drastically. Open up a poorly Exposed image in the Lightroom develop module. Local Adjustments. The original incarnation of Lightroom was an incredible boon to the photographic world, allowing for non-destructive editing of images. Lightroom 2 then expanded upon the idea and added Local Adjustments to the mix, allowing for simple, non-destructive editing of unique portions of a given image. Targeted adjustments in Lightroom. X-Equals - image, workflow, technology, business. A while back we discussed the relationship between the Histogram and the Tone Curve but considering some e-mails and interactions we have had with our readers it seems we should spend a bit of time looking a bit deeper into the Histogram itself.
Learn Lightroom 3 - Remove noise from photos. Share this Episode.