
History. The Monoyama period (1573 - 1614) is the beginning of the kumihimo of today.

It evidenced change in kimono style with the introduction of a very wide ”obi” (sash) that required a narrow cord to hold it in place. The braided ”obijime” was created for this purpose. The style is still worn in Japan today when wearing a kimono is appropriate. Toward the end of the Edo period (1616 - 1867), the takadai, or high braiding stand, developed into its current form, one allowing for more complex, intricate patterns to be created.
Edo (later named Tokyo) became the center for kumihimo. By the time of the Meiji period (1867 - 1912) samurai culture had declined and the wearing of armor was prohibited by law. Despite this, there still is a market for expensive, exclusive hand-braided products, especially for obijime. Microsoft Word - Kumihimo_On_A_Disk.doc - Kumihimo_On_A_Disk.pdf. Maru_Yatsu_Kumi_Disk.pdf. Kumihimo on a Maru Dai.PDF - Kumihimo_on_a_Maru_Dai.pdf. Tutorials > Beaded Chain for Kumihimo Projects. The Silk Standard by Rosalie Neilson. 25+ Different Ways To Make Bracelets With String. Heart Kumihimo Pattern. We will need: 16 strings (13 black and 3 pink) about 20 cm longer than your wrist circumference + some for tying the bracelet.
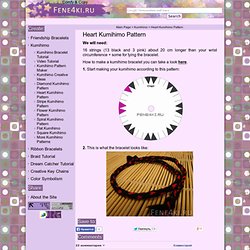
How to make a kumihimo bracelet you can take a look here. 1. Another Mitake-32 - Craft Design Online » Craft Design Online. Japanese Braiding Instructins. There are hundreds of different kumihimo stitches, some simple and some very complex, using different numbers of strands.
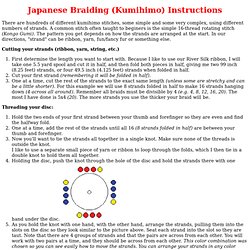
A common stitch often taught to beginers is the simple 16-thread rotating stitch (Kongo Gumi). The pattern you get depends on how the strands are arranged at the start. In our directions, "strand" can be ribbon, yarn, fun/fancy fur or something else. Cutting your strands (ribbon, yarn, string, etc.) First determine the length you want to start with. As you hold the knot with one hand, with the other hand, arrange the strands, pulling them into the slots on the disc so they look similar to the picture above.
Begin your braid. Kumihimo_On_A_Disk. Kumihimo pattern-9 Strand. How to Make a Spiral Kumihimo Braid. Instructions by Michelle Wood, Jewelry-Making Expert, Exclusively for Fire Mountain Gems and Beads® In this style of braid, the numbers change position as the disc is turned in a counter-clockwise direction.

The kumihimo disk has 32 numbered slots and 4 dots indicating North, East, South and West. To determine strand length needed, multiply desired finished length by 3. Example: If you want a 20-inch necklace, you will need 60 inches of cord. Because you are folding four cords in half to make eight cords, you will need to cut four strands 120 inches each. Hold the folded cord end firmly in place on the underside of the disc while setting up the face of the disc. With North at the top of the disc, you are ready to start your braid. Kumihimo%20cord. Happy Endings. Tutorial. [b]In this tutorial I will show you how to make a 4 string Kumihimo Rope (or round braid).
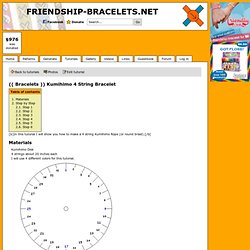
[/b[ Kumihimo Disk 4 strings about 20 inches each I will use 4 different colors for this tutorial. Step 1 Set your strings up so that they are evenly spaced and opposite eachother. In this case at 1, 9, 17 and 25. Step 2 Move your bottom string up (from 17 to 32) Step 3 Move your top string down (from 1 to 17) At this point I usually move the first string from 32 back to 1. Design simple. Kumihimo Tips Galore. Tutorial for Kumihimo Spiral Braid using Satin Cord / Rattail (Rat tail) Cord. Round,flat,flat on round design. Individual post from "Nothing In It" While I was doing my big project earlier this year to braid all of the 16-strand braids in Jacqui Carey's "Creative Kumihimo" I noticed that most of the 8-strand braids in that book were expanded or combined into 16-strand versions, except for 8C.
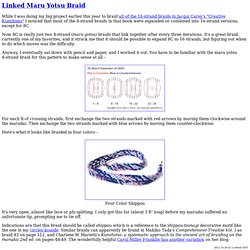
Now 8C is really just two 4-strand (maru yotsu) braids that link together after every three iterations. It's a great braid, currently one of my favorites, and it struck me that it should be possible to expand 8C to 16 strands, but figuring out when to do which moves was the difficulty. Anyway, I eventually sat down with pencil and paper, and I worked it out. You have to be familiar with the maru yotsu 4-strand braid for this pattern to make sense at all - For each X of crossing strands, first exchange the two strands marked with red arrows by moving them clockwise around the marudai. Braids. Kumihimo - Getting Started. Kumihimo is a form of Japanese braiding using various types of stringing material, often combined with beads to make exceptional jewelry.

The term Kumihimo in Japanese means the gathering of threads. This technique involves using different types of looms to achieve different types of braids. The possibilities are endless and can be customized to suit everybody, so find your Kumihimo supplies and get started! When doing Kumihimo you will learn that using a different number of strands, as well as different colors, will change the overall look. Different types of stringing material can also change the look, as well as adding beads to all or some of the strands. In Kumihimo, each thread in one single "slit" is referred to as a warp. Setting Up the Disk.
Videos: How to Braid Beaded Kumihimo and Make a Bracelet.