
Image Pipes. Text and images Copyright (C) 2002 Adrian Likins and may not be used without permission of the author.
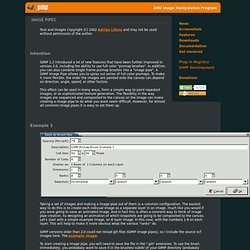
Intention GIMP 1.2 introduced a lot of new features that have been further improved in version 2.0, including the ability to use full color "pixmap brushes". In addition, you can also combine single frame pixmap brushes into a "image pipe". A GIMP Image Pipe allows you to spray out series of full color pixmaps. To make it more flexible, the order the images are painted onto the canvas can depend on direction, angle, speed, or other factors. This effect can be used in many ways, from a simple way to paint repeated images, or as sophisticated texture generation. Example 1. Image Pipes 2. Text and images Copyright (C) 2002 Sam Jones and may not be used without permission of the author.
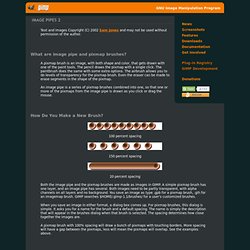
What are image pipe and pixmap brushes? A pixmap brush is an image, with both shape and color, that gets drawn with one of the paint tools. The pencil draws the pixmap with a single click. The paintbrush does the same with some extra options. The airbrush allows you to do levels of transparency for the pixmap brush. An image pipe is a series of pixmap brushes combined into one, so that one or more of the pixmaps from the image pipe is drawn as you click or drag the mouse. How Do You Make a New Brush? 100 percent spacing 150 percent spacing 20 percent spacing Both the image pipe and the pixmap brushes are made as images in GIMP. When you save an image in either format, a dialog box comes up. Golden Text Tutorial. Text and images Copyright (C) 2002 Simon Budig and may not be used without permission of the author.
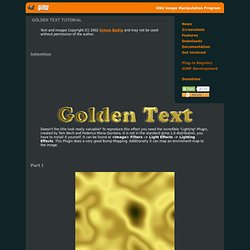
Intention Doesn't the title look really valuable? To reproduce this effect you need the incredible "Lighting"-Plugin, created by Tom Bech and Federico Mena Quintero. Sketch Effect. Text and images Copyright (C) 2004 Vidar Madsen and may not be used without permission of the author.
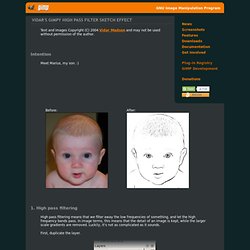
Intention Meet Marius, my son. :) Photo to sketch. Text and images Copyright (C) 2002 Dave Neary and may not be used without permission of the author.
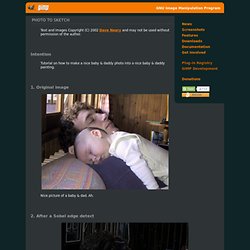
Intention Tutorial on how to make a nice baby & daddy photo into a nice baby & daddy painting. 1. Original image Nice picture of a baby & dad. 2. Straightforward Sobel edge detect (<Image> Filters -> Edge-Detect -> Sobel) of original (don't forget to save a copy of the original) The Sobel edge detect should be done on the background image (without an alpha channel) rather than a copy of the background (which has an alpha channel). 3. Bring out detail with an auto-equalise (<Image> Layer -> Colors -> Auto -> Auto-Equalize) of the sobel edge detect, and convert it to greys using desaturate (<Image> Layer -> Colors -> Desaturate). 4. We only want the strong edges, otherwise it'll look crap.
We set the curve type to free (which allows discontinuities), and then for the bottom 3/4 of the curve (or thereabouts) to 0. Draw A Paint Brush. Text and images Copyright (C) 2002 Tuomas Kuosmanen and may not be used without permission of the author.
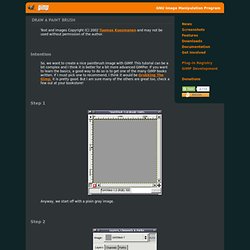
Intention So, we want to create a nice paintbrush image with GIMP. This tutorial can be a bit complex and I think it is better for a bit more advanced GIMPer. If you want to learn the basics, a good way to do so is to get one of the many GIMP books written. If I must pick one to recommend, I think it would be Grokking The Gimp, it is pretty good. Step 1. Creating Icons. Text and images Copyright (C) 2002 Jakub Steiner and may not be used without permission of the author.
Intention Almost every desktop enviroment I've seen has a special application for creating icons, usually a very limited drawing application. In this short tutorial, we'll show you how GIMP (GNU Image Manipulation Program) can help you create icons for your desktop. Before You Begin As with any new task, it will help to have a little background information: Filenames and Structure GIMP enables you to save compressed files and work with them transparently, using the .xcf format. Nautilus (gnome-vfs) can't yet handle compressed GIMP native files Choosing a Color Palette You may think palettes are only necessary in special cases like indexing colors of web images. You may want to consider using a palette that already exists. If you prefer to create your own palette, it's best to just define the most basic colors. Getting Started.
Using GAP. Text and images Copyright (C) 2002 Jakub Steiner and may not be used without permission of the author.
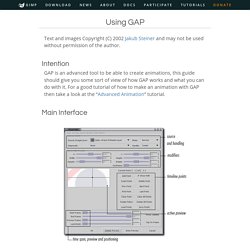
Intention GAP is an advanced tool to be able to create animations, this guide should give you some sort of view of how GAP works and what you can do with it. For a good tutorial of how to make an animation with GAP then take a look at the “Advanced Animation” tutorial. Main Interface Source Image/Layer specifies, which layer you want to animate on top of the current image. Advanced Animations Tutorial. Text and images Copyright (C) 2002 Jakub Steiner and may not be used without permission of the author.
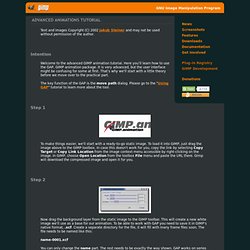
Intention Welcome to the advanced GIMP animation tutorial. Here you'll learn how to use the GAP, GIMP animation package. It is very advanced, but the user interface might be confusing for some at first. That's why we'll start with a little theory before we move over to the practical part. The key function of the GAP is the move path dialog. Step 1 To make things easier, we'll start with a ready-to-go static image. Step 2.