
Sew Good by Deborah Good: Make a Frilled Cushion. Make this lovely rectangular cushion cover, trimmed with a deep frill of contrasting fabric and three big buttons.
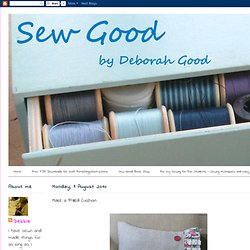
It's a very easy project and suitable for those with just a little experience on the sewing machine. I have used a crisp Irish linen for mine, some new chunky buttons and a pretty printed vintage cotton for the frill. Velcro squares, under the buttons, fasten the cover, but you could make buttonholes if you can. Materials required Cut a piece of main fabric 34cm x 100cm (height x length), and a piece 34cm x 12cm for the facing. From a contrast fabric, for the frill, cut a 60cm x 20cm strip. 3 nice buttons to match. A 6cm length of 2cm wide velcro - hook and loop. A 33cm x 43cm rectangular cushion pad. Step 1. With WS (wrong side) facing turn in one end by 7cm and press. Turn over again by 15cm. Turn the opposite end over by 35cm.
Step 2. Neaten one long edge of the frill facing to prevent fraying, with a ziz-zag or overlocking stitch. Gather to 30cm. Step 3. Step 4. Press. Yarn Along. Freshly Pieced. FREEBIES FOR CRAFTERS. DIY BAG LOVER. Morsbags sociable guerilla bagging. Fashion, Sewing Patterns, Inspiration, Community, and Learning. About.com: Tutorial — Mitered Corners.
Start with a small mitered corner application to gain confidence in making excellent mitered corners every time!
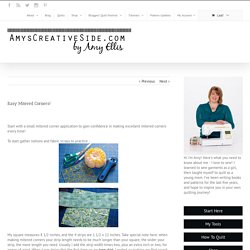
To start gather notions and fabric scraps to practice : My square measures 8 1/2 inches, and the 4 strips are 1 1/2 x 12 inches. Take special note here: when making mitered corners your strip length needs to be much longer than your square, the wider your strip, the more length you need. Usually I add the strip width times two, plus an extra inch or two, for peace of mind. When I was doing this the first time on my tree skirt, I ended up making my first round of border half the width to accommodate the miter — it wasn’t long enough for the width.
On with the instructions: pin your strips, center on your square, on opposite sides Sew with 1/4″ seam — I don’t reinforce my seams at all, it may be helpful to pull out a few stitches when setting the miter. I press open here to cut down on bulk pin and sew opposite sides borders to the square Press open again You should have 4 of these! Amy. Chick chick sewing: Fabric tray tutorial. Few of my blog readers asked me to do a tutorial on my projects that I made so far, so I decided to give it a try today...
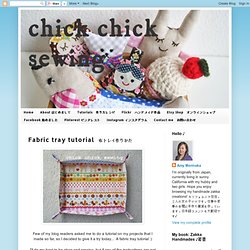
A fabric tray tutorial :) I'll do my best to be clear and precise, but if any of the instructions are not clear enough, just let me know. After all, this is still my second sewing tutorial ever in my whole 40 something life... Ha ha! Okay, here we begin! What you need: One rectangle 10.5″ x 8.5" in main fabric (I used Japanese print) One rectangle 10.5″ x 8.5" in backing fabric (I used linen) One rectangle 10.5″ x 8.5" of your preferred batting (cotton, fleece, etc. Directory of Free Sewing Patterns, Tutorials and Projects.