
SketchUp Pro Case Study: Robertson+WalshDesign. The following is from Brandon Walsh of Robertson+WalshDesign.
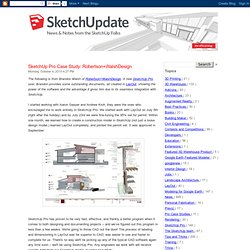
A new SketchUp Pro user, Brandon provides some outstanding documents, all created in LayOut, showing the power of the software and the advantage it gives him due to its seamless integration with SketchUp. I started working with Aaron Gasper and Andrew Kroh; they were the ones who encouraged me to work entirely in SketchUp Pro. We started work with LayOut on July 5th (right after the holiday) and by July 23rd we were fine-tuning the 95% set for permit.
Within one month, we learned how to create a construction model in SketchUp (not just a loose design model,) learned LayOut completely, and printed the permit set. It was approved in September. SketchUp Pro has proven to be very fast, effective, and frankly a better program when it comes to both designing and documenting projects – and we’ve figured out this program in less than a few weeks. Thanks for your enthusiasm, Brandon. Brandon Feltman, SketchUp Sales Team. Architectural Illustration 2d / 3d Hybrid 'Digital Watercolor' Technique by Scott Baumberger – 3D Architectural Visualization Rendering Blog - Ronen Bekerman. Googleearth to Revit 2013.avi. Bim. Tutorial. #1 keep your texture image or file small.
Ever wonder why your rendering keep on crashing or freezes before it could ever complete? The size of the images used for the texture in your model do consume RAM during render, so its best to put your image file small below 500kb should be enough. #2 show only necessary model or polygon before hitting the R button. keep your models and components in layers, and keep em organize so that it wont be a sore for your tired eyes. If you want to produce an exterior render, hide anything that isn't significantly important to be in the scene (ie; interior furniture) #3 keep your model neat and delete any unnecessary components.
. #4 lastly, there is always something that can be done to boost up your sketch up app. If you guys got any other tips you can post it on the comment section below. Compositing V-ray Render Layers in Photoshop. In this tutorial Ahmed Fathi takes a look at how to composite together V-ray render layers using blending-modes and masks in Photoshop.
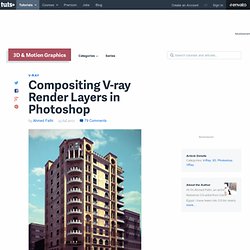
Once completed, this process allows you to change or tweak any aspect of your image in seconds without having to re-render a thing! Ahmed also covers a few extra post production techniques such as Chromatic Aberration and Depth Of Field, as well as how to emulate a Cross-processed look. Republished Tutorial Every few weeks, we revisit some of our reader's favorite posts from throughout the history of the site.
The Making Of Country Home. Hi all.
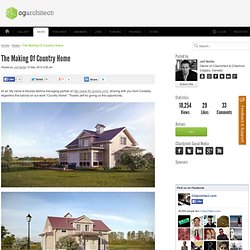
My name is Nicolás Molina managing partner of sharing with you from Cordoba, Argentina this tutorial on our work "Country Home". Thanks Jeff for giving us this opportunity. This is a project for a future presentation townhome "country" in an environment that emphasizes the architecture.
In this case it was based on a model from 3DDD.ru, which was then completed with a new roof, ridges, drains, curtains, deck etc. Original model. Detail and ridge tiles, beveled walls. Detail of drains, curtains and beveled corners. 3D Deck planking added. Detail of the deck. Compositing V-ray Render Layers in Photoshop. Vray-materials.de - Your ultimate V-Ray material resource.
Making sense of VRay Settings. Recently Ryan Lintott and I went to a VRay training seminar by the man himself Vladimir Koylazo (one of the makers of VRay) who went through a number of facets of VRay including a step by step way of breaking down your render settings into logical steps to get the best combination of quality and speed.
I thought this was just too gooder process not to share so have decided to put together the following tutorial taking people through these steps he explained so VRay will hopefully become less complicated, and so you can better critique what is happening within your scenes. The real core of this is every scene is different and has different requirements in terms of detail resolution and Global Illumination. There are many settings posted on the web (I have done a few myself) outlining suitable settings for VRay, and much debate over which setting is best.
Download thousands of textures for free! Exclusive library of seamless diffuse, bump and displacement maps! Compositing V-ray Render Layers in Photoshop. Freebies. Welcome to the Freebies Pages.
Here you will find all the vectors, brushes, textures and all the different resources available on the blog and sorted by similarity. About the license is Creative Commons 3.0, that means that you can use them in personal and commercial projects as long as you give me the proper attribution. Icons by snap2objects or Mauricio Duque for example or a link back to the Facebook fan page. In case you are not able to give the attribution you should drop me a line asking for quote in the release of that license.
So here are the efforts of more than 4 years in trying to bring original and useful freebies to you. Original Vector Template designs Culture Elements Vector elements. 3D Architectural Visualization & Rendering Blog.