
Incredibly detailed Blender game modelling tutorial series. No prior knowledge assumed. : gamedev. Www.blendtuts.com. Advanced Poly Modeling Tassimo T 65. 3D Studio-max - Free 3D Studio Models, 3D Studio Materials, Textures. CGRats - CG Tutorials and resources. Quick Tip: How to Deform Edges in 3ds Max Using the Free ‘Deformed Edges’ Script. 3DM3. CG Channel. Photoshop Tutorials - 3D Studio Max, Maya, Lightwave, Bryce and Cinema 4D Tutorials. ZBrush tutorials: 25 ways to sculpt and paint in 3D. ZBrush tutorials 1.

Beginner's guide to ZBrush If you sign up for a free demo account with Digital Tutors, you can access easy-to-follow, 70-minute tutorial that covers everything you need to get started with the sculpting software. 2. ZBrush 4 essential training Online software training website Lynda introduces ZBrush to artists making a transition from another sculpting program, covering the most popular tools and techniques for digital painting and sculpting 3. A series of 18 in-depth ZBrush videos from Mathew Burniston, showing you how to model a terrifying alien creature then animate it to chilling effect. 4.
Weta Workshop veteran Scott Spencer sat down with 3D World magazine to share some of his insider techniques for sculpting better-looking models in less time with ZBrush. 5. Mathew Cooling from Jellyfish Pictures shares his workflow for modelling the creatures from the stunning BBC TV series Planet Dinosaur. 6. Sculpting Sci-Fi weaponry 7. CG Persia. CmiVFX Worlds Leader In VFX Training - 3D, Maya, Blender and more tutorials from beginner to advanced. Showmethatagain. Polycount - Polycount Wiki.
Modeling A High Poly Stylized Bow In 3D Studio Max. Back in September we published an awesome free model of a stylish modern bow from Stefan Surmabojov, and today we're happy to bring you a tutorial covering it's creation.

In this intermediate level tutorial, Stefan will share the tools and techniques he used to construct and detail the model in 3D Studio Max using a variety of edit poly tools and techniques. Step 1 First we start by creating a Cylinder with 32 sides and 2 Height Segments. After that we need to convert it to editable poly (Right Click> Convert To> Convert To Editable Poly) and select the bottom 20 polygons as shown. Click To Enlarge Step 2 After we select the polygons, we need to extrude them and then make them planer by choosing Make Planar on the Y axis.
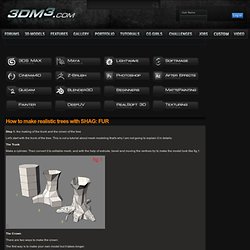
Step 3. The Gnomon Workshop - Professional Training for Artists. Tutorials and Training for CG, 3D, Animation and VFX. 3DSMAX Tutorials, Maya Tutorials, Cinema4D Tutorials, Photoshop Tutorials, ZBrush Tutorials, Blender Tutorials, Mudbox Tutorials. Step 1: the making of the trunk and the crown of the tree Let's start with the trunk of the tree.

This is not a tutorial about mesh modeling that's why I am not going to explain it in details. The Trunk Make a cylinder. Then convert it to editable mesh, and with the help of extrude, bevel and moving the vertices try to make the model look like fig.1 The Crown There are two ways to make the crown: The first way is to make your own model but it takes longer. Here I am going to explain the easiest way. Then you delete the mesh saving only the clone (branch_1), and using rotate and clone operations arrange the crown of the tree (similar to fig. 3). Step 2: The fur part Attach all of the branches in one object. A similar result is shown at fig. 4. Modeling A High Poly Fantasy Inspired Axe In 3D Studio Max. In this tutorial we are going to create a very cool stylized axe model completely inside 3D Studio Max.

We are going to use different modelling techniques and primitive objects to create the model as well as some interesting positioning tricks to arrange some of the model's elements. Step 1 First we create a Cylinder with 18 Sides and 40 Height Segments, and Convert it to Editable Poly by Right clicking and choosing Convert to > Convert to Editable Poly. After that select the edges loops shown Below. Click To Enlarge Step 2 In the Modifier panel, under the Edit Geometry rollout. Step 3. Autodesk 3ds max Modeling tutorials.