
Free Vector. Creating a typographic portrait in Photoshop. In this tutorial, we will turn a typical portrait image to a fantastic typographic design using Adobe Photoshop.
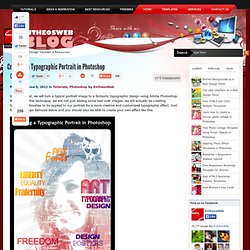
Note that in this technique, we are not just adding some text over images, we will actually be creating typographic brushes to be applied to our portrait for a more creative and customized typographic effect. Just follow the steps itemized below and you should also be able to create your own effect like this. STEP 1 First things first, we will setup our main portrait image. Open Adobe Photoshop and load up your portrait image. In most cases we will want to retouch the Photographs so that the lighting and colors are a little bit more pronounced. STEP 2 Great! STEP 3 You will then see the shadow areas of our image selected. STEP 4 Then, click back on our original layer.
STEP 5 Then, with the midtones selected, we also press CTRL+J to create a layer out of them. Règle typographique – typomètre, simplement, gratuitement ! Hello les ptits loups, Hier, je faisais mon malin sur Twitter en publiant une photo (que voici), de ma règle typographique (typomètre) imprimée sur plastique transparent.
Cette règle, que je balade depuis mes études de design à l’Ensad, permet de mesurer sur du papier, l’interlettre, l’interligne, le corps d’un texte, l’épaisseur d’un filet, etc. Autant d’outils qui sont pratiques pour les graphistes, designers et autres typographes afin de pouvoir comprendre, vérifier et analyser les structures typographiques des magazines, des livres, etc. Puis en réfléchissant un peu, je me suis dit qu’il serait sympa de vous partager toutes ces règles typographiques à télécharger en PDF et à imprimer sur du papier calque ou sur du rhodoide (plastique transparent).
En effet, il en existe plusieurs, je vous ai donc fait un petit fichier PDF contenant différentes règles à imprimer. > Télécharger le PDF Merci Aurélien Ces articles peuvent aussi vous intéresser: Foto-Mosaik-Edda. Massive Collection of Best Photoshop Tutorials from 2010. Dec 14 2010 Photoshop has given new pinnacles to creativity of designers all around the globe.
They are free to create astounding effects that can accomplish almost anything one can imagine. Many artists have shared their creation process through quite a number of tutorials and articles. Today we present to you the best Photoshop tutorials from categories of abstract, animatation, automation, photo retouching, digital painting, poster design, brushes and buttons (and the list goes on!)
To help you increase your knowledge and skills. Photo Effects & Color Abstract Photo Manipulation Here we’ll learn how to create an abstract photo manipulation that looks like you’ve just painted the subject; the artist has included lots of useful techniques for creating impressive abstract pieces. Playing with custom brushes to create magical scenes In this tutorial the artist will show you some powerful features of brushes.
Drawing Digital Art Poster Design Abstract Animation. 30 effets de texte avec Photoshop. Posté par jbj le 25 avr 2008 dans Adobe Photoshop , Design • 13 commentaires Lors de la réalisation d'un design, le texte et le logo ont une importance primordiale: Un beau design sera inévitablement enlaidi si le logo et le texte ne sont pas à la hauteur. Pour apprendre, vous perfectionner où vous en inspirer, voici une liste de 30 tutoriaux pour la réalisation d'effets de texte sous Photoshop. Dance Photo Manipulation Part 1. Written by RossApril 30, 2009 I wanted to write a tutorial showing how to reproduce some of the really common elements, regularly found in graphic design these days, almost cliche elements.
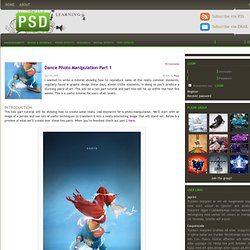
In doing so you’ll produce a stunning piece of art. This will be a two part tutorial and part two will be up within the next few weeks. This is a useful tutorial for users of all levels. Introduction This two part tutorial will be showing how to create some really cool elements for a photo-manipulation. Step 1 Start by finding an image you want to edit, the one I used can be found here. Step 2 Create a new layer then select the brush tool and grab a large soft round brush and with the foreground color set to black add some vignetting to the image. Step 3 Create a new layer then fill the layer black then go Filter>Render>Lens Flare and place it somewhere in the center of the image.