
How to make roses from maple leaves. Better than Tiffanys. Have some spare time?
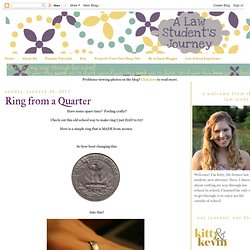
Feeling crafty? Check out this old school way to make ring I just HAD to try! Here is a simple ring that is MADE from money. So how bout changing this: Yep, I did it! I saw rings like this on etsy, and thought “how did they do that!” Ready? DIY Doily Lamp. Orange kitty crafts: stag's head pillow. Here's a simple little freezer stencil pillow I made for our basement... 1.
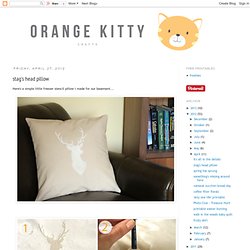
Cut out the image & iron freezer paper onto fabric. (Iron from the outside in to help keep intricate patterns from folding over or skewing) 2. Paint. 3. 4. If you'd like to make your own stag's head, find the template HERE. Paper Mojo the Blog » Blog Archive » Everblooming Origami Cherry Blossoms. One of my favorite things about Spring is when you start seeing those little tiny blossoms appear on the trees.
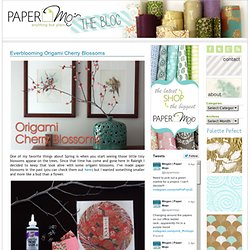
Since that time has come and gone here in Raleigh I decided to keep that look alive with some origami blossoms. I’ve made paper blossoms in the past (you can check them out here) but I wanted something smaller and more like a bud than a flower. What you’ll need: - Paper of your choice cut into 2″ squares (I used one of our Yuzen Potluck Packs) - Glue (The stickier the better! Aleene’s Clear Gel Tacky Glue is perfect for this) - Binder Clips - A Branch (preferably from your own yard and not your angry neighbors) Now it’s time to start folding 1 ) Start with a 2″ square of paper 2 ) Fold the paper in half corner to corner with the pattern on the outside 3 ) Now fold the paper in half again corner to corner to make a small triangle 4 ) It should look like this now If you are familiar with origami this is a basic crane fold we are doing.
Still with me? 8-bit popup cards. Hello!
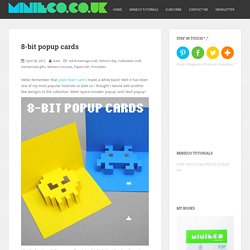
Remember that pixel heart card I made a while back? Well it has been one of my most popular tutorials to date so I thought I would add another few designs to the collection. DIY: Leather Heart Bookmark. I got the idea to make this leather heart bookmark after seeing Simple Serendipities' heart felt bookmark Skill level: Easy Time: less than 10 minutes Supplies: Leather (I am using a scrap from a vintage leather jacket) Pen Scissors Thread needle A book Using the corner of the book I created 2 right angles for my hearts.
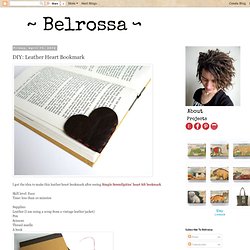
Them I free hand drew the rest of the hearts and cut them out. A stencil would work just as well. Lay the two hearts one on top of the other with right sides facing out. That's it!! Lovely Wire Knot Ring Tutorial. You can make this lovely ring (or a version of this design) yourself, using just some basic tools, wire and a lip balm! Yes, in this tutorial I am going to demonstrate that just basic beginner tools and a wire from Michael’s can go a long way! Wouldn’t this ring make a great present?? For the purpose of this tutorial I am going to be using the very basic, cheap tools that are available almost everywhere. Instead of a ring mandrel you can just use a tube of a lip balm, like I did. I chose to make my ring from a simple gold-plated wire (20 gauge) but you could also use 18-gauge wire, twisted wire (wouldn’t that be nice?)
PLEASE excuse the state of my nails in these pictures.. First thing to do is to cut a piece of wire. Next, wrap your wire around the tube of your lip balm. Cut of the extra bits, if any. Now bend the wire coming from your left to aim away from the ring and then bend again to aim it slightly upwards, as shown on pictures below. Almost done! And it’s done. The DIY Modern Outdoor Succulent Planter #2. Little guiding stars. Since the new year has started I’ve been trying to think of ways to be more kind to my self.
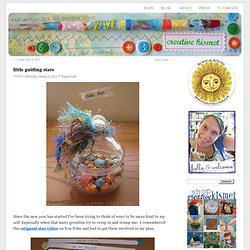
Especially when that nasty gremlins try to creep in and stump me. I remembered this origami star video on You Tube and had to get them involved in my plan. I thought it would be fun to make a whole bunch with kind words and “you are….” phrases inside. I made 60 of them, enough to last me the whole year if I open one a week, plus a few extra just in case. I used 12 x 12 inch scrapbook paper and cut 1/2 x 12″ strips, then followed the video HERE*. *UPDATE! Happy Hippity Hop! We're taking a long weekend off here for the Easter break (we're working on a new website with hopes of getting a bit more done with the extra day tucked in there).
So we're bidding you farewell early with a few links and this cute little picture tutorial (see more below) sent to our e-mail from the folks at Present&Correct. Happy wishes for your Easter and Passover break.