
Modo 501 & The Gradient Editor with Yazan Malkosh. Modo Action Centers presentation with Q&A. TV: Understanding the tool pipeline. Polygon Table - Help Building One. Dominiekdr. Hello modo. Modeling the console table 3D Max.mp4. IT'S ART – Exclusive Making Of Mysterious Sculpture by Tomasz Strzalkowski – Part 1. ZBrush - Bio mechanic design. Creature #1 Detailing process in ZBrush 4R3 [CGNUGGETS!] Lunch Time ZBrush: Bat Creature (Part 1) DPI and PPI Explained – Andrew Dacey Photography. There seems to be a great deal of confusion among many people regarding the use of some terms in digital imaging.
One of the more common sources of confusion is the difference between DPI and PPI. The main problem with this is that DPI (dots per inch) is an old term that has been applied to everything relating to resolution and the size of a digital image. This is very confusing because different situations work with resolution in very different ways, and having a single term for all of them just makes things more confusing. More recently, the term PPI (pixels per inch) has appeared in common usage and is far more specific for what the term entails. DPI is still used in some documents and software when PPI is really what they mean, but this is changing. Let's start with PPI, it's easy to understand. All that PPI does is affect the print size of the image.
An Example Suppose you have a 100 x 100 pixel image, it could be printed at many different sizes. Now let's talk about DPI. ZBrush Tutorial: Create an insectoid alien with DynaMesh. This tutorial will look at how I created a ferocious insect alien character using DynaMesh tools.
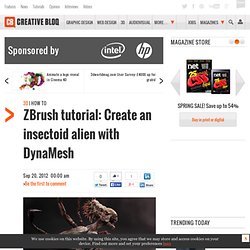
DynaMesh is a new ZBrush approach to building volumes, which brings the program even closer to seamless digital sculpting. DynaMesh enables you to add and subtract to the mesh without worrying about the original volumes or underlying topology. As you alter the shape, the mesh is dynamically rebuilt – hence the name DynaMesh. This approach frees you from the need to import a base mesh with an established volume. Now you’re free to add to and subtract from the form as you see fit as you work. The character here was created entirely from spheres with the addition of a couple of parts cut from other models. Download the support files for this ZBrush tutorial here and here. Stage 01: Build the foundations of your alien insect To begin you’ll first establish the basic form of the body. Optimized Texturing in Zbrush 4 Part 2 of 2.
ZBrush 4.0 UV Master Tricks - Part 01. Zeeble or Greeble that is here the Question! Simon Grell's Website. Plane retopology modelling in zbrush If I want to make a quick simple object I often use this technique.
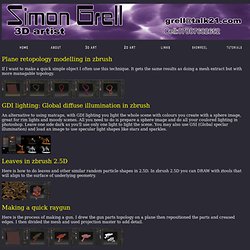
It gets the same results as doing a mesh extract but with more managable topology. GDI lighting: Global diffuse illumination in zbrush An alternative to using matcaps, with GDI lighting you light the whole scene with colours you create with a sphere image, great for rim lights and moody scenes. All you need to do is prepare a sphere image and do all your coulored lighting in photoshop. Leaves in zbrush 2.5D Here is how to do leaves and other similar random particle shapes in 2.5D. Making a quick raygun Here is the process of making a gun. Greeble displacement 1. fill screen ctrl-f with flat colour medium gray and select single layer brush. Ready, Set, Render! HiI have recently posted several alpha-test images in this thread and was asked to post a breakdown of the steps required to achieve similar renders in Z4R2.Thanks to the enhancements to BPR, LightCap™ and BPR Filters in Z4R2, you are now able to achieve higher quality renders quite easily (and faster than previously possible).
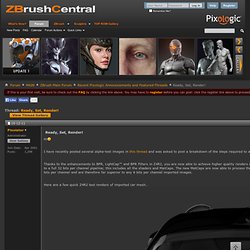
Furthermore, in Z4R2 the rendering engine has been updated to a full 32 bits per channel pipeline; this includes all the shaders and MatCaps. The new MatCaps are now able to process the 96 bits per pixel maps that are generated by LightCap. These maps (diffuse and specular) are composed of 32 bits per channel and are therefore far superior to any 8 bits per channel imported images.Here are a few quick Z4R2 test renders of imported car mesh… As can be seen in the movie below, the 'studio lights' setup for these renders is quite simple... Low Poly Modeling With ZBrush 4r4. Zbrush Mechanical Part 11, Wireframes « Lovecraft Forest. Wireframe cages are handy.
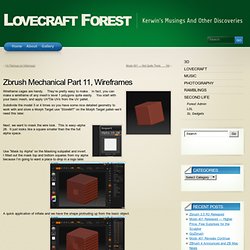
They’re pretty easy to make. In fact, you can make a wireframe of any mesh’s level 1 polygons quite easily. You start with your basic mesh, and apply UVTile UVs from the UV pallet. Subdivide the model 3 or 4 times so you have some nice detailed geometry to work with and store a Morph Target use “StoreMT” on the Morph Target pallet–we’ll need this later. Next, we want to mask the wire look. Use “Mask by Alpha” on the Masking subpallet and invert. A quick application of inflate and we have the shape protruding up from the basic object. If only Zbrush had a way to just save this frame and chuck the rest. Tags: Zbrush This entry was posted on January 29, 2009, 12:01 am and is filed under 3D. Angry-faun-zbrush-r2-bpr-render-workflow.jpg (JPEG-Grafik, 1467 × 8206 Pixel) Making Time For Art #2 - Now with tutorial movie PART 2. Maxter's Sculpting Stuff - Page 7.