
Adafruit's Raspberry Pi Lesson 11. DS18B20 Temperature Sensing. The breadboard layout for just the basic DS18B20 is shown below.
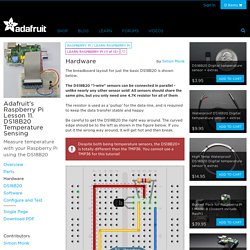
The DS18B20 "1-wire" sensors can be connected in parallel - unlike nearly any other sensor sold! All sensors should share the same pins, but you only need one 4.7K resistor for all of them The resistor is used as a 'pullup' for the data-line, and is required to keep the data transfer stable and happy Be careful to get the DS18B20 the right way around. The curved edge should be to the left as shown in the figure below. Despite both being temperature sensors, the DS18B20+ is totally different than the TMP36. If you are using the waterproof version of the DS18B20 then the device has three leads, red, black and yellow. If you are using the "high temperature" version of the DS18B20 we sell, connect Orange Stripe to 3.3V, White connects to ground and Blue Stripe is data, pin #4.
You still need a ~4.7K-10K resistor from data to 3.3V. Raspberry Pi Temperature Sensor: Build a DS18B20 Circuit. In this tutorial I will be going through the steps on how to setup your very own Raspberry Pi temperature sensor.
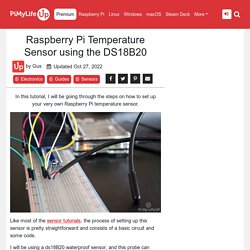
Like most of the sensor tutorials they are pretty straight forward consisting of a basic circuit and some code. I will be using a ds18B20 waterproof sensor, this probe can provide temperatures over a one wire interface. Even better this is waterproof making it perfect if you need to use the sensor in a wet environment. If you want to see how to put together the circuit and a run down on the code, then be sure to check out my video below. I go through everything there is to know about this cool little circuit. Raspberry Pi DS18B20 Temperature Sensor Tutorial - Circuit Basics. The DS18B20 temperature sensor is perfect for projects like weather stations and home environment control systems.
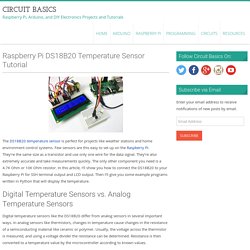
Few sensors are this easy to set up on the Raspberry Pi. They’re the same size as a transistor and use only one wire for the data signal. They’re also extremely accurate and take measurements quickly. DS18B20+ One Wire Digital Temperature Sensor and the Raspberry Pi. NOTE: If you are using the latest software for your Pi (which you should be) then you will need to edit the boot config text file: Add the following line to /boot/config.txt dtoverlay=w1-gpio In previous tutorials we’ve outlined the integration of simple sensors and switches with the Raspberry Pi.
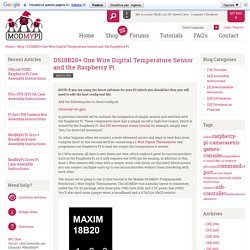
These components have had a simple on/off or high/low output, which is sensed by the Raspberry Pi. Our PIR movement sensor tutorial for example, simply says “yes, I’ve detected movement”. So, what happens when we connect a more advanced sensor and want to read data more complex data? In 1-Wire sensors, all data is sent down one wire, which makes it great for microcontrollers such as the Raspberry Pi, as it only requires one GPIO pin for sensing. The sensor we’re going to use in this tutorial is the Maxim DS18B20+ Programmable Resolution 1-Wire Digital Thermometer. Temperature and Humidity from AM2302/DHT22 Sensor Displayed as Chart. In this how-to, the Raspberry Pi will be configured to automatically acquire and log temperature and humidity from a AM2302/DHT22/DHT11 sensor and display the collected data like in the following picture.
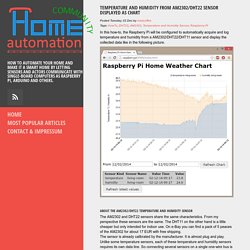
About the AM2302/DHT22 Temperature and Humidity Sensor The AM2302 and DHT22 sensors share the same characteristics. From my perspective these sensors are the same. The DHT11 on the other hand is a little cheaper but only intended for indoor use. Yet more DHT22 sensor code. #!
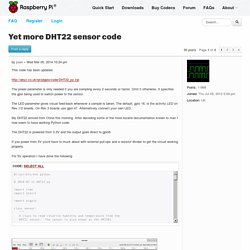
Data Logging with Arduino, DHT22 sensors, Python, Xively, and Raspberry Pi. – Jacob Thomas. I recently completed a data-logging project that was long overdue.

My dad is building a double-walled, super-insulated house, and wanted me to track temperature/humidity in multiple places throughout the structure. In doing so, we plan to calculate overall efficiency, as well as track down areas to recover wasted heat (such as a 120-degree attic during the summer, or the basement near the wood-stove in the winter). We plan to capture this neglected heat via a combination of heat pumps and a closed-loop heat recovery system in the attic, but that is a story for another day. A little over a year ago, I wrote a simple Python script that integrated with an Arduino to collect temp and humidity figures.
It used the GData API to write to a spreadsheet, where the figures were then easily analyzed. Step 1: Arduino Sketch I simply used Adafruit’s DHT library, and wrote a sketch to read from seven sensors. HUGE HINT: For long runs, skip 1 pin on the Arduino when iterating through sensors. Temperature and Humidity from AM2302/DHT22 Sensor Displayed as Chart. Yet more DHT22 sensor code. ESP8266 - Documentation - Documentation. DHT11/22 Temperature Sensors using the WebIOPi REST API. I have been really impressed with the WebIOPi REST API, I am using it to control my garage door.
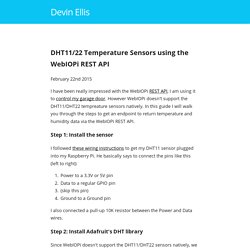
However WebIOPi doesn't support the DHT11/DHT22 tempreature sensors natively. In this guide I will walk you through the steps to get an endpoint to return temperature and humidity data via the WebIOPi REST API. Step 1: Install the sensor I followed these wiring instructions to get my DHT11 sensor plugged into my Raspberry Pi. He basically says to connect the pins like this (left to right): Power to a 3.3V or 5V pinData to a regular GPIO pin(skip this pin)Ground to a Ground pin I also connected a pull-up 10K resistor between the Power and Data wires.
Step 2: Install Adafruit's DHT library Since WebIOPi doesn't support the DHT11/DHT22 sensors natively, we have to install a driver that can read from it. DHT Humidity Sensing on Raspberry Pi or Beaglebone Black with GDocs Logging. The Python and C code to work with Adafruit's DHT sensors is available on Github at We use some C code to talk to the DHT sensors since they require extremely fast timing to read, and then wrap the C code in a simple Python library for easy integration into your own programs.
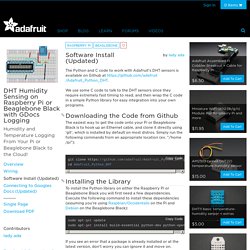
The easiest way to get the code onto your Pi or Beaglebone Black is to hook up an Ethernet cable, and clone it directly using 'git', which is installed by default on most distros. Simply run the following commands from an appropriate location (ex. Adafruit/DHT-sensor-library. ESP8266 Weather station - Documentation - Documentation. #include <ESP8266WiFi.h> #include "DHT.h" #define DHT_PIN 12 #define DHTTYPE DHT11 DHT dht(DHT_PIN, DHTTYPE, 15); float hum; float temp; const char* ssid = "SSID"; const char* password = "password"; WiFiClient client; String thing_ID = "Thing_Id"; String propertyID_temp = "Temperature_Property_Id"; String propertyID_hum = "Humidity_Property_Id";
DHT11. Realtime temperature monitoring with Raspberry Pi and MQTT protocol - Documentation - Documentation. Component list Raspberry PiDHT11/22 or AM2302 temperature and humidity sensor4.7K or 10K resisterBreadboardJumper wires 1. How to post data to Google sheets using ESP8266 - Embedded Lab. In the past couple years, the ESP8266 platform has flourished dramatically and emerged as one of the most popular hardware tools among electronics hobbyists and IoT enthusiasts.
Packed with a 32-bit RISC CPU running at 80 MHz, a fully integrated WiFi radio with TCP/IP protocol stack, serial peripherals (I2C, SPI, and UART), an ADC channel, and general purpose I/O pins, the ESP8266 is the most integrated and affordable WiFi solution available in the current IoT market space. An ESP8266 hardware, like NodeMCU and ESP-01, can directly interface with sensors using its peripherals and upload the sensor measurements to a local or a remote web server via internet. Right now, there are already quite a bit of cloud IoT platforms (ThingSpeak, thinger.io, TESPA.io, Xively, … the list is getting bigger everyday) that provides APIs and tools to allow the ESP8266 users to directly upload their sensor readings online for real-time visualization and global access. ESP8266 temperature and humidity logger with deep sleep enabled - Embedded Lab. ESP8266 has made it possible for hobbyists and makers to develop IoT applications in simple and inexpensive ways.
This article shows an example of making a very simple temperature and humidity logger using ESP8266 that uploads the data directly to a cloud service, such as ThingSpeak, and allows to visualize the data in real time. The ESP8266 module used in this project is WeMOS’ D1 Mini board. Yet more DHT22 sensor code. #! /usr/bin/env python # 2014-07-11 DHT22.py import timeimport atexit import pigpio. Python code for dht11 sensor. # -*- coding: utf-8 -*-#! /usr/bin/pythonimport RPi.GPIO as GPIOimport timeimport smbusimport sys # - - MCP23017 registers - - #IO_DIRECTION_A = 0x00 # IO direction (0=output, 1=input (Default))IO_DIRECTION_B = 0x01IOPOLA = 0x02 # IO polarity (0=normal, 1=inverse)IOPOLB = 0x03GPINTENA = 0x04 # interrupt on change (0=disable, 1=enable)GPINTENB = 0x05DEFVALA = 0x06 # default comparison for interrupt on changeDEFVALB = 0x07INTCONA = 0x08 # interrupt control (0=interrupt on change, 1=interrupt on change from DEFVAL)INTCONB = 0x09GPPUA = 0x0C # pull-up resistor (0=disabled, 1=enabled)GPPUB = 0x0DINFTFA = 0x0E # interrupt flagINFTFB = 0x0FINTCAPA = 0x10 # interrupt captureINTCAPB = 0x11GPIOA = 0x12 # port valueGPIOB = 0x13OLATA = 0x14 # output PortsOLATB = 0x15.
How to Set Up the DHT11 Humidity Sensor on the Raspberry Pi - Circuit Basics. Dht11.