
Apio is an IoT platform that lets you build smart devices. Apio lets you create smart objects in five minutes, while its SDK guides you along the way.
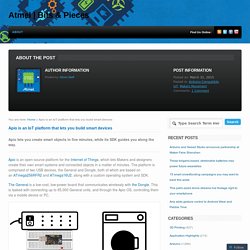
Apio is an open-source platform for the Internet of Things, which lets Makers and designers create their own smart systems and connected objects in a matter of minutes. The platform is comprised of two USB devices, the General and Dongle, both of which are based on an ATmega256RFR2 and ATmega16U2, along with a custom operating system and SDK. The General is a low-cost, low-power board that communicates wirelessly with the Dongle. This is tasked with connecting up to 65,000 General units, and through the Apio OS, controlling them via a mobile device or PC. The General is entirely Arduino-compatible, which means users can write their own code in the Arduino IDE, and features an integrated IEEE 802.15.4 communication channel, the LWM. So, what sort of IoT applications can the General be used for? Pinoccio - Wireless microcontroller for web-enabled DIY projects.
Wireless Arduino-compatible miniatures. The IoT platform GroveStreams is a new IoT platform in the cloud designed to interact with users and remote M2M networks.
Arduino. RS-232 Laser Transceiver. Published in Electronics Australia Oct. 1997 pp.56-61 Laser based projects used to be expensive, until the development of solid state lasers.
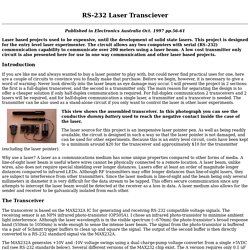
This project is designed for the entry level laser experimenter. The circuit allows any two computers with serial (RS-232) communication capability to communicate over 200 meters using a laser beam. Types of Capacitors. There are many different types of capacitors and they each vary in their characteristics and each have their own advantages and disadvantages.
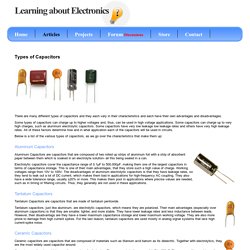
Some types of capacitors can charge up to higher voltages and, thus, can be used in high voltage applications. Some capacitors can charge up to very high charges, such as aluminum electrolytic capacitors. Some capacitors have very low leakage low leakage rates and others have very high leakage rates. All of these factors determine how and in what application each of the capacitors will be used in circuits. Different Types of Capacitors. - each of the different types of capacitors has its own performance parameters and can be used in differnet applications.

Check out our list to see the best capacitor type for a given application. Electronic capacitors are one of the most widely used forms of electronics components. However there are many different types of capacitor including electrolytic, ceramic, tantalum, plastic, sliver mica, and many more. Prize Entry: A Two Component Temperature Sensor. Here’s a design challenge for you: make a temperature sensor for any computer.
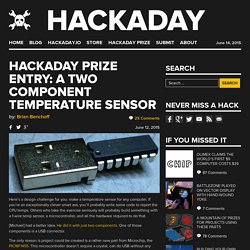
If you’re an exceptionally clever smart ass, you’ll probably write some code to report the CPU temps. Others who take the exercise seriously will probably build something with a 1-wire temp sensor, a microcontroller, and all the hardware required to do that. [Michael] had a better idea. He did it with just two components. One of those components is a USB connector. The only reason is project could be created is a rather new part from Microchip, the PIC16F1455. Visuino - Visual Development for Arduino by Mitov Software. Users of the Visuino (Software) must accept these terms of license.

If you refuse to accept the terms of license, you may not use this software, and you have the right to return it within 30 days of the purchase date, and to receive your money back. For your convenience a copy of this license agreement will be stored on your system during the installation. This license grants you the following rights: You have a non-exclusive license to the Software. The Title and all intangible rights to the Software are the property of Mitov Software. You may install and use one copy of the Software per computer assuming only one and the same person will use the Software on all of the computers.
ESP8266 As A Networked MP3 Decoder. Support libraries, good application notes, and worked examples from a manufacturer can really help speed us on our way in making cool stuff with new parts.
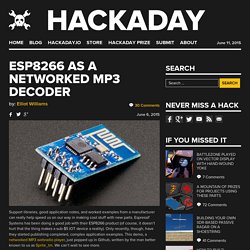
Espressif Systems has been doing a good job with their ESP8266 product (of course, it doesn’t hurt that the thing makes a sub-$5 IOT device a reality). Only recently, though, have they started publishing completed, complex application examples. This demo, a networked MP3 webradio player, just popped up in Github, written by the man better known to us as Sprite_tm. We can’t wait to see more. The MP3 decoder itself is a port of the MAD MP3 library, adapted for smaller amounts of SRAM and ported to the ESP8266. What external parts, you ask? More GPIOs For The ESP8266. The ESP8266 is an incredible piece of hardware; it’s a WiFi module controllable over a serial port, it’s five freaking dollars, and if that’s not enough, there’s a microcontroller on board.
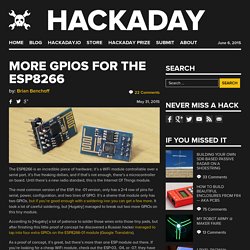
Until there’s a new radio standard, this is the Internet Of Things module. The most common version of the ESP, the -01 version, only has a 2×4 row of pins for serial, power, configuration, and two lines of GPIO. It’s a shame that module only has two GPIOs, but if you’re good enough with a soldering iron you can get a few more. It took a lot of careful soldering, but [Hugatry] managed to break out two more GPIOs on this tiny module. According to [Hugatry] a lot of patience to solder those wires onto those tiny pads, but after finishing this little proof of concept he discovered a Russian hacker managed to tap into four extra GPIOs on the ESP8266-01 module (Google Translatrix). As a proof of concept, it’s great, but there’s more than one ESP module out there. Video below. More GPIOs For The ESP8266. ESP8266 As A Networked MP3 Decoder. How to Build Beautiful Enclosures from FR4 — aka PCBs. Most hobbyists say that it is easier to build a functional prototype of an electronic device, than to make the enclosure for it.
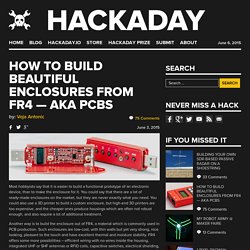
You could say that there are a lot of ready-made enclosures on the market, but they are never exactly what you need. You could also use a 3D printer to build a custom enclosure, but high-end 3D printers are too expensive, and the cheaper ones produce housings which are often not robust enough, and also require a lot of additional treatment. Another way is to build the enclosure out of FR4, a material which is commonly used in PCB production. Such enclosures are low-cost, with thin walls but yet very strong, nice looking, pleasant to the touch and have excellent thermal and moisture stability. Here I shall explain the process of building those “magic” enclosures. The global approach is simple – you take the sheet of single-sided copper clad FR4, cut it and solder the parts together. Monitor program for Arduino.
In Japanese [ArduinoConf][ArduinoMonitor][iArduino] Abstract You can control Arduino's pins by ArdunoMonitor and watch changes on pins. This is useful for debugging your hardware before you write a sketch. Before you begin Place iArduino folder into your libaries folder of your Arduino folder. Start ArduinoMonitor. Electronic Supplies.
Electronics. Arduino. Shields. Hackaday Prize Entry: A 7805 Replacement. A Simple Programmable 555. “Instead of an Arduino, he could have done that with a 555 timer.” “Instead of a 555 he could have done that with two transistors.” “Instead of a few transistors, he could have done that with butterflies.” These are quotes from various Hackaday comment threads throughout the years. It seems simplicity is the name of the game here, and if you need a timer chip, how about an 8-pin DIP? This, of course, means an I2C programmable oscillator in the form of an LPC810. A Tool For Spying On Serial Data. [Piotr] was working on a recent Arduino project when he ran into a problem. He was having trouble getting his Arduino Pro Mini to communicate with an ESP8266 module.
He needed a way to snoop on the back and forth serial communications. Since he didn’t have a specialized tool for this task, [Piotr] ended up building his own. The setup is pretty simple. You start with a standard serial cable containing the TX, RX, DTR, and GND wires. The next piece of the puzzle was coming up with a way to see the data more clearly. HM 10 Pinout · nickswalker/ble-dev-kit Wiki. ESP8266. Project & Electronics. ESP8266 Community Forum View topic - This is how to install without replacing your existing IDE.
- Mon Mar 30, 2015 6:03 pm#13068 Guess I'm not as smart as I thought, because I couldn't get the contents of arduino-esp8266-master.zip to work at all. (win 7 x64, if that matters) 1.6.2 & arduino-esp8266-master.zip = no-go, the boards and programmer don't show up, not even if I plant them in the program files\arduino\hardware folder itself instead of in the my documents folder. manually taking the files from the arduino-1.6.1-p1-windows.zip and putting them with my 1.6.2 install, it finally recognises the board and programmer, but I can't get it to properly compile anything, I either get a very nondescript "Error compiling" or a Java regex stack overflow (Not sure what that was about..) arduino-1.6.1-p1-windows.zip (version 1.6.1) works fine by itsself for the ESP, though 1.6.1 doesn't "work" with normal arduino (theres apparently a known issue with the delay() command that was fixed in 1.6.2)
First Impression on the ESP8266 Serial-to-WiFi Module. Check my new blog post on the ESP8266 Toy Continuing from my previous blog post about Hi-Link HLK-RM04 module, I have finally received the ESP8266 Serial-to-WiFi module that I’ve been waiting for. As I said previously, with the popularity of IoT devices, there is an increasing demand for low-cost and easy-to-use WiFi modules. ESP8266 is a new player in this field: it’s tiny (25mm x 15mm), with simple pin connections (standard 2×4 pin headers), and best of all, it’s extremely cheap, less than US$3 from Taobao.com!
Selecting and Using RS-232, RS-422, and RS-485 Serial Data Standards. Introduction "The great thing about standards is there are so many to choose from. " Transistor: Simple Switch with Raspberry Pi GPIO - TacticalCode EN. Test_Configure_RTLdongle - g4zfqradio. Testing the RTL Dongle Independently of any SDR Software:- Home Automation: Home Automation : Start Up ESP8266. Si4703 FM Radio Receiver Quickstart Guide.
Si4703 FM Radio Receiver Quickstart Guide Skill Level: Beginner. PIC 16F84 Serial Programmer. The Microchip PIC 16C84 was one of the first serial in-system programmable microcontroller. Switch Mains Power with an ESP8266. FPGA Based Ambilight Clone. PIC project, using cheap RF modules! [Back to Home Page] Electronica. RF. IO. RFXtrx433. RF433MHz. Electronics. Arduino. Electronics. Sensors. RF 433. Electronics. Électronique. Arduino. 433. RFXCOM not shorted. Electronic. Arduino. RF 433.92 MHz. Highly mobile packet radio. The Mobilinkd TNC1 started its life, as with many things these days, as an Arduino project. It quickly took on a life of its own, first gaining Bluetooth capabilities when I discovered the latent abilities of APRSdroid.
And then gaining a battery and recharging circuitry before finally ending up as a product that could be mass-produced. But underneath it all is still the Arduino project that it started out as. With a few minor tweaks to the firmware to remove the Bluetooth and battery bits, the same firmware that runs in the Mobilinkd TNC1 will run on an Arduino.
The TNC doesn’t use Bluetooth, so you cannot use it with APRSdroid, but you can use other packet and APRS software on your computer over the Arduino’s USB serial port. Here are the things you will need for this project: The resistors, capacitors and transistor cost just a few cents in total if you have them lying around. Take a look at the breadboard. Arduino Plug the Arduino Nano into one end of the board. 3.5mm Connector. Arduino. Testing. Writing Automated Acceptance Tests with Spec Flow. Ham Radio Sounds - Internet and Radio: Sounds. ESP8266 Arduino Code and Circuit/Schematic for Sending Commands. Installing and Building an Arduino Sketch for the $5 ESP8266 Microcontroller. Cooking Hacks - Electronics for Arduino, Raspberry Pi and 3D Printers.
February 2009 ~ Data logger based on PIC 16F877, 18F452 and 18F4550. How to Build a Thermocouple Amplifier. Building Your Own Mini Fridge? USB PIDs For All. Crimping Electronics Connectors (Dupont, PH, XH, VH, KF2510) Logic Noise: More CMOS Cowbell! Simple Keypad Scanning With SPI And Some Hardware. Raspberry Pi vrac. LM35 with PIC16F877A using PICBasic. Arduino-Projects. SCIKIDS. Logisim. Use The Internet To Get Your Kadabra To Evolve. Building Your Own Mini Fridge? An Introduction to Clock Dividers and Psychological Warfare.
Swrmeter. Lex's Blog - Hamradio - Tuinbaan - LGB - Modelspoor - Fotografie - ICT - OZ2CPU meter. Rfattenuator. AD8310FASTRFD. RF Power and SWR Power Meter. Lazure - RF SWR Power Meter. Hfgendet1. Hfgendet2. Raspberry PI. Micro Contrôleurs. Electronique. Arduino. Meet the ESP 8266 WiFi Serial Transceiver - Digits Domotica Blog. View topic - ESP8266 EasyIoT library. Projects - PCB Heaven. Raspberry Pi vrac. Tiny gadgets.