
Dahlia flower tutorial. Sorry...but I just can't help it...I guess I'm just drawn to flowers.
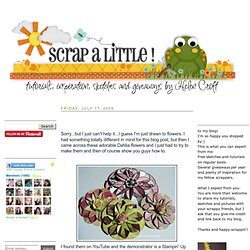
I had something totally different in mind for this blog post, but then I came across these adorable Dahlia flowers and I just had to try to make them and then of course show you guys how to. I found them on YouTube and the demonstrator is a Stampin' Up gal named Dawn. Click here to see the video I watched. I've been thinking about if I should make videos instead of posting a bunch of photos. But personally I prefer pictures. Please let me know what you think. Anyways, back to the flowers... you'll need: double sided patterned papercircle punchadhesiveflower center (button,rhinestone,brad)optional:inkbone folderPunch out 8 circles. Fold them in half and then half again, so that the circles are divided in four quarters.
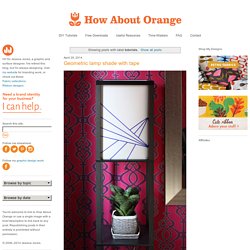
Paper Flowers – Anyone Can Do That. Japanese Kusudama, this tutorial is featured on Craftuts Anyone can do that, I assure you.

The proof: I can, just take a quick look at my result below. And, believe me, I am neither meticulous nor particularly patient. How About Orange. Here's a look at our upstairs guest bathroom.
Last night I covered an accent wall with removable wallpaper. I love it! This bathroom has a peculiar layout. You walk in past the shower stall on the right, and when you hit the sink, you turn right to get to the toilet. Which is under a lovely arch at the end of a passage that is almost long enough to feel like a hallway. The kind folks at Walls Need Love sent the product to review. Like the Sunburst wallpaper I designed last year, this paper is essentially a giant self-adhesive wall decal, and it's easily to peel off and reposition. I measured the wall and cut a length of paper that would leave a little extra overhang at the bottom. After a couple tries I had it, and then it was just a matter of peeling off the backing paper gradually while smoothing down the paper with the tool provided.
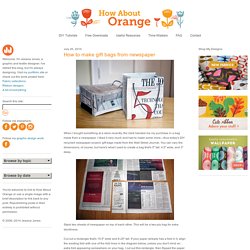
I cut another piece to place next to the first panel, overlapping the seam by a quarter inch to match the pattern. Page corner bookmarks. This project comes to you at the request of Twitterer @GCcapitalM.
I used to believe that a person could never have too many books, or too many bookmarks. Then I moved into an apartment slightly larger than some people’s closets (and much smaller than many people’s garages) and all these beliefs got turned on their naïeve little heads. But what a person can always look for more of is really cool unique bookmarks. Placeholders special enough for the books that are special enough to remain in your culled-out-of-spacial-necessity collection. Page corner bookmarks are cute, practical and deeply under-represented in the world.* They’re easy to make, easy to customize, and will set you apart from all those same-same flat rectangular bookmarks.
If you like this tutorial, here are a couple others that might be up your alley. For the monster-loving adults in the room, try some googly-eyed paper monster wine charms. What you’ll need: Putting it all together: 1) Follow steps 2 and 3 from above. How to make gift bags from newspaper. When I bought something at a store recently, the clerk handed me my purchase in a bag made from a newspaper.
I liked it very much and had to make some more—thus today's DIY recycled newspaper project: gift bags made from the Wall Street Journal. You can vary the dimensions, of course, but here's what I used to create a bag that's 5" tall, 4.5" wide, and 3" deep. Stack two sheets of newspaper on top of each other. This will be a two-ply bag for extra sturdiness. Creative Kismet » Blog Archive » little guiding stars.
Since the new year has started I’ve been trying to think of ways to be more kind to my self.
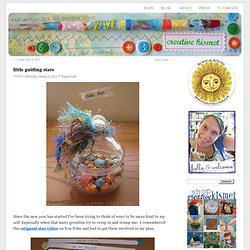
Especially when that nasty gremlins try to creep in and stump me. I remembered this origami star video on You Tube and had to get them involved in my plan. I thought it would be fun to make a whole bunch with kind words and “you are….” phrases inside. I made 60 of them, enough to last me the whole year if I open one a week, plus a few extra just in case. I used 12 x 12 inch scrapbook paper and cut 1/2 x 12″ strips, then followed the video HERE*. *UPDATE! Be Sociable, Share!