
Pet Bed Tutorial by ~Yakkomia on deviantART. Bag Organizer. Ever dug around in your bag frantically for your phone, or a pen, or your camera and feel frustrated because you can't find it among all your other things scattered in your bag?
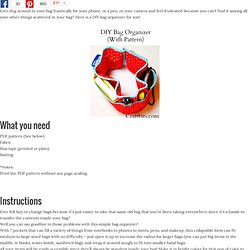
Here is a DIY bag organizer for you! What you need PDF pattern (See below) Fabric Bias tape (printed or plain) Batting *Notes: Print the PDF pattern without any page scaling. Instructions Ever felt lazy to change bags because it’s just easier to take that same old bag that you’ve been taking everywhere since it’s a hassle to transfer the contents inside your bag? Well you can say goodbye to those problems with this simple bag organizer! With 7 pockets that can fill a variety of things from notebooks to phones to mints, pens, and makeup, this collapsible form can fit medium to large sized bags with no difficulty – just open it up to increase the radius for larger bags (you can put big items in the middle, ie books, water bottle, sandwich bag), and wrap it around snugly to fit into smaller hand bags.
Step 1: Pattern. Notebook Cover Tutorial. That’s notebook as in one of those old skool ones, with paper and lines and stuff, as opposed to the laptop type, does anyone remember them? I churn through notebooks at a furious pace, I have lists constantly on the go and a different notebook for every topic. I drool over the beautiful ones you see in the stationary stores but always hold myself back, notebooks are for me to scribble in, I know I would feel guilty defacing a perfectly clean page in one of the $20 leather lined and gold encrusted books that you can buy at Paperchase, so instead I just stock up on $1 books from the dollar store and make them my own! What’s great about this is that if you always buy the same brand and size of book you can just keep on transferring the cover to the new book. And the pockets on the inside are super handy for notes of paper and the scraps that I tend to carry around.
A notebook! Enough fabric to cover the outside of your notebook – even for an A4 size the most you’ll need is a fat quarter. How to sew a baby felt owl. 1. Trace, pin, cut Trace the pattern onto paper and cut out. Pin each pattern piece to a piece of fabric; cut the fabric accordingly. Remove the pins.Hand-stitch patterned pieces of fabric onto felt wing pieces. Hide the knot on the end of your thread between fabric and felt. 2. Following the placement instructions on the pattern piece, pin the grey part of the eye into position on the body and stitch to body. Note. How to make felt notebook covers. 1. Cut, allign, fold, pin Cut out appliqué pieces from fabric, using iron-on interfacing to stiffen very lightweight fabric before cutting. Place felt on a flat surface, long side facing you, place the notebook on top, aligning the spine with the centre of the felt. Fold the edges of felt over the front and back covers; close the notebook. Position the appliqué pieces or ribbon to best effect on the front of the cover; pin in place. 2.
Remove notebook and stitch the appliqué pieces or ribbon trim in place. Tip Contemporary prints lift craft staples out of the realm of dowdy. Like this? How to make lovebird pillows with silk flowers. Words Sania Pellphotography Penny Wincer Make your house a home with these embroidered pillows from The Homemade Home by Sania Pell. The idea for this array of pillows started with the pair of birds, which were on an apron I found in a sale. As it cost next to nothing, I didn’t feel bad about cutting it up to reuse the birds. If you can’t find a suitable bird print fabric, however, you could use one with a butterfly print or something similar. The branch the birds are sitting on is appliquéd fabric, and I added some silk flowers and leaves to create the effect of spring blossom.
Kawaii messenger bags by *tho-be on deviantART. Flat Plushie Tutorial by ~Marki-san-Design on deviantART. It’s A Plush Life! Basic Plushie Tutorial by ~JoanColeman on deviantART. Cute Plushie Tutorial by ~Sexual-Pancake on deviantART. Electric guitar bag tutorial by ~Eyespiral-stock on deviantART. Pichu by ~shmalice on deviantART. Pikachu pokemon plushie by ~yael360 on deviantART. How to make eyes of my doll. ** You can read this howto in Thai here. >>> How to ทำตาตุ๊กตาง่ายๆ สไตล์คินจัง Many people ask me how I make my doll's eyes, so I put this howto in my blog. I'm not good at English, so please patien to read them.T3T It's very easy, I'm sure that it's easier than you think.
Let's see. First of all, Let me intruduce my model, That is Nonghakhow . *0* Materials. - A piece of one side felt, or a piece of white cloth that you can find. - A black lineart pen. (0.3 or 0.5 mm., waterproof) - Color pencil. - Scissors - Tweezers - A clear nail varnish - Paper If you don't have ones, you can use whatever materials that you can find around your house. Ok, now the materials are ready. Step 1. Draw the eyes shape that you like on the paper or print it out from your PC. After you got the eyes, put the cloth on the eyes and draft the line out with the black pen. Step 2 Now we got lineart of the eyes. Step 3. Because I use the non waterproof color, so I coat the eyes surface with the clear nail varnish. Felt : QB Keychain by ~kinkaku on deviantART. Mokona Plush Keychain by ~stevoluvmunchkin on deviantART. Tutorial: Mokona felt plush by ~vivee on deviantART.
Felt Mokona by ~vivee on deviantART. Bunny Plush Keychains by =Oborochann on deviantART. Hedwig plush harry potter owl by ~yael360 on deviantART. Charizard iPod Case by ~E-Macks on deviantART. Cat Felt Bag by ~k-irb on deviantART. Sheep Felt Case by ~AKhandmade on deviantART. Chanel Rabbit by ~satu-san on deviantART. Koala Felt Case by ~AKhandmade on deviantART. Totoro iphone case by ~yael360 on deviantART. Moltres Bell Plush by ~Sexual-Pancake on deviantART. Petit Legends Set 1 Kanto by ~Sexual-Pancake on deviantART. Fluttershy plushie TRIAL tutorial by ~KawaiiPetitPois on deviantART. Lugia Hat and Scarf by ~clearkid on deviantART. How to Wire Ears by ~clearkid. Typhlosion Hat Tutorial by ~clearkid on deviantART. How to Add Ears by ~clearkid on deviantART. How to Color Fleece Eyes by ~clearkid on deviantART. Fleece Hat Tutorial by ~clearkid on deviantART. Cat hat tutorial by ~jaken-rox on deviantART.
Glaceon Hat by ~clearkid on deviantART. Wrist Pincushion Tutorial. Once upon a time, I made a classmate in my costuming class a wrist pincushion for her Secret Santa present and it was so delightful that I made another for myself.
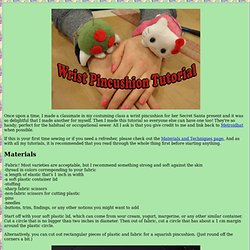
Then I made this tutorial so everyone else can have one too! They're so handy; perfect for the habitual or occupational sewer. All I ask is that you give credit to me and link back to Metroidhat when possible. If this is your first time sewing or if you need a refresher, please check out the Materials and Techniques page. And as with all my tutorials, it is recommended that you read through the whole thing first before starting anything. -Fabric! Start off with your soft plastic lid, which can come from sour cream, yogurt, margerine, or any other similar container. Alternatively, you can cut out rectangular pieces of plastic and fabric for a squarish pincushion. Hand sew a running stitch around the outer edge of the fabric. Thaaat's right... gather that fabric tight.
Now cut a length of your elastic. Bow Tutorial by *The-Cosplay-Scion on deviantART. Ladder Stitch Tutorial by ~Saint-Angel. Iron On Eye Tutorial by *Renegar-Kitsune. Jolteon Pattern by *Renegar-Kitsune on deviantART. Raichu Sewing Tutorial by *Renegar-Kitsune on deviantART. Jolteon Sewing Tutorial by *Renegar-Kitsune on deviantART. Jolteon Eye and Mouth Template by *Renegar-Kitsune on deviantART.