
How to Make T-shirt Bracelets. Better than Tiffanys. Have some spare time?

Feeling crafty? Check out this old school way to make ring I just HAD to try! Here is a simple ring that is MADE from money. So how bout changing this: Yep, I did it! I saw rings like this on etsy, and thought “how did they do that!” Ready? Find a quarter, or similar looking foreign coin (I used a 10 pence because I couldnt find a good quarter). Got your quarter? Grab a hammer. Back in the day, I’ve heard they used to use spoons for this part, and tapped instead of hammered…but I cannot even IMAGINE how long that would take. Anyway, you want to hammer the edges. Just keep hammering, and spinning it in a circle. Yes your hands will get black. Next, you will want a drill. Anyway, keep moving up sizes of drill bits until you get too close to the edge. If you have a dremel, or a sander type bit for your drill…USE IT. McLaughlin Designs · DIY: Feather Extensions. Tutorial - Notebook purse/briefcase.
Here's a great idea for gifts, party favors, road trip journals, rainy day projects........you name it!
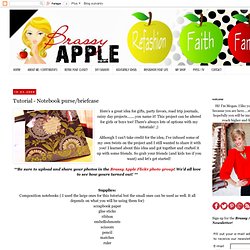
This project can be altered for girls or boys too! There's always lots of options with my tutorials! ;) Although I can't take credit for the idea, I've infused some of my own twists on the project and I still wanted to share it with you! I learned about this idea and got together and crafted it up with some friends. **Be sure to upload and share your photos in the Brassy Apple Flickr photo group! Supplies:Composition notebooks ( I used the large ones for this tutorial but the small ones can be used as well. Optional:hole puncheyelets/grommetsglitterscrapbooking pop ups Step 1:Purse: If you would like to create an angled shaped purse notebook you will need to have the composition notebooks professionally cut.
I had my notebooks cut about 1.5 - 2 inches on each side and then angled out to the outer edge as pictured below. Trace and cut. Step 4: Glue. Applying to cover. Re-purposing: Tshirts into 5-strand-braided-headbands. I was walking through Target a few weeks ago and noticed this little knit fabric headband that was not just braided together…….but woven.
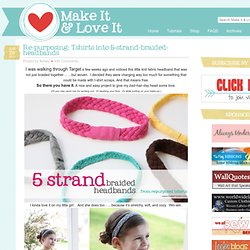
I decided they were charging way too much for something that could be made with t-shirt scraps. And that means free. So there you have it. A nice and easy project to give my bad-hair-day head some love. (Or you may need one for working out. I kinda love it on my little girl . She always has little hair fly-aways that get into her face…….and this helps with that problem. It even works great with her hair down…..and keeps that hair tucked behind her ears. And yep, good for me too. Thanks little t-shirt scraps. Want to make your own? First, find some old t-shirts. Then, cut your fabric into long strips. Next, stack your 5 strips on top of each other and sew together at one end. Now, pull on each strip of fabric so that they kind of curl on the edges.
But let me explain a little better. First, you’ll work on the left side. Do-it-Yourself DIY String Wedding Lanterns Yarn Chandeliers. Jessica of Wednesday Inc shows us how to make those gorgeous twine chandeliers from the inspiration shoot she shared with us this morning.

Using balloons, glue and twine, you can also make these lanterns for your wedding – and then bring it home and use it as your very own mid century lampshade. What you will need are: balloons, glue, yarn, tray for glue, corn starch 1/2 cup of Corn starch, 1/4 cup of Warm water, clear fast drying spray paint, hanging lamp cord or fishing line (depending on your desired final product), and a lighting kit if you’re looking for a fully functional lantern.
Jessica recommends using a sharpie to mark on the inflated balloon how much room you need to leave for the lighting cord. She also recommends coating the balloon with vaseline prior to wrapping the yarn coated with glue so it doesn’t stick on the balloon once it’s dry. You can see all the details on Jessica’s blog. Are you getting excited to try to do this at home as much I am? Print Hula Hoop Rug Page. DIY Citrus Salt Scrub. It’s that time of year.
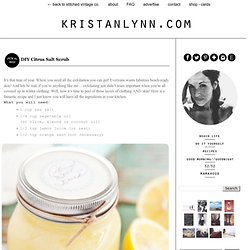
Where you need all the exfoliation you can get! Everyone wants fabulous beach-ready skin! And lets be real, if you’re anything like me… exfoliating just didn’t seam important when you’re all covered up in winter clothing. Well, now it’s time to peel of those layers of clothing AND skin! Here is a fantastic recipe and I just know you will have all the ingredients in your kitchen. What you will need: 1 cup sea salt 1/4 cup vegetable oil (or olive, almond or coconut oil) 1/2 tsp lemon juice (or zest) 1/2 tsp orange zest (not necessary) photo credit: via First mix the oil and sea salt together. How to exfoliate: Clean body as normal in shower. Now I’m ready for the beach. . # kristanlynn xoxo.