
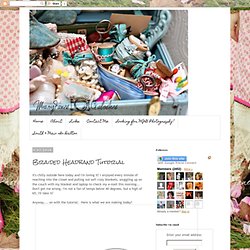
Rick Rack Rosettes. A friend gave me this flower ring and necklace, when she handed them to me I thought they were porcelain–there’s a very vintage feel to them.

From a distance you really can’t tell that they’re made out of rick rack! Yes, rick rack! She shared how to make them with me, and now I’m sharing with all of you readers! The wow of the rosette comes from a few simple steps! She found this tutorial, in Portuguese I believe. First, cut 2 strips of rick rack. Then twist the two pieces of rick rack together, like this. And then run a stitch down one side to hold it all together. Like so. And to make the flower, you just start from one end and roll it up. Keep rolling. Until you have this–and then tuck the little tail under and hot glue it down. You’ll notice all of the petals are closed, so to open them up you just peel them back one by one. Video Podcast: How to Make a Handbag out of a Recycled Book. » Curbly.
I have a penchant for purchasing stuff that’s cool, but for which I don’t have specific plans or use.

Case in point: I have piles of pulp and sci-fi novels from the 40s-60s. The art and colors are amazing, and the language provides for ridiculous quotes for ages. But after I slice out the illustrations, and force my way through the first and last chapters so I can say I ‘read’ them, these dimestore masterpieces don’t escape from their cardboard homes often. Thus, enter this project: an adorable handbag featuring the incredible art of ‘literature’.
Click play, or go here to watch the video. Materials:• A hardbound book with an appealing cover• Fabric (1/2 yard or so)• Sewing machine or needle and thread• Scissors• Utility knife• Craft glue• Store-bought [or handmade] purse handle• Colored markers• Polyurethane finish, Mod Podge, or watered-down white glue 1. 2. 3. Braided Headband Tutorial. It's chilly outside here today and I'm loving it!
I enjoyed every minute of reaching into the closet and pulling out soft cozy blankets, snuggling up on the couch with my blanket and laptop to check my e-mail this morning... Don't get me wrong, I'm not a fan of temps below 40 degrees, but a high of 65, I'll take it! Anyway.... on with the tutorial. Here is what we are making today! What you need- Thick hair tie Six 1" strips of fabric Bulldog clip or safety pin Sewing machine (or needle and thread) Fabric tac I ripped my fabric strips so they were a bit frayed on the edges, personal choice. Tack each end of the braid just enough that it doesn't come undone . Then tack both braids together on each end, be careful not to twist the braids. Cut your hair tie so it's one strip of elastic.
Sandwich your elastic ends between the ends of your braids on each end, again, careful not to twist the braids. Sew over the elastic so that it's secure. Cargo Scarf: Free your hands, and your mind will follow! Flat pattern hair band. This is probably one of the simplest sewing projects ever, but I made a few miserable prototypes before arriving at it.
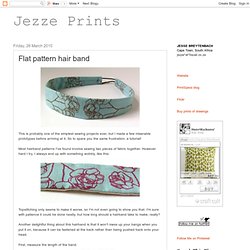
So to spare you the same frustration: a tutorial! Most hairband patterns I've found involve sewing two pieces of fabric together. However hard I try, I always end up with something wobbly, like this: Topstitching only seems to make it worse, so I'm not even going to show you that. I'm sure with patience it could be done neatly, but how long should a hairband take to make, really? Another delightful thing about this hairband is that it won't mess up your bangs when you put it on, because it can be fastened at the back rather than being pushed back onto your head. First, measure the length of the band. Draw a line for the length, and mark the middle. Cut this pattern out, then trace around it onto another piece of paper. Cut the pattern out of fabric. Press the seam open so that it lies along the middle of the band. Sew buttons on the ends (on the right side).
Zip-up Earbuds. I love to have my music with me everywhere I go, but I hate the tangled mess my wires become when I toss them in my bag or pocket.

Last night I whipped up a fun and functional solution by adding a zipper to my earbuds. This project took me around an hour to do (perfect for catching up on some t.v. from hulu.com). The supplies are few; basic sewing supplies, a pair of headphones, and a nice long zipper. I happened to have this crazy purple and gold nike zipper I found thrifting a while ago, it seemed perfect for this project. The first step is to pull the earbuds apart, to separate the wires all the way down to the plug. Next, take one side of your headphones and one side of the zipper tape and start stitching the wire into the tape. Survival Bracelet (Updated!) How to make Glittens (fingerless glove-mittens)