
Out of Order: DIY Tutorials. DIY Shift Dress - Martha Stewart Crafts - StumbleUpon. Sweater Tank Top and High Waisted Shorts. Recently, I turned an old sweater and thrifted pants into this tank top and high waisted shorts.
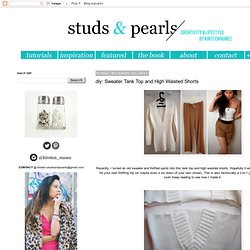
Hopefully it will give you a little inspiration for your next thrifting trip (or maybe even a run down of your own closet). This is also technically a 2-in-1 project, so you guys are in luck! Keep reading to see how I made it. The sweater I had was from Wet Seal - I bought it for a holiday party years ago, during my Sophomore year of college. I actually haven't worn it since, so I decided to give it a new life after all this time. I started off by cutting right across the sweater, above the chest area. I folded over the edge and pinned it down.
I sewed a straight stitch along the edge. I folded it over again - about an inch this time - and pinned it down. Taking the same thread I used earlier, I hand sewed small stitches in equal intervals along the edge of the fold. I also hand sewed the front of the sweater, right at the top. This was the last step to finish up the top. The finished outfit! Fur & Ribbon Scarf. Fact #1: I'm all about detail.
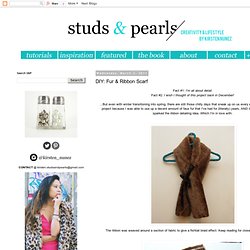
Fact #2: I wish I thought of this project back in December! ...But even with winter transitioning into spring, there are still those chilly days that sneak up on us every now and again. I love this project because I was able to use up a decent amount of faux fur that I've had for (literally) years, AND because my original idea sparked the ribbon detailing idea. Which I'm in love with. The ribbon was weaved around a section of fabric to give a fishtail braid effect. Supplies: - Faux fur (Mine was 50 inches long & 5.5 inches wide) - Ribbon, about 100 inches.
This scarf can certainly be made without a sewing machine, but if you have basic sewing skills and access to a sewing mahcine - I strongly suggest that you use it. 1) Fold your strip of fur lengthwise, so that the back side is facing out. 2) Sew along the edge - ONLY lengthwise. Side note: I adore my pincushion - it's about 12 inches high and is in the shape of a dress form. Keep sewing! Xo, kirsten. DIY Shibori.
Today marks HonestlyWTF’s four year anniversary.

Four years! To celebrate, we’re revisiting the very first tutorial we ever featured on the site: shibori tie dye. Lauren and I first discovered shibori after discovering an old photo on the web. The idea of recreating an ancient Japanese dyeing technique inspired us to spend an entire weekend experimenting with our favorite deep blue, indigo. After dyeing just about every white article of clothing in sight, our blue stained fingers excitedly uploaded the tutorial – we couldn’t wait to share it with our 30 readers. You’ll need:an indigo dye kitnatural fiber clothing or fabric2 5 gallon bucketsrubber glovessmall wood squaresrubber bandstwinea PVC pipea long wooden sticka drop clothrubber glovesscissors When choosing fabric or clothing, it’s important that made of natural fibers.
Itajime shibori is known as the shape-resist technique. Fold it again in the other direction – again, like an accordion. Wrap the twine around the fabric. DIY Ombré Denim. Dip dyed ombré denim has been popping up here and there and not only do we love the look, it’s super easy to do yourself! We’ve combined Tory Burch‘s dip dyed jeans and Miss Unkon‘s ombré 501s as inspiration for a pink infused DIY that could be done in a jiffy. Start by rinsing your shorts with water. A bottle of RIT liquid dye amounts to 1 cup; you’ll dye your shorts with the lightest shade first and darkest shade last.
Pour 1/3 of the cup of dye into 2 gallons of hot water and mix. When dyeing dark denim, you will want to use less water for a darker dye. Ring out the excess dye and add another 1/3 cup of dye to your bucket.
DIY Belts – 3 easy ways! Photos: kirsten for we heart this Belts: the part of an outfit that is not only an accessory, but can practically become essential to your favorite shirt, tunic or dress.
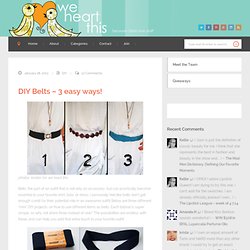
I personally feel like belts don’t get enough credit for their potential role in an awesome outfit! Below are three different “mini” DIY projects, on how to use different items as belts. Each tutorial is super simple, so why not share three instead of one? The possibilities are endless with these, and can help you add that extra touch to your favorite outfit.