
Easy Cat Halloween Makeup Tutorial. How to Apply Liquid Foundation. Written by Sam Sam is a 17-year-old, oddly tall guy whose love of all things skincare, makeup, and fashion started when he entered the modeling world at 14. Since then, he’s established himself as a freelance makeup artist in the theatre and fashion worlds, and started his own blog to preach the wonders of orange eyeshadow, Asian skincare, and designer fragrances to the masses. You can also follow Sam on Twitter. Liquid foundation is one of the ficklest products to apply. Ever. Not only is its basic application a chore, but even after you feel like you have a routine down, the smallest hiccup — anything from product buildup on your brush to a stray brush stroke — can throw off your entire look for the rest of the day.
Nasty Gal Blog. Inspired by all of the bold hues and crazy prints we can’t get enough of lately, we wanted to add a splash of color into our latest how-to.

This week, we’re going to show you three takes on the perfect post-make-out pout. You know the moment when your lipstick starts to fade from the outer edges of your lips, leaving a flush of color in the center? That’s what we’re going for. It looks fresh and effortless, and it’s a great way to give the Lolita red a night off and play around with bright and dark shades that we usually shy away from. So, without further ado… Nasty Gal Blog. We’re always secretly jealous of cute braiding styles we see on blogs and out in the street, but always end up opting for the five-second bun or ponytail instead.

That is, until our hairstylist showed us how easy it is to re-create this awesome braid that will crown you babe for the day. Here’s how to master your favorite new braid in five simple steps. 1. First things first, split your hair down the middle. Nasty Gal Blog. Let’s be real.
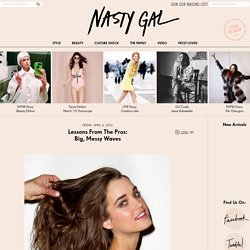
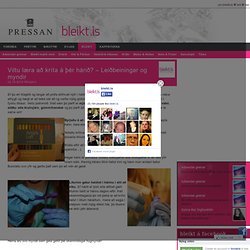
No one actually wakes up with the big, “morning after” waves everyone lusts for. That’s why we bribed our amazing hairstylist Johnny to share his (surprisingly easy) steps to get the ‘do of our dreams. The best part? No one has to know you didn’t just roll out of bed and go. 1. 2. 3. 4. 5. Viltu læra að kríta á þér hárið? – Leiðbeiningar og myndir. Ef þú ert litaglöð og langar að prófa eitthvað nýtt í hárið er þetta kannski eitthvað fyrir þig.
Sjóðheitt lúkk sem vekur athygli og hægt er að leika sér að og verða mjög góður í. Það tekur samt smá tíma og heppnast kannski ekki í fyrstu tilraun. Hey Sugar Lips. Winter have your lips crackin’ like the Sahara?
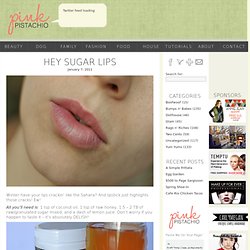
And lipstick just highlights those cracks! Ew! All you’ll need is: 1 tsp of coconut oil, 1 tsp of raw honey, 1.5 – 2 TB of raw/granulated sugar mixed, and a dash of lemon juice. Don’t worry if you happen to taste it – it’s absolutely DELISH! Mix these ingredients together to make a sugary paste. WHY THE CHOICE OF INGREDIENTS? Coconut Oil = vit E & K, polyphenols are anti aging, & fatty acids that moisturize w/o breakouts Raw Honey = natural antibacterial, amino acids that moisturize. Raw Sugar = produces glycolic acid/alpha hydroxy which exfoliates & stimulates collagen production – anti aging Lemon Juice = vit C & citric acid brighten skin, scars, and exfoliates. How to: Fix your broken powder makeup. I could not count the amount of money I have wasted by throwing away makeup that I thought was trash, when I could have fixed it.

There is no need to throw your money away on perfectly good makeup! If you happen to break you powder makeup, you can easily fix it with alcohol (rubbing alcohol) and patience! This works for any kind of powder based makeup, such as bronzers, blot powders, eyeshadows, whatever! As you can see I broke my favorite bronzer - MAC "Refined Golden", and instead of buying a new one, which is out in the "Style Warriors" collection, I decided to fix mine and save my money. Sunshine Sugar Scrub. This home-made scrub is the ideal solution for the woman that has everything.
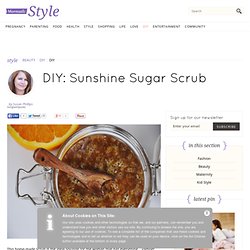
Pamper your favorite teacher with a jar for Teacher’s Appreciation Week (May 3), or indulge your Mom for Mother’s Day (May 8). (for a 12oz. jar) 2 cups brown sugar 1 cup sea salt ½ cup olive oil 1 T. honey 1 whole orange Splash vanilla In a large bowl, combine the brown sugar and salt Add the olive oil. A Pretty Life in the Suburbs: Coconut Sugar Scrub.
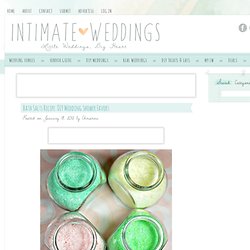
Bath Salts Recipe: DIY Wedding Shower Favors. Posted on January 18, 2012 by Christina DIY bath salts are probably the easiest and most economical DIY favors known to man, er woman – especially with this bath salts recipe.
Hugmyndir fyrir heimilið. Ten Ways to Dress Up a Ponytail. Sometimes I'm just not in the mood to spend a lot of time on my hair.

But at the same time, I don't want to look like a homeless hairdresser when I go to work, so I try to make my ponytails as fancy as possible. Here are ten easy ways I like to dress up my ponytail: 1. Tough As Nails. Having been a habitual nail-biter since kindergarten, Maggie has decided to finally break this bad habit and grow some "big girl nails".
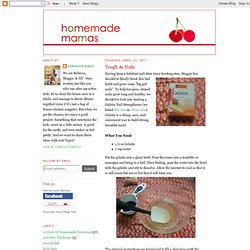
To help her poor, abused nails grow long and healthy, we decided to look into making a Gelatin Nail Strengthener (we found this one on eHow.com). Gelatin is a cheap, easy, and convenient way to build strong, beautiful nails! Makeup and Cosmetics. How To Create A Simple Brown Smoky Eye Makeup Tutorial. Since you guys wanted to see more step-by-step tutorials, I will be doing a series of makeup tutorials starting with one of my favorite looks, smoky eyes. One thing I LOVE about the smoky look is how versatile it is. You can use pretty much any color and you can go from a soft smoky to a really dramatic one.
My favorite colors to use on my brown eyes are purples, blues, greens, bronzes and charcoals. In my tutorial below, I used golds and browns but feel free to substitute them with other colors. Step 1. How-To: Instant Eye-Makeup - Do Yourself. How-To: Instant Eye-Makeup - Do Yourself. How-To: Instant Nail Arts - Do Yourself. How-To: Instant Hairstyles- Do Yourself.
SUGAR SMACK. Photo: w magazine post designed by kristin ess We’re finally coming out of a long, dry winter and the evidence is all over our dry chapped lips! This is not good for all the bright-colored lips that are so en vogue this Spring. But luckily, we can all head over to our kitchens or grocery stores and tackle it head on. Here are two solutions, depending on how bad the damage is.
If only there were chocolate in them… Pretty Sweet (Lightweight Formula) RED CARPET BREAKDOWN. Photo: wireimage.com post design: Kristin Ess photo + post design: Kristin Ess. HALLOWEEN HAIR TUTORIAL #1. Photos by kristin ess, post designed by kristin ess A couple weeks ago, I asked you guys which Halloween hair tutorials you wanted. Let’s just say it was an overwhelming victory for 1920′s and 1930′s hair.
Sephora: Beauty, Skin Care, Makeup, Hair, & Fragrance. 9 Charmingly Delightful Beauty Techniques from All Over the World … Beauty techniques are highly beneficial, but some of them are incredibly recycled. What I mean is, in my life, I always get the same pieces of advice. My friends and family members always share the same beauty techniques – and yes, they're extremely helpful, but sometimes I'd like to hear something new, wouldn't you?
Whats the best hot oil treatment. Breaking Down Beauty: Washing Your Brushes « Painted Ladies. By Sheila. 22 Beautiful Uses For Vaseline.