
http://www.shexists.com/2012/01/how-to-instant-nail-arts-do-yourself.html
Songwriting Exercises - Handout Songwriting Exercises by Joel Mabus Scaffolding SUGAR SMACK photo: w magazine post designed by kristin ess We’re finally coming out of a long, dry winter and the evidence is all over our dry chapped lips! This is not good for all the bright-colored lips that are so en vogue this Spring. But luckily, we can all head over to our kitchens or grocery stores and tackle it head on. Mermaid Nails Share this image Share It Pin It For our trip to Costa Rica, I wanted fun nails that had an almost tropical vibe. Weekly Mani: Splatter Nail-MotorCity Moxie This week’s no chip mani is a creation called splatter nail. I created this splatter nail design using five (5) Orly nail colors. I’ve been eyeing this splatter nail art for a few weeks, and I decided to give it a whirl.
Guide for Writers: Words to Avoid If you miss the humor of this introduction, you won’t after reading this document. The sentence contains a basic grammar error, a style slip, and several vague words.) When editing a manuscript, some words deserve to die — not always, but usually. In the works we edit, and in our own works, we encounter words and phrases that are overused, imprecise, and… boring. Writing needs to compel readers to continue from one sentence to the next.
RED CARPET BREAKDOWN photo: wireimage.com post design: Kristin Ess photo + post design: Kristin Ess Last night, our lovely Lady Conrad was out on the town sporting a faux-bob, double liner and a fuchsia lip! Follow these steps to get the look! Newsprint manicure I saw this newsprint manicure over on The Daily Nail and thought it was adorable (especially for bookworms and word lovers like myself). I did a little Google detective work to see how to recreate it, and was surprised at how easy it is! All of the tutorials I found called for vodka or other clear distilled spirits, but we were fresh out. I used isopropyl alcohol instead, and it seemed to get the job done. I tried a quick and dirty version this afternoon to share it with you: Like this:
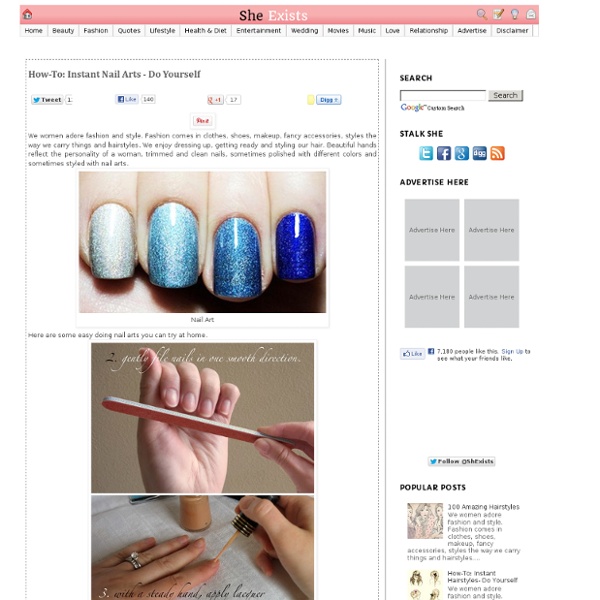
Nail Art: Most Original Designs Nail art has nowadays become among the hottest fashion trends. Clothes, shoes, hairstyles, makeup styles seem to be more stylish and fashionable than ever thanks to mixure with nail samples. A nice and original sample depends on lots of important factors including nail polish colors, experiences and imagination of nail artists. It's amazing that nature can harmonize with humans through the beauty of nails, from flowers, animals, fruits, to food, and famous symbols such as Internet Explorer, Mozilla Firefox, all are shown off on nails. Below are the most original nail designs for you to select and comment. Pac-man nails How to…Get Zebra Print Nails photo credit Here at Every College Girl, one of our most popular posts of all time is our tutorial on how to get cheetah print nails. I love the look; it’s so simple and fun, and animal prints are getting hot again. To follow along the same vein, I decided to do a similar animal print nail tutorial.
24 - THE DIRTY - Dirty Laundry - {the blog} Friendship Day is 8/7. So I'm going to try my hand at making some friendship bracelets for a few of my friends that have helped me SO much with Dirty Laundry over the past several weeks. I'm going to try to make some snazzy ones! HALLOWEEN HAIR TUTORIAL #1 photos by kristin ess, post designed by kristin ess A couple weeks ago, I asked you guys which Halloween hair tutorials you wanted. Let’s just say it was an overwhelming victory for 1920′s and 1930′s hair. There are 3 more coming up, but for now we bring you “Vintage Vixen” starring Lady Conrad! This hairstyle can be used with many different costumes– Gatsby girl, flapper, silent film star, old school gangster’s girl, showgirl (a la Water for Elephants), etc… Good luck and as always, tweet us a photo!! TOOLS: small barrel curling iron (we used 5/8″), sectioning clips, silver 2-prong setting clips, 2 clear elastics, large bobbypins, a large soft bristled flat brush, comb, hairspray, and a headband (optional).
Water Marble Tutorial. Supplies: orange stick or... Water Marble Tutorial. Supplies: orange stick or toothpick, shot glass or cup (the smaller the circumference, the less polish you end up wasting), room temp. water, nail polish, tape (optional, but it helps with the clean up) I like to begin by prepping my nails with base coat and one coat of polish.