
Less Framework 4. I called Less Framework "a CSS grid system for designing adaptive websites".
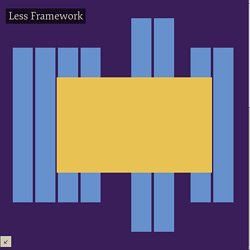
It was basically a fixed-width grid that adapted to a couple of then popular screen widths by shedding some of its columns. It also had matching typographic presets to go with it, built with a modular scale based on the golden ratio. The resources it was originally published with are still available on GitHub. Contrary to how most CSS frameworks work, Less Framework simply provided a set of code comments and visual templates, instead of having predefined classes to control the layout with.
This is how I still work today and definitely a method I advocate. /* Default Layout: 992px. Less Framework was popular in the early days of responsive design. Eventually, I moved on from fixed-width grid systems and worked on a fully fluid-width one, in the form of Golden Grid System. Less Framework's popularity was helped by the following contributions and the lovely people behind them (dead links crossed off): Because you make things with WordPress.
How to Create a Separate Page for Blog Posts in WordPress. Page Links To. This plugin allows you to make a WordPress page (or post or custom post type) link to a URL of your choosing, instead of its WordPress URL. It also will redirect people who go to the old (or “normal”) URL to the new one you’ve chosen. Common uses: Set up navigational links to non-WordPress sections of your site or to off-site resources.Publish content on other blogs (or other services, like Medium) but have them show up in your WordPress posts stream. All you have to supply is a title and a URL. The post title will link to the content on the other site.For store operators, you can link to products on other retailer’s sites (maybe with an affiliate code) but have them show up like they’re products in your store.Create a “pretty URL” for something complicated. Contribute You can contribute (or report bugs) on Github. Upload the page-links-to folder to your /wp-content/plugins/ directory.Activate the “Page Links To” plugin.
Existing Content Usage: Creating New Page Links: Installing Multiple Blogs. Languages: English • Português do Brasil • ไทย • 中文(繁體) • (Add your language) Multiple Blogs Through Multiple Installs If you want multiple blogs using WordPress, you must actually install each separately (that is, as a separate WordPress installation).

You can do this whether you have the ability to create multiple databases or are limited to a single database. Please note in WordPress 3.0 there is now a native ability to create multiple blogs, referred to as a network of sites. This is because the codebase for WordPressMU was merged into core. Multiple Databases You'll need a separate MySQL database for each blog you plan to install. The wp-config.php file will vary for each installation. Define('DB_NAME', 'wordpress'); // The name of the database define('DB_USER', 'username'); // Your MySQL username define('DB_PASSWORD', 'password'); // ...and password DB_NAME will be the name of the individual database created for that blog. Single Database Main blog: $table_prefix = 'main_'; Test blog:
Create A Network. Languages: বাংলা • English • Français • 日本語 • Português do Brasil • Português • Русский • ไทย • 中文(简体) • Español • (Add your language) As of WordPress 3.0, you have the ability to create a network of sites by using the multisite feature.
This article contains instructions for creating a multisite network. A multisite network can be very similar to your own personal version of WordPress.com. End users of your network can create their own sites on demand, just like end users of WordPress.com can create blogs on demand. If you do not have any need to allow end users to create their own sites on demand, you can create a multisite network in which only you, the administrator, can add new sites. A multisite network is a collection of sites that all share the same WordPress installation. NOTE: If you are currently running WordPress MU, you do not need to complete these steps. Step 0: Before You Begin.