background preloader

DIY

Facebook Twitter

How to Make Ice Lanterns. I made ice lanterns this past weekend with plans to light them on New Year's Eve. Unfortunately it wasn't cold enough, so I put them out this evening. They were simple to make and I love the beautiful swirls created by the addition of food coloring. Would you like to make your own? Clear some space in your freezer and gather your supplies....

Materials Large plastic containers of varying shapes (bowls, tupperware, buckets, etc.)Plastic cupsSomething to weigh the cups down so they don't float (I used silverware)WaterFood coloringDirections Fill each container with 1 - 2 inches of water. To unmold the lantern, pour hot water into the cup and twist to release it. Yarn Love | Family Chic. WEDNESDAY, JANUARY 25, 2012 | Comments: 98 Spell out your feelings with this easy-to-make sign of love. To make this you will need: wire reinforced clothesline (available at home improvement & hardware stores), yarn & wire clippers. Clip off a length of clothesline (it took about a yard to make this) and shape into the word, "LOVE". Tie or hot glue end of yarn onto beginning of wire and start wrapping the entire word with yarn. When you reach a point where two wires cross each other, wrap yarn around both wires to stabilize the design and hold the word in place.

Wrap yarn all the way to the end of the word and tie a knot or add a dab of hot glue to secure. Fresh DIY Christmas Decorations. Clever Corner DIY Solutions. Posted by ScrapHacker.com on tisdag, augusti 28, 2012 · Leave a Comment Let creativity sprawl into each and every corner of your home – literally! Narrow corners are surprisingly often overseen and deemed ”impossible” to make something out of…Challenged by this ‘fact’ (further enforced by the lack of pre-made corner solutions from furniture retailers) I thought I’d gather a bunch of corner D.I.Y ideas proving the ‘corners are impossible’ notion wrong… DIY from ‘Craftaholics Anonymous’ – TUTORIAL HERE D.I.Y from DesignSponge – TUTORIAL HERE Pics via here & here Pics via here & here Pics from StellaBleuDesigns Corner table/shelf DIY Ideas, clockwise from top left: Stacked table DIY idea spotted here, red table spotted here, green DIY corner table from Martha Stewart & lastly naturally clever design from PelleDesigns, spotted here With those ideas in mind, I hope you feel inspired to inject some love and functionality into a forgotten corner or nook around your house.

Goodbye, house. Hello, Home! Homemaking, Interior Design Blog, Staging, DIY: BATHROOMS. Today, I am teaming up with some of my best organizing blogging buddies to share with you all of our favorite household organizing helpers. We've all gathered quite a few simple and creative ideas for you! Let's get started with the items that I find most helpful in my own home. They come in all shapes, sizes, and colors and make the top of my list for their versatility and penchant for containing and hiding ANYTHING. We keep our reading material contained in the living room in large wire mesh baskets under our coffee table. This is in our All-in-One office/theater/library/guest room. Inside the baskets are all manner of electronics and their cords, extra CD cases, and DVDs. In my pantry, the large baskets up top hold extra Kleenex, to-go food storage containers, and paper towels. This is a medium magazine basket that I got from Thirty One HERE. It's handy most anywhere, it holds rolls of ribbon on its bar and gift wrapping supplies, or toilet paper on the bar and magazines below,

Little Lucy Lu: Ladder Laundry Rack. I am SO excited about my latest "project" ... it's kinda a long one. ....But it'll be worth it. :-) Are you ready??? 
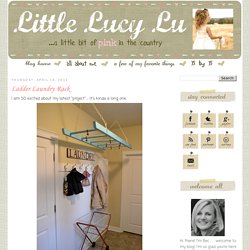
OK, so to preface this I need to remind you that I am a TALL gal. 5 feet 11 inces, to be exact. And my legs take up a great deal of those 71 inches.

A 35-inch inseam makes me ridiculously happy. But it is also relatively hard to find ... and more importantly - KEEP! I can't tell you how many times I have "ruined" my just-barely-long-enough jeans by putting them in the dryer And therein lies my problem. Let me put this in pictures ... This is what my laundry room looks like most days: Jeans, pants, and various other dryer unfriendly articles of clothing hung on the coat hooks and any other hooks I can find (like the one inside my ironing board cabinet door).

I NEED a drying rack. Enter: this old wooden ladder. Which I painted turquoise blue (the same turquoise blue I used on the trunk on the front porch!)... And then I sanded and scuffed and stained it up a little bit ... P.S. Water Balloon Luminaries. A fun and easy project with a beautiful payoff. 
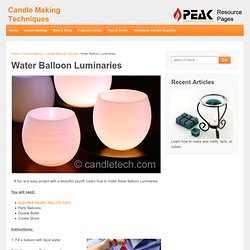
Learn how to make these Balloon Luminaries. You will need: High-Melt Paraffin Wax (IGI 1260)Party BalloonsDouble BoilerCookie Sheet Instructions: 1. Fill a balloon with tepid water. 2. 3. 4. 5. 6. 7. 8. 9. 10. Here is an example of these luminaries when using dye. Make a Pretty Pouf Ottoman. Top Bloggers Favorite DIY Projects. DIY Fire & Ice Lanterns.

The old becomes new: A new variation on the outdoor lantern. We have had an unusually warm winter in Michigan this year, and while the temps have been nice, I have had to hold off on this project idea until we got a cold snap. We finally got some snow and cold earlier this week, so I was able to try out this fun winter project. I had pinned a product called Globe Ice Lantern Kits a few months back recognizing that I could DIY them at home.

Originally priced at nearly $30 for a kit that makes 6 lanterns, I think they are very reasonable for a small batch. If you are making several (say, for a special event or to light a walkway), you can make 3 of these DIY versions for only $2 worth of supplies from the dollar store. To make DIY Fire & Ice Lanterns, you will need: a package of 3 punch balloons from the dollar store a package of 3 LED tea lights from the dollar store bowls small cylinder (shot glass, pop bottle, etc.) water freezer or below-freezing outdoor temps. Salvaged drawers = modular bookcase. I picked up these drawers on Freecycle. 
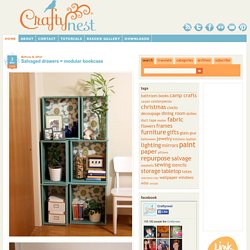
They were salvaged from the kitchen of a 1940s house that was demolished.

My original plan was to put the drawers on wheels and use them as under-bed storage. Turns out, no two drawers are the same height, which would look janky. So I tried stacking them vertically instead (anchoring them to the wall, of course). You could also hang these drawers as individual shadowboxes. How to make a modular bookcase out of salvaged drawers Supplies primer2 coordinating paint colorsdecorative or wrapping paper.

Tools paintbrushdrop clothscissors or craft knife, straight edge, and cutting mattape measure or yardsticksoft rubber brayerdrillsand papervacuum or tack cloth 1. 2. 3. 4. 5. 6. 7. 8. Putting the lights on. Hanging String Balls. Whattya need? 
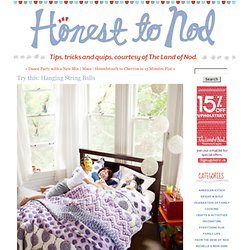
BalloonStringScissorsGlueJar How do I make glue string balls? Step 1: Hang inflated balloon from ceiling. Step 2: Put string and glue in the jar with a hole in the lid. Next, pull string from hole while wrapping around the balloon. Step 3: Wait until dry (try to contain yourself). Created by Dane Holweger. Put your stuff up in the air! Hanging DIY ideas & tutorials.

Posted by ScrapHacker.com on onsdag, juni 27, 2012 · 9 Comments To heck with both feet on the ground! Now’s the time to put your ideas up in the air! I’ve gathered a bunch of supafly D.I.Y to give wings to anything you’ve got around the house (well, almost!). By showing you a bunch of different applications (from chunky sofas to delicate D.I.Y hanging planters) I hope you’ll all find a little something to get your DIY juices flowin’ in the mix – Enjoy! Pics via here The hanging desk is not only cool looking but an awesome space saver! Pics via GreenWeddingShoes, CapitolRomance & Etsy Gotta love the swinging chair! Eleanor from team behind awesome venture SCRAP (a.k.a the School & Community Reuse Action Project), has made a great ”Hanging notepad” tutorial for Etsy – DIY TUTORIAL HERE Hanging Notepad #2! Pics via here Check out the awesome tutorial on how to make a hanging ”Kokedama string garden”, by talented Aura Scaringi of Mimimou for DesignSponge – DIY TUTORIAL HERE Pics via here.

PHOTOS: Stunning Mason Jar Crafts. DIY Picture Tiles - You Will Never Buy a Photo Frame Again. Lately I’ve been having this huge urge to decorate the house. This is big news. I do not decorate. Arguably, one of the reasons why is because I. absolutely. hate. to. buy. mass. produced. decor.

(Also, I can’t ever remember if pink and purple go together or not.) Anyway, this extends to photo frames. You might think, with my trigger finger on the camera all the time, my house would be littered with photos. Nope. Long story short, I discovered this method of transferring my photos cheaply, quickly, and beautifully to something uncommon and unique. Tiles. The only thing that’s not particularly crunchy about this is that it uses Modge Podge or similar (and I’m not sure what’s in Modge Podge).

It’s just grainy and doesn’t dry clearly. Boo. BUT, if you can overlook that one minor issue, I think you’ll love this. And it will be glorious. Here’s how you do it. First, you need to go to Home Depot, Lowes, or something like it. (FYI, I found that Lowes prices on tiles were cheaper than Home Depot. DIY Home Decorating - How to Make a Beanbag Chair at WomansDay. Whether it’s extra seating you need or a plush spot to put your feet up, this cozy circular beanbag pouf fits the bill. The playful dot pattern adds retro-inspired whimsy and visual interest.

Skill Level: Intermediate Materials: 3 yd fabric; tape measure; water-soluble marker; string and tape (optional); scissors; pins; iron; thread; sewing machine with zipper foot; 20" zipper; 6 yd 3/8" cording; polyester bean filler (we used Poly-fil Beanbag Filler from Fairfield Processing). Directions: 1. 2. 3. 4. 5. 6. 7. 9. 10. 11. 12.