
Shelves made of books. Hanging coat rack. Add charm and storage with a painted branch.

If you have a narrow entryway or a shortage of closet space in your home, try this easy DIY as an alternative to traditional, free-standing coat racks. Fallen branch2 equal lengths of chain link (measure from ceiling to approximate hanging height and multiply by two to get the length of each chain)2 eye hooks2 screw anchorsDrillHammerLow- or no-VOC paint Step 1: Paint the branch Choose a sturdy, fairly straight branch with a few knots that give it an interesting shape, and make sure the hook of a hanger can fit around the diameter. Let the branch dry out completely, then, using a small brush, paint it with eco-friendly white paint for a fresh look. Step 2: Secure eye hooks in ceiling Anchor two ceiling hooks 1' from the wall, to ensure enough space for coats to hang. Step 3: Hang the finished branch Slip both ends of one length of chain link onto an eye hook to create a loop. Wall Art installation - flowers. When I first spotted this image on Flickr, I fell in love with the idea immediately.

What a beautiful installation this would make in a guest room, living room, or even the master bedroom! It's soft and whimsical, crafty and nostalgic all at the same time. Can you guess what it's made of? Christine of CityPix snapped this image in a local cafe, inspired by the simplicity and beauty of the wall installation. Adapting this concept into your own home decor would be a piece of cake! So, what do you guys think of this idea? Tagged : thrift, Craft, art, Inspiration, doilies, wall art, decor, decorating, paper, Reuse, repurpose, upcycling, DIY.
Bird Nest Necklace. I have been seeing a lot of bird nest jewelry around lately.
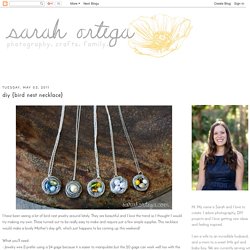
They are beautiful and I love the trend so I thought I would try making my own. These turned out to be really easy to make and require just a few simple supplies. This necklace would make a lovely Mother's day gift, which just happens to be coming up this weekend! What you'll need: - Jewelry wire (I prefer using a 24 gage because it is easier to manipulate but the 20 gage can work well too with the help of some round nose pliers) - pearls or glass beads - necklace chain - jump ring and a clasp Select the beads you want, string them onto your wire and arrange them as you'd like. then simply wrap the wire around the beads wrap some wire in the space between each bead (I like the look of three loops but you could just do one or two if you prefer) this is what the back looked like.
Garden therapy » A Green Guide to Natural Beauty + Mango Citrus Body Butter Recipe. It’s time to review our very first Garden Therapy Book Club book, A Green Guide to Natural Beauty: 35 step-by-step projects for homemade beauty by Karen Gilbert. There are many different types of books we will be looking at in Book Club, but when the book is DIY or project-based, then the best way to test it out is to give the projects a try. As the title suggests, A Green Guide to Natural Beauty boasts 35 different natural beauty projects, which made it very appealing given that I’ve been aiming to make as many of my bath and body products as I can. As part of the Natural Skincare Series I’ve shared recipes and tutorials for soap, scrubs, and bath products all made with natural ingredients, and where possible ingredients from my garden.
First and foremost this book is beautiful. The photography is stunning and while those who love lots of bright colour may find the pages a tad on the beige side. Apricot Face Scrub Recipe p. 60 Review 2/5 Mango Citrus Body Butter p. 78 Ingredients: Equipment. Paper Tree. Hi there!
I'm Sharon from Two Girls Being Crafty, and I am so delighted to be today's guest blogger on Everyday Mom Ideas! Thank you so much, Julia, for having us. My co-blogger, Tristin, and I create fun and inexpensive crafts that anyone could do. Our goal is to inspire. So come check us out! Today I would like to share with you all our newest craft. This simple project uses scrapbook paper leaves to create a bright and cheery Spring ambiance for your home. First, drag out your unseemly healthy assortment of scrapbook paper scraps. Cut out a template of your leaf from the cardboard (you can also use chipboard or card-stock). Take your floral wire and cut strips anywhere from 5"-8" long.
Lay down some newspaper next to your workspace. Now for the fun part! ...or make them funky. And you're done! Glowing Jar.