
Paper Plate Easter Basket. Easter craft : chick and bunny Easter basket. Easter. Cement Easter Eggs. How’s everyone’s Easter prep coming along?

If you haven’t had the chance to get your egg-making on, but are still hoping to squeeze in a crafting session, I’ve got just the project for you. Marbleized Easter Eggs. Ever since coming across this DIY on Design Mom, I’ve been waiting for just the right opportunity to do some major marbling.
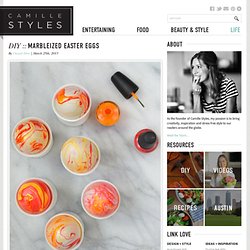
When I sat down to brainstorm projects for the upcoming Easter holiday, I thought about how the vivid shades of nail polish would be perfect for marbling Easter eggs… and didn’t they turn out pretty? Making these is rather addictive: I couldn’t stop playing around with different color combinations and dipping just about everything in sight into the swirly waters. But the most fun part was seeing how each egg turned out completely different. Keep reading to see how it’s done! Pour a few drops of each nail polish color onto the water surface. Easter Egg Garland. Today is all about Easter.
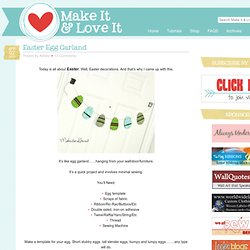
Well, Easter decorations. Papier-mache easter eggs. For Easter I made papier-mache polka dotted eggs.
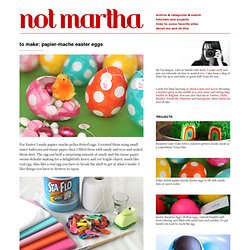
I created them using small water balloons and tissue paper then I filled them with candy and toys and sealed them shut. The egg can hold a surprising amount of candy and the tissue paper seems delicate making for a delightfully heavy and yet fragile object, much like real egg. Also like a real egg you have to break the shell to get at what’s inside. I like things you have to destroy to open. You’ll need: water balloons (they make the egg-iest shape)white tissue paper (one sheet will make about three eggs)colorful tissue paper (one sheet will make many eggs, so you don’t need much)a 3/4 inch hole puncha paint brush you don’t care much aboutliquid laundry starcha sturdy shot glass to hold your egg while you’re working with ita way to hang the balloons to dryenough time to let these dry overnight, and a few hours to let them dry after filling and sealing them (you’ve been warned) Note: I tried a few variations on the starch.
Why the loop? Cp.c-ij.com/en/contents/3157/rabbit_saito/downloads/rabbit_saito_e_a4.pdf. Capture the Details: Easter egg craft - suncatchers! The kids and I made some pretty Easter egg decorations for our sliding glass door.
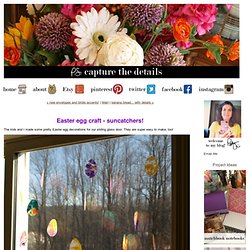
They are super easy to make, too! You will need: crayons in pretty colors, a crayon sharpener (usually built in to the larger crayon boxes), wax paper, invisible thread, a small hole punch, an iron and old towels. I chose bright 'girly' colors for my eggs and so did Sarah. Ben chose darker 'boy' colors. Start by peeling the back end of a crayon and sharpening it onto a piece of wax paper that is on top of old towels (the crayon wax can seep through the wax paper). Let the shavings fall evenly. When you are happy with your shavings piles place a second sheet of wax paper over the top and another old towel over that.
Let the paper cool - it won't take long - and then hold it up to the light to inspect your work! Create an egg template from heavy cardstock and trace the shape onto the wax paper. Here is my pile - Benny and I held them up to the light... Some close-ups..... Happy Spring!!!!!!!!!!!!! Butterflies. I saw this craft after the years of different butterfly punch art and i was finally ready. i had pictures of annie painting the paper but they have disappeared. the first step is to watercolor paint on paper.paint all over with pattern or with out....less water makes for brighter colored paint.and let it dry. then punch out as many butterflies as you can. i bought this martha stewart butterfly punch at joann's.they are not cheap but it was on sale and they do have 40% off coupons quite often.and THAT punch is really cool.VERY easy to use!
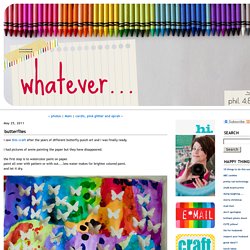
It's in two pieces so you can punch out from any part of the paper not just on the edge.VERY COOL.i get why it costs more than the other brands....quality.it's martha! Little Door On The Sound. Easter. Just before Easter the lovely peeps at Lékué sent me the 3D easter egg and bunny mould and a decopen.
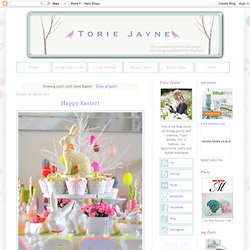
I filled my bunny and egg mould with white chocolate and then, using the decopen filled with white chocolate coloured blue, I drew a graffiti squiggle over the top; a great gift for my cute nephew Samuel who loves bunnies and puzzles! 3D easter egg and bunnyWhat you will need: Instructions Temper (melt) white chocolateSpoon chocolate into icing bottle or bag fitted with a small nozzleSqueeze chocolate into mouldsLightly tap moulds so chocolate lays flat and air bubbles are removedStir blue chocolate food colouring a little at a time into the remaining white chocolate until you have desired colour. Stir well so colour is evenFill decopen with blue melted chocolate and carefully draw design onto filled mouldsLightly tap moulds so chocolate lays flat and air bubbles are removedLeave to set.
Bunny jars for Easter. Painting easter eggs. Sleepy bunny goody bags. I saw this pin pop up all over the place yesterday, which led me to Mer Mag’s “Easy Bunny Candy Pouch” – and before I knew it I had some felt bunny pouches of my own.
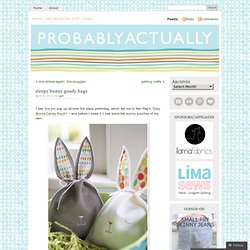
It was exactly the kind of project I was in the mood for – there’s a printable template, I had all the supplies on hand, and each little pouch took about 10 minutes from start to finish. Embroidering the bunny faces was fun, and you can customize them any way you like – I used the sleepy eyes from the template and added a little mouth, then cut some fabric scraps for inside the ears. These were so simple to make – cut out a back and front, stitch the little face, and sew the two pieces together, leaving a gap between the ears so you can fill it with treats.
Then tie the ears together, and your bunny pouch is complete!