
Sketchbookideas - StumbleUpon. Build/Make/Craft/Bake: How-to: Hammered flower and leaf prints - StumbleUpon. Get out the hammer, it's how-to Tuesday and we have some botanical prints to make!
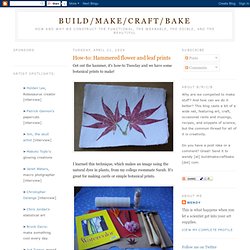
I learned this technique, which makes an image using the natural dyes in plants, from my college roommate Sarah. It's great for making cards or simple botanical prints. Actually, you'll need a little more than just a hammer. Here's a supply list: flowers or leaves to printwatercolor or other rough, acid-free paperselection of hammers (including ball-peen or cross-peen, if possible)hard work surface (cutting board, slab of wood, etc.)paper towelsscissorspentweezers or toothpicksacrylic finishing spray (optional) Start by going on a walk or visiting your garden to find leaves and flowers to work with.
Then set up your work surface. Next, trim any chunky or squishy bits off of the plants and arrange them on your watercolor paper. Cover the plant with 2-3 layers of paper towels. On the paper towels, sketch the borders of the area you'll need to hammer. Peel back the paper towel to check your progress. Nothing found for 2010 01 27 Grocery-bag-yarn. When people see the handbags some of us carry around they never believe that we’ve made them from regular grocery bags.
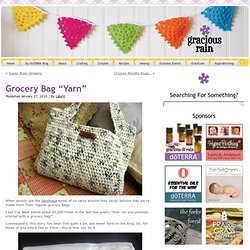
I bet I’ve been asked about 65,000 times in the last few years–”How can you possibly crochet with a grocery bag?” Consequently, this story has been told quite a bit, but never here on the blog. So, for those of you who’d like to know—this is how you do it. Take one innocent looking grocery–the thin, noisy kind–and smooth it out flat.
Fold it in half lengthwise and smooth out again. Fold in half again, and smooth out. Cut off the bottom seam, and the handles at the top. Fold in half again. Cut the strip into 1 inch pieces… until you’ve cut the whole strip. Open up the loops… Remember making rubberband chains when you were a kid? Well, it’s like that. Pull one loop through the other until… they knot together. -pretty much like yarn. Homemade Stick Deodorant Recipe - StumbleUpon. Thank you for visiting Little House in the Suburbs.
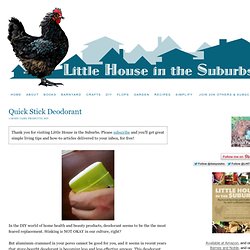
Please subscribe and you'll get great simple living tips and how-to articles delivered to your inbox, for free! In the DIY world of home health and beauty products, deodorant seems to be the the most feared replacement. Stinking is NOT OKAY in our culture, right? But aluminum crammed in your pores cannot be good for you, and it seems in recent years that store-bought deodorant is becoming less and less effective anyway. This deodorant uses a natural moisture absorber (cornstarch), a natural deodorizer (baking soda), and a natural anti-bacteria/fungal oil (tea tree oil) to keep any stink from developing in the first place. So, here’s what I suggest….make this stuff ahead and use it on SATURDAY, or a sick day, or any day you aren’t going to see anyone special, so you’ll feel secure and not look like a nut obsessively sniffing your underarms all day. Homemade Stick Deodorant 1. 2. 3.
Clothing. Home.