
Make Key to My Heart Perler Beads. Not long ago, I made a vintage style key out of fused beads for a milestone occasion.
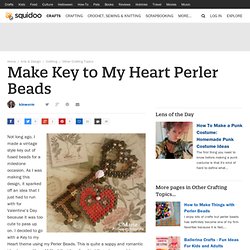
As I was making this design, it sparked off an idea that I just had to run with for Valentine’s Day because it was too cute to pass up on. Taokaka. Beading Design Software Made Easy. Voxel Builder. MeshLab. Shape Carving Editor. Grenade Process . Firstly I opened the tool palette, clicked on sphere, and dragged it onto the canvas and clicked edit making sure that 'Make Polymesh 3D' was turned on.
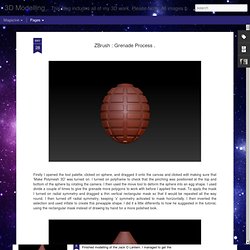
I turned on polyframe to check that the pinching was positioned at the top and bottom of the sphere by rotating the camera. I then used the move tool to deform the sphere into an egg shape. I used divide a couple of times to give the grenade more polygons to work with before I applied the mask. To apply the mask I turned on radial symmetry and dragged a thin vertical rectangular mask so that it would be repeated all the way round. I then turned off radial symmetry, keeping 'x' symmetry activated to mask horizontally. Fast low-res mesh retopology with ZBrush 4 voxels - Polygons, Pixels & Paint. Fumotrim Free:3D Block Modeler (Android) - Screenshot #1. 3Defy - Transform Photos into 3D Models! A sandstone block built from lego, blending real objects with 3d prints. 3D scanning is traditionally achieved with prohibitively expensive laser scanner hardware. However, recent software developments have opened up the possibility of acquiring a similar quality of 3d scan using just a stills camera.
I used the program Agisoft Photoscan, which I highly recommend, and a cheep point-and-shoot canon camera. Agisoft Photoscan is easy to use, and not terribly expensive. There are also some free alternatives, ScannerKiller, and 123d Catch. I took around 29 photos from different angles, and the software automatically derived a 3d mesh from those photos.
I generated the mesh with Target quality set to Medium, and Geometry type set to Smooth. These programs tend to work best with very textured objects. In many cases it is possible to approximate tiny micro details from the scanned object. Precision Texturing - Part 2. Many people have asked how to get really clean texture transfers when working with Projection Master.
By this I mean crisp, sharp edges that remain once the model has been picked up again from the canvas. The truth is that getting great results like this is a simple matter of understanding what is really happening at the fundamental level when you work with Projection Master.This mini-tutorial will take the mystery out of the process, while also providing an easy way to deal with those situations when you find yourself guessing. No more trial and error! These steps will give you great results every time.This tutorial also supplements my Precision Texturing Tutorial which I wrote last year. That tutorial explained ways to paint crisp edges on the canvas. Happy ZBrushing! Zbrush advanced masking. If it's precision you want, you might need to take a different approach to the make of the model.
For instance, the dragon decor I'm guessing is a separate subtool from the blade? If it isn't, splitting up pieces into more subtools would help increase the poly limits per piece. If they are separate, you may benefit from using the extract function ( Tools > Subtool > Extract ). on the parts you have masked. This would create a new subtool of those parts and from there you could split them up further by polygroups ( if so desired ). Just be careful as the more subtools you have will make a tedious cycle of exporting them for baking in xNormals ( I'm assuming you're doing the zBrush to xNormal workflow ). This way, you can then sculpt the fine detail on the handle and take advantage of dynamesh to re-allot your poly density to where needed ( either that or.... retopo :o ) Auto Masking » ZBrush Docs. The Brush > Auto Masking sub-palette controls the auto-masking features.
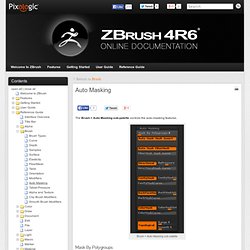
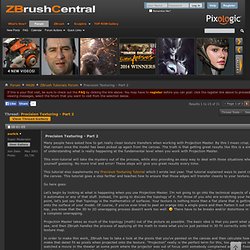
Brush > Auto Masking sub-palette Mask By Polygroups The Mask By Polygroups will apply a virtual masking based upon the polygroups of the tool. SUPER TUTORIAL ZBRUSH. Zbrush4-QRemesher-guides plugin. Topology Brush » ZBrush Docs. The Topology brush offers your two major possibilities: Creating accessories with a surface thickness.Creating new topology to replace a patch of existing topology.Creating a surface for retopologizing your models.
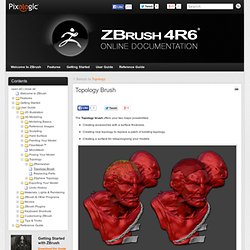
On the left, the drawn curves with the polygons in preview mode. On the right, the new polygons with a predefined thickness, ready to be sculpted. Model courtesy of Mariano Steiner. Security Alert: 3D model: Mica. $19.95 [buy, download] This Mica cap mushroom 3D model is a part of Mushrooms collection.
![3D model: Mica. $19.95 [buy, download]](http://cdn.pearltrees.com/s/pic/th/3d-model-mica-19-buy-download-61747228)
These Mica mushrooms, 3D or not, look rather suspicious. So, the rule of a mushroom hunter number one: do not eat the mushrooms that you do not know or that look like something inedible – is to be observed! Well, in fact the 3D Mica mushrooms are non-poisonous, but a 3D mica cap is much too small and watery to be worth eating. Therefore, Mica cap mushroom 3D nearly vanishes to nothing when you cook it, and has almost no flavor and it is not just because of 3D. Product Specifications Media Type: 3D Model Published: Geometry: polygonal. Gallery.