
Make your own Zafu. Fabric: A sturdy material such as a cotton/polyester blend.

Try 100% cotton duck fabric. It is important to find a fabric that you will not slip off of when you are meditating. See coment below under 'pieces'. Stuffing: Kapok is the more traditional fill. Buckwheat hulls are a common alternative and work great. BASIC PIECES: a) Length of cloth 59 inches x 6 to 9 inches wide. STEP 1: Pleat the length of cloth (piece a). Three inches after the first set of pleat markings, make the second set, as indicated above. B) Next, iron the pleats and pin them. STEP 2: Now, having completed the first step, take the right edge of the pleated strip cloth and pin it to the left end of the strip, 3-1/4 inches from the left edge. STEP 3: Mark each circle of cloth at four equidistant points.
STEP 4: Next, ease (pin) all the pleats in to the circles, top and bottom. STEP 5: Turn inside out and stuff with kapok or buckwheat hulls (through opening in the side that the zafu will have). Bow Belt. We're always looking for fun ways to add embellishments and touches of color to our outfits especially in the winter when we tend to get bored with everything and anything.
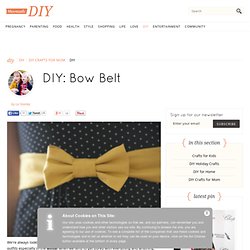
With bows being fiercely back in style, what better way than with a bright bow belt! You can pick any color for this but we'd recommend something solid and cotton. You'll need a simple snap as well to hand stitch on. The measurements for the three pieces you'll need to make are in the directions below. Measure your waist (over a thin shirt) and add 2 inches to that length. Making the belt: Fold in half the long way and sew along the long side. Fold over one open end and hand stitch one side of the snap into the inside. Flip right side out now. Once it's right side out, measure it around your waist. Now sew the second snap on through both pieces. Making the bow: For the bow cut a piece of fabric 6'' x 10''. Turn it inside out and move the seam to the middle. Sew the ends together as shown. Free Sewing Patterns & Projects. Placemat Hack: Flaptop Laptop Cover. Finally a use for colorful, rectangular placements available at World Market!
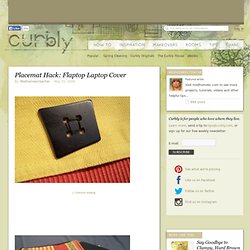
Here's a tutorial you can follow to make some jazzy padded laptop covers for yourself or for gifts. You'll need a little more than basic sewing skills to do this, but it's worth the time and it's very customize-able. With some patience and desire, you'll be the envy of all your Black-Nylon-Canvas-Cased Friends. what you need: sewing machine thread, scissors, seam ripper three placemats, padding for interior or quilted lining fabric lining fabric.
How to sew a yoga mat bag. I have been wanting to make this for over a month.
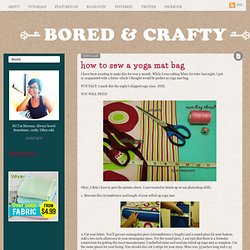
While I was cutting fabric for totes last night, I got re-acquainted with a fabric which I thought would be perfect as yoga mat bag. FUN FACT: I made this the night I skipped yoga class. HEE. Okay, I didn’t have to post the picture above. I just wanted to brush up on my photoshop skills. Laptop Sleeve made out of some used military fabrics. Inspiration Anthro : Catch and Release Scarf. So here is my tutorial for the Catch and Release Scarf from Anthro.
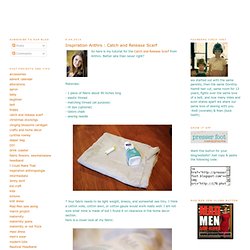
Better late than never right? Materials: - 1 piece of fabric about 90 inches long- elastic thread- matching thread (all purpose)- rit dye (optional)- tailors chalk- sewing needle * Your fabric needs to be light weight, breezy, and somewhat see thru. I think a cotton voile, cotton lawn, or cotton gauze would work really well. 1 - Cut your fabric so that you have one long piece that is about 90" x 17" 2 - To finish the two long edges fold in 1/4", press, fold another 1/4", and press again. 3 - Leave the top thread of your machine with your normal all purpose thread. iPod case tutorial. I’ve been meaning to do a repeat of the mobile phone holder tutorial I did way back, as I used bias binding which was a bit of a disaster.

So I’ve finally gotten another one together. Plus, this is one of the prizes you can win if you post a ‘made from Stashtacular tutorial’ picture in the Flickr group. So get busy! The $25 gift certificate giveaway from 1Choice4Quilting is here, so go enter now! To make this mobile phone/iPod case, you’ll need: sewing kit (machine, thread, scissors, etc.) a bit of fabric – you’ll need 4 pieces for the holder and 1 small piece about 3” x 4.5” for the strap a bit of velcro (I used iron on) a bit of wadding I wrapped a scrap of wadding around my phone and cut that width, and cut the height about ½” taller than my phone actually is. Then take that piece and cut it in half to get your 2 sides of wadding.
Make your quilt sandwich: Interior piece WSU, wadding, then exterior piece RSU (right side up). Quilt the two pieces as desired: Sew Crafty - Bags. iPod or iPhone Case Stand. [ Close Privacy Policy ] Privacy Policy / Your California Privacy Rights Revised and posted as of March 4, 2013 Prime Publishing, LLC ("Company," "we" or "us") reserves the right to revise this Privacy Policy at any time simply by posting such revision, so we encourage you to review it periodically.

In order to track any changes to this Privacy Policy, we will include a historical reference at the top of this document. Pick-A-Pocket Purse. Fabric Scrap Basket. Poochie Bags - Fat quarter friendly freebie. Poochie Bags - Fat quarter friendly bag Wow, that’s a lot of f-words in my title.

I’ve always gotten a kick out of “fat quarter friendly”… very District 9-ish. Like the fat quarter is either allowed or not allowed to mingle with the other fabrics. Three fat quarters. Three different versions for three different “pooches”. I call the bottom corners “milk carton corners” to make the bag “pooch” out. Milk carton boxed corners not only alter the pooch of the pouch - but the height as well. I like a chubby pooch. “Baby Happy” is the quilt under the poochie bags and my PDF pattern is available here. You can get my PDF pattern here.
PLEASE NOTE: This pattern that is for someone who knows how to sew. BOOKS: – The Practical Guide to Patchwork by Elizabeth Hartman – Complete Guide to Quilting by Better Homes & Gardens – Quilts! Sports Bags ePatterns and Sewing Tutorials.